Create Report Of Assigned Licenses To Users From Microsoft 365
Introduction
Power Automate is a tool that enables you to implement queries without knowing hardcore coding patterns. Microsoft Graph API is the universal endpoint for Microsoft 365 which give you the flexibility to access azure active directory resource through single endpoint using power automate.
I am writing this article to share how we can implement Graph API with Power automate to generate reports and this implementation would be useful to IT Admin who is responsible for AD resources and related reports.
Today, I am going to write steps to generate reports for users along with the list of licenses are assigned. Definition Generate an excel report on 1st day of each month for users, a list of assigned licenses to each user along with the metadata of users, and store excel report in the SharePoint document library.
Learning Objectives
- Register Application and Grant Permission in Azure Active Directory
- Create Scheduler in Power Automate
- Access SharePoint list in Power Automate
- Array Filter in Power Automate
- Connect to Graph API
- Excel Online Connectors in Power Automate
- Add row to Excel Worksheet.
Prerequisites
- Microsoft 365 Account
- License to access Power Automate
- SharePoint Site with Site Collection Administrator
- Create Excel Template including worksheets and tables and upload it to the SharePoint document library. The sample Template file is added to the attachment. Let’s get started !!
Step 1 - Create a new SharePoint List to stores licenses Product Name
and SKU IDs** When we get the user’s assigned licenses from Graph API then it returns SKU ID only. So, we can use this list to filter Product Names from SKU ID. Select here to get a list of licenses product names and SKU IDs.
Create a new list called “licenses” in SharePoint Site and add a column called GUID. Add Product Name and GUID from above Microsoft Documents. 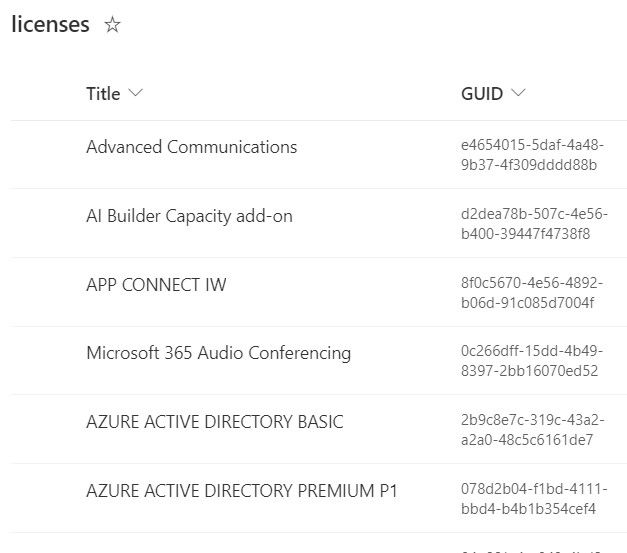
Step 2 - Register Application and Azure Active Directory
Application Creation
- Open Azure portal
- Select azure active directory
- Select App registration
- Select New Registration
- Enter the Name of the application
- Select ‘Accounts in this organizational directory only '
- Select register
- Copy Application ID and Tenant ID and put it aside, we will use it in power automate.
Generate Secret Key
- Select ‘Certificates & secrets’ in the newly created application.
- Select New client secret
- Add description
- Select Expires to 24 months.
- Select Add
- Copy the value of the Secret key and put it aside, we will use it in power automate.
Grant API Permission
- Select API Permission
- Select ‘Add a permission’
- Select Microsoft Graph
- Select Application Permission
- Find and Select ‘User.Read.All’
- Select Add Permission
- Select Grant Admin consent for
<Tenant Name>
Step 3 - Create Power Automate from Recurrence trigger
Open power automates from App list in Microsoft 365. Create new flow -> Select Recurrence -> Select month -> Create. 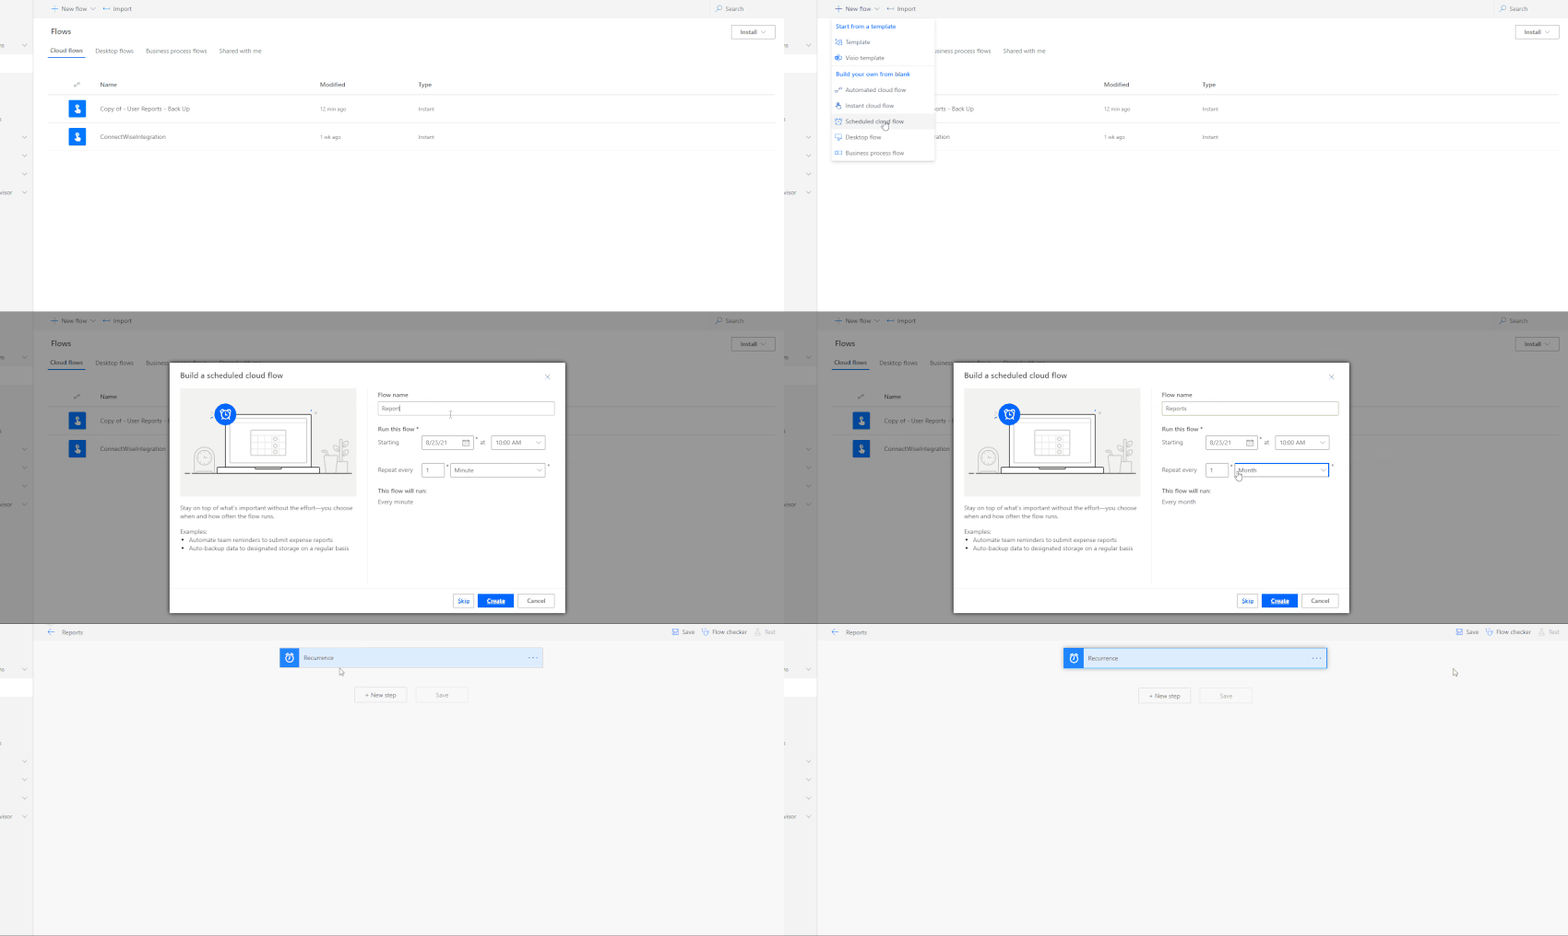
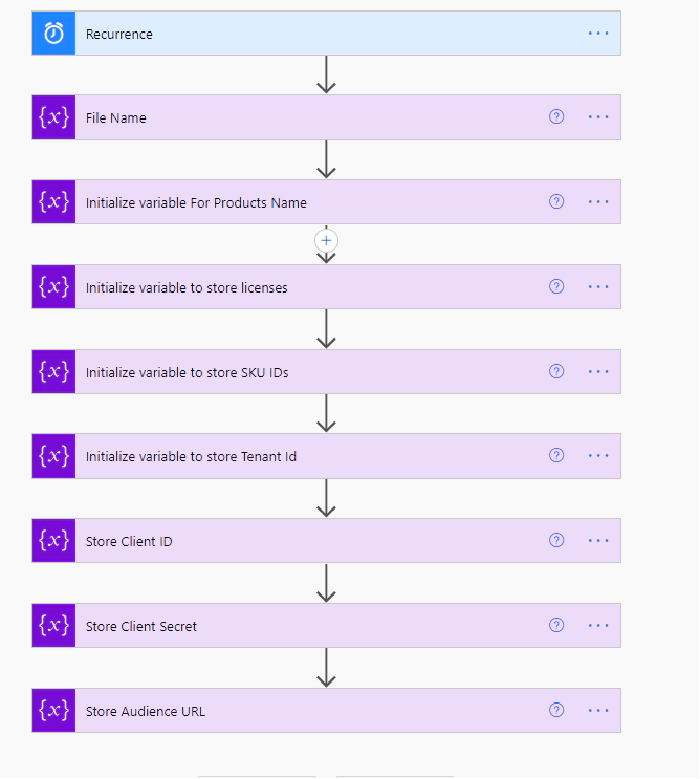
Step 4 - Initialize variables in Power Automate
We need 7 variables that will store multiple values and use them to
generate reports.
Step 5 - Get Licenses from SharePoint list in Power Automate
We will use ‘Get Items’ and ‘Append to array object’ connectors in power to automate. 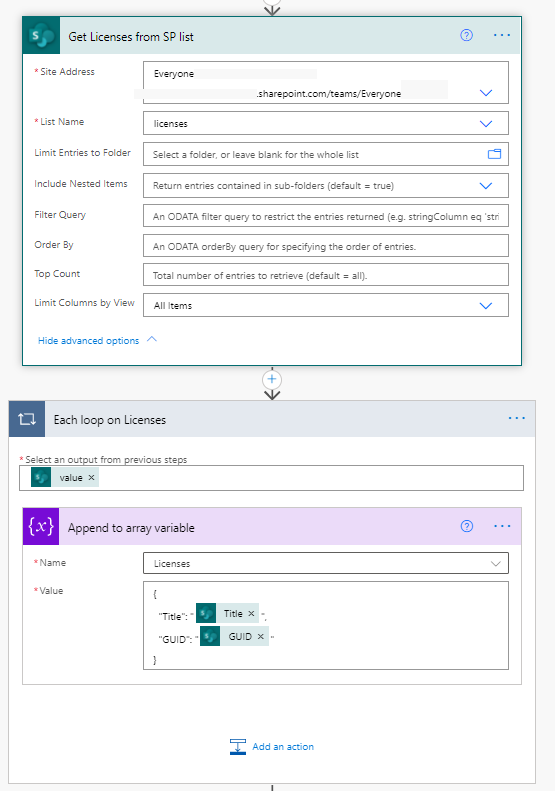
Step 6 - Create report file from excel template
We will get file content from a template file that is store in the
SharePoint document library and create a new file that will be used to
store users’ details in it.
We will use “Get File Content” to get content from the existing excel
file template and “Create File” to create a new file in the desire
location in SharePoint.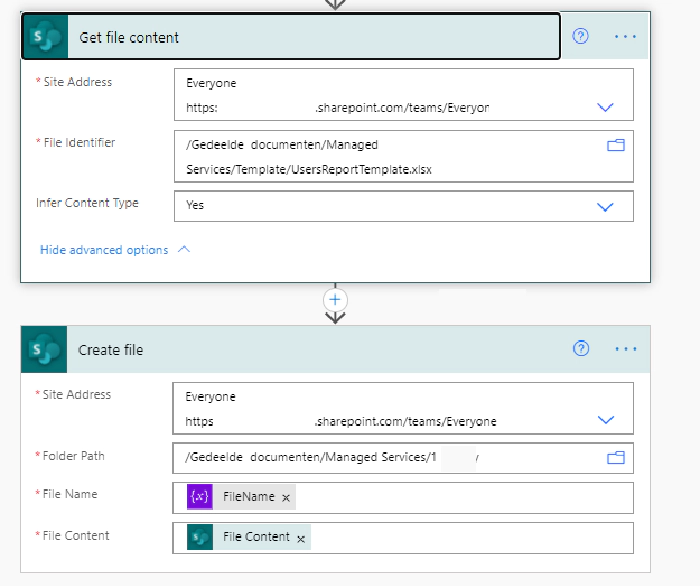
Step 7 - Access Excel worksheet in Power Automate
We will get worksheets from excel sheet using Excel Online connector in
Power automate.
Get all sheets from excel file using “get Worksheet: connector.
“Parse JSON” connector is used to access response from getting Worksheet
connector.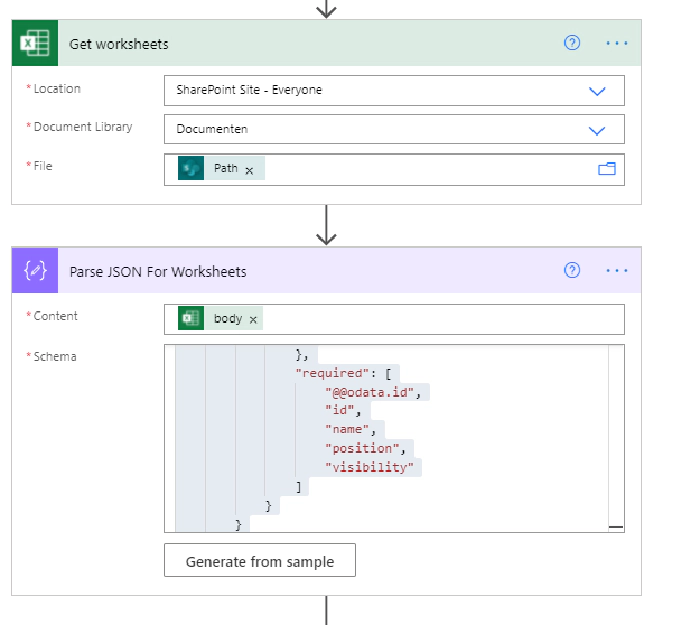
{
    "type": "object",
    "properties": {
        "@@odata.context": {
            "type": "string"
        },
        "value": {
            "type": "array",
            "items": {
                "type": "object",
                "properties": {
                    "@@odata.id": {
                        "type": "string"
                    },
                    "id": {
                        "type": "string"
                    },
                    "name": {
                        "type": "string"
                    },
                    "position": {
                        "type": "integer"
                    },
                    "visibility": {
                        "type": "string"
                    }
                },
                "required": [
                    "@@odata.id",
                    "id",
                    "name",
                    "position",
                    "visibility"
                ]
            }
        }
    }
}
Step 8 - Get Users using Graph API
“Http” Connector will be used to execute rest API in power automate.
End Point URL
: https://graph.microsoft.com/beta/users?$filter=userType%20eq%20%27Member%27&$select=displayName,createdDateTime,accountEnabled,userPrincipalName,givenName,surname,externalUserState,assignedLicenses
Method: get
Authentication: Azure Active Directory
Tenant: Add Reference of TenantId variable
Client Id: Add Reference of Client ID Variable
Secret: Add Reference of Client Secret Variable
Audience: Add Reference of AudienceURL variable
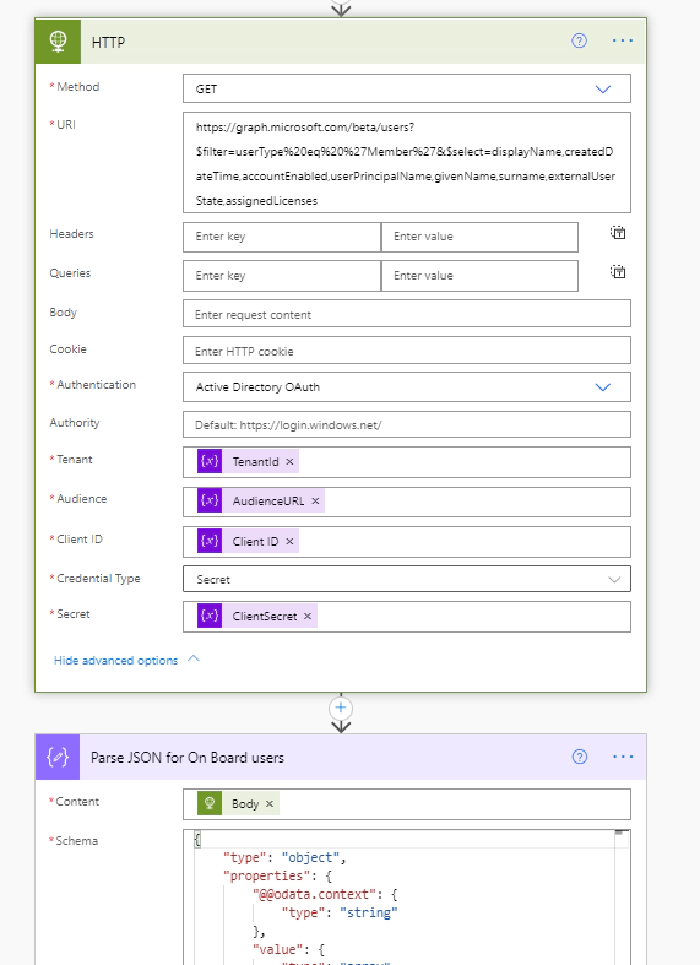
Pass JSON schema in Parse JSON Connector.
{
    "type": "object",
    "properties": {
        "@@odata.context": {
            "type": "string"
        },
        "value": {
            "type": "array",
            "items": {
                "type": "object",
                "properties": {
                    "@@odata.id": {
                        "type": "string"
                    },
                    "displayName": {
                        "type": "string"
                    },
                    "createdDateTime": {
                        "type": "string"
                    },
                    "accountEnabled": {
                        "type": [
                            "boolean",
                            "null"
                        ]
                    },
                    "userPrincipalName": {
                        "type": [
                            "string",
                            "null"
                        ]
                    },
                    "givenName": {
                        "type": [
                            "string",
                            "null"
                        ]
                    },
                    "surname": {
                        "type": [
                            "string",
                            "null"
                        ]
                    },
                    "externalUserState": {
                        "type": [
                            "string",
                            "null"
                        ]
                    }
                },
                "required": [
                    "@@odata.id",
                    "displayName",
                    "createdDateTime",
                    "accountEnabled",
                    "userPrincipalName",
                    "givenName",
                    "surname",
                    "externalUserState"
                ]
            }
        }
    }
}
Step 9 - Get Assigned Licenses Product Name
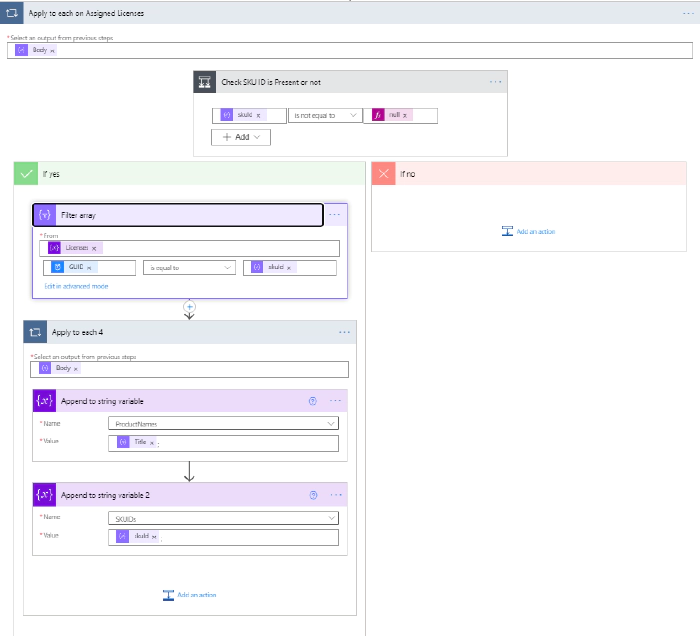
We have an array of Product name list which we had created on starting of the automation. Let’s Access the assigned Licenses object from the user’s object which is getting on the response of HTTP request.
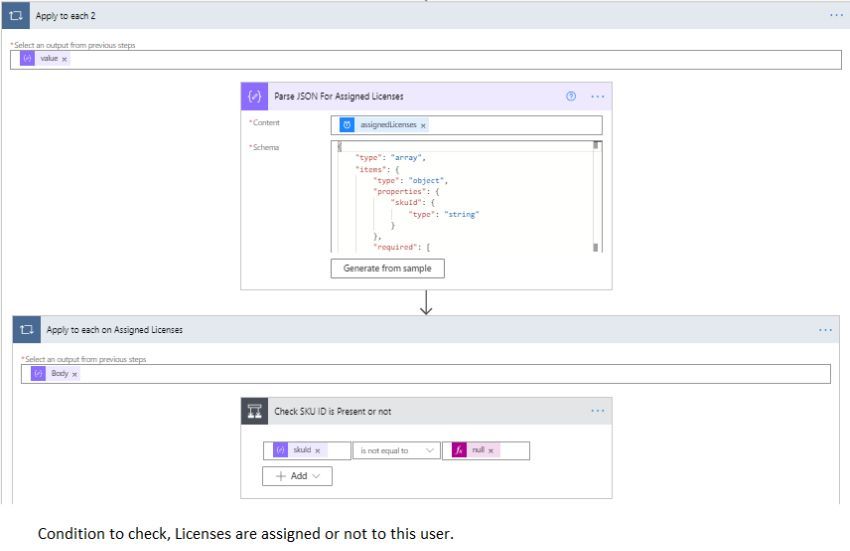
Let’s filter the array if we found licenses are assigned to the user. We can get SKU ID from the response and we do filter from licenses array based on SKU IDs. “Filter Array” action is used to filter items from an existing array in power automate.
Step 10
Add a new row in the table is created excel file.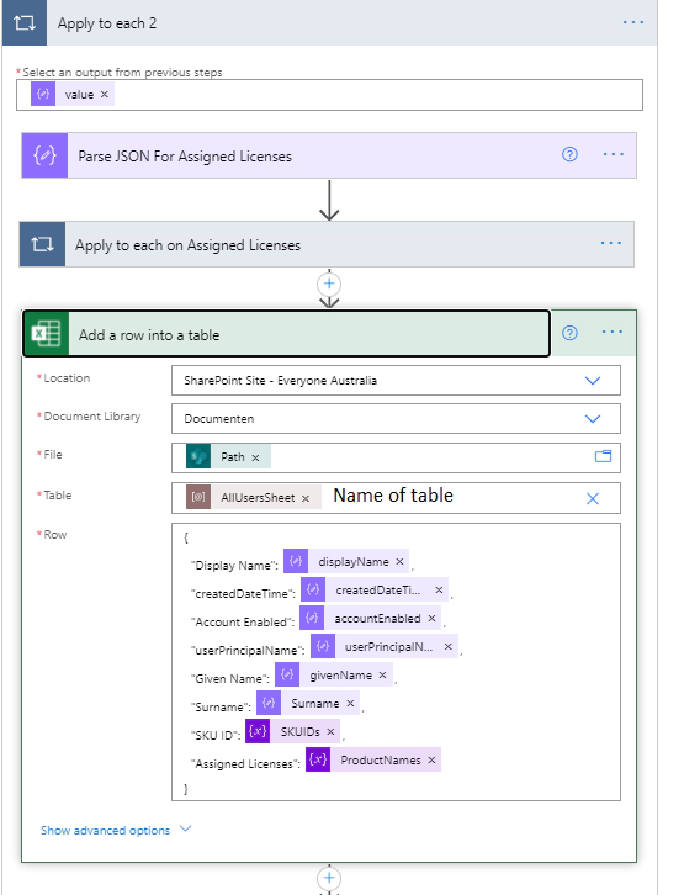
Conclusion
We learned how to connect the SharePoint site and list to Power automate, Create and append array, Call graph End point, Register application and Access and Add new Records in Excel worksheet.
Happy Learning!