Do you need ngrok to develop Microsoft Teams apps?
If you’ve started down the path of developing applications for Microsoft Teams, you may have seen a tool called ngrok as a prerequisite in various tutorials and lab exercises. It’s also integrated with a number of tools such as the Microsoft Teams Toolkit and the yo teams generator; even the Bot Framework Emulator has an ngrok option. This article will explain what ngrok is, why it’s useful, and what to do instead if you or your company are uncomfortable using it. Also, please check out the companion video for this article, which includes live demos of Teams development with and without ngrok.
First the shocking truth: Microsoft Teams applications don’t run in Teams. OK maybe it’s not shocking, but it’s true. Teams applications are made up of regular web pages and web services that you can host anywhere on the Internet. Teams tabs and task modules (dialog boxes) are just embedded web pages; bots and messaging extensions are web services. This allows developers to use their choice of web development stack, and to reuse code and skills. Web developers typically host a small web server on the same computer where they edit their code to run and debug their applications. For Microsoft Teams developers in particular, ngrok is very handy in this situation. Here’s why:
- ngrok provides the encryption needed for https, which is required for Teams applications. It’s set up using a trusted TLS certificate so it just works immediately in any web browser.
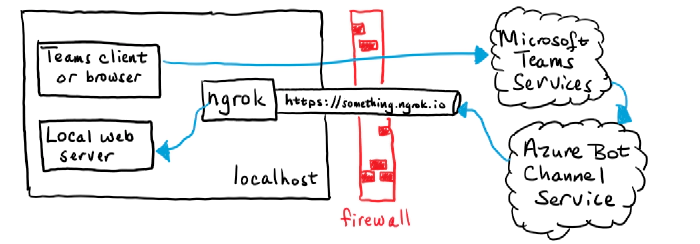
- ngrok provides a tunnel from the Internet to your local computer which can accept incoming requests that are normally blocked by an Internet firewall. The requests in this case are HTTP POSTs that come from the Azure Bot Service. Though tunneling is not required per se, there has to be some way for the Azure Bot Service to send requests to the application.
- ngrok provides name resolution with a DNS names ending
in
ngrok.io, so it’s easy to find the public side of the Internet tunnel. - ngrok makes mobile device testing easier since any Internet-connected phone or tablet can reach your app via the tunnel. There’s no need to mess with the the phone’s network connections; it just works. These conveniences have made ngrok the darling of many Microsoft Teams developers. It lets them compile, run, and debug software locally without worrying about any of these details. The tunneling part, however, lacks the guard rails expected by many IT professionals, especially if they’re managing a traditional corporate network that relies on a shared firewall or proxy server for security. While ngrok only provides access to the local computer where it’s run, an insider "bad actor" could launch attacks from such a machine. For that reason, some IT departments block all access to ngrok.
Many colleagues have suggested other tunneling applications such as Azure Relay or localtunnel. While they may do the job, they still open a tunnel from the public Internet to your development computer, and thus the same security concerns usually arise. This article will only consider approaches that don’t involve tunneling from the Internet.
Tunneling explained
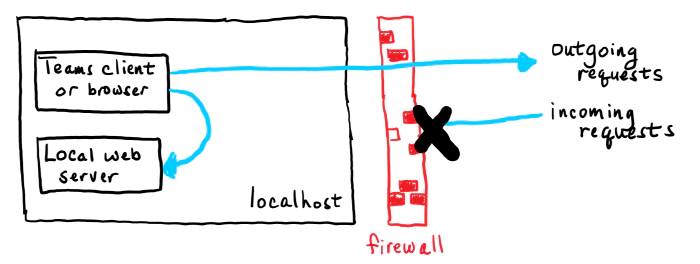
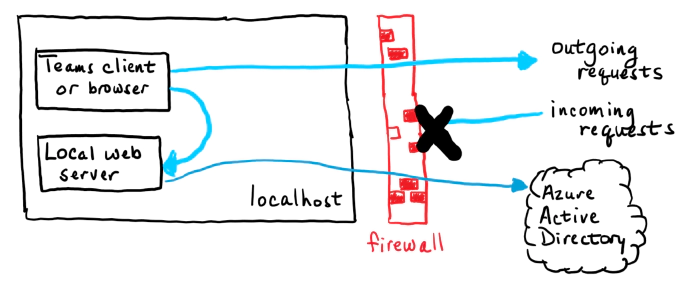
Most computers that are connected to the Internet aren’t connected directly. Network traffic passes through some kind of firewall or NAT router to reach the actual Internet. The firewall allows outgoing requests to servers on the Internet but blocks all incoming requests. This is largely a security measure, but it has other advantages as well.

A typical web developer runs some kind of web server on their local
computer. They can access that web server using the
hostname localhost, which routes messages through a “loopback”
service instead of sending them out on the network. As you can see in
the picture, these messages don’t go through the Internet at all.
But what if, in order to test the application, it needs to get requests
from the Internet? Bots are an example of this; the requests come from
the Azure Bot service in the cloud, not from a local web browser or
other client program. Another place this comes up is when implementing
webhooks such as Microsoft Graph change
notifications;
the notifications are HTTP(s) requests that come from the Internet.
The problem is these incoming requests are normally blocked by the
firewall. If you’ve ever opened a port on your home router to allow a
gadget to receive incoming connections, this is the same situation.
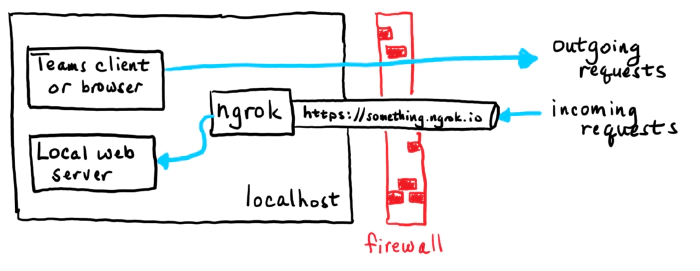
With ngrok running, the incoming requests go through the ngrok service
and into your locally running copy of the ngrok application. The ngrok
application calls the local server, allowing the developer to run and
debug the web server locally.
Using ngrok
ngrok is a command line program that works on Windows, Mac OS, Linux
and FreeBSD.
Suppose your local web server is
at http://localhost:3978 (the default for
bots). Then run this ngrok command line:
ngrok http 3978
You will then see a screen like this:
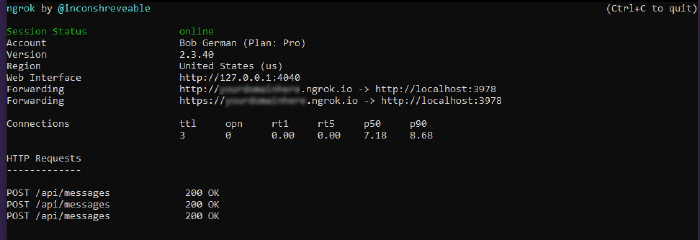
http://(something).ngrok.io or https://(something).ngrok.io will be
forwarded to http://localhost:3978 where your
bot code is running. At this point you would put the
“something.ngrok.io” address into your Azure bot configuration, Teams
app manifest etc. as the location, and leave the command running while
you debug your application.
ngrok url
The external ngrok url will always look like this:
With the free ngrok service, the value of (something) is different every time you run ngrok, and you’re limited to an 8-hour session. Every time you get a new hostname you need to update your configuration; depending on what you’re doing and how many places you had to enter the hostname, this can be a chore. The paid plans allow you to reserve names that will persist, so you can just start ngrok and and you’re ready to go.
Hint: If you’re doing a tutorial using the free version of ngrok, make a note of every place you use the ngrok URL. That way you can easily remember where to update it when it changes.
The example above assumes that your local server is running http on the specified port. If your local server is running https you need a different command or it won’t connect:
ngrok http https://localhost:3978
Host header rewriting
The HTTP(s) protocol includes a header called Host, which should
contain the host (domain) name and port of the web server. This is used
for routing requests to the right server, and for allowing a single web
server to serve multiple web sites and services.
If your debug server ignores the host header, you can ignore this
section. But some servers will require the header to match the host
name, such as localhost:3978. The challenge is that if the request was
sent to 12345.ngrok.io, the originator will probably put that in the
host header when the server is expecting localhost:3978. To handle
this, ngrok provides a command line argument that replaces the host
headers with the local host name. Simply add the -host-header command
switch to enable this.
For example,
ngrok http -host-header=localhost:3978 3978
If you see the messages go through to your local web server but it doesn’t respond, it may be expecting a specific host header. All the command options are detailed in the ngrok documentation.
Network tracing
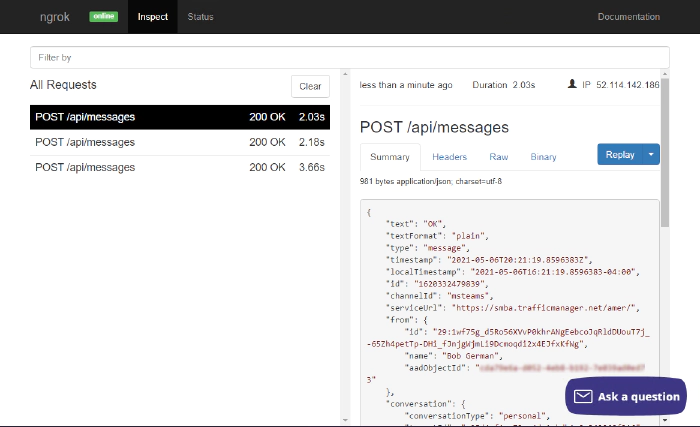
You might notice that the ngrok screen shows a trace of requests that went through the tunnel; in this case they’re HTTP POST requests from the Azure Bot Service, and the local server returned a 200 (OK) response. This is handy because you can see a 500 error from your server code by just glancing at the ngrok screen. You might also notice the “Web interface” url on the ngrok screen. It provides a full network trace of what went through the tunnel, which can be very helpful in debugging.
Developing Tabs and Web-Page based Teams features
Some Teams application features are based on web pages provided by your application:
- Tabs and Tab Configuration Pages
- Task Modules (dialog boxes)
- Connector Configuration Pages
These features are backed by ordinary web pages that are displayed in an
IFrame within the Microsoft Teams user interface. Tabs using the Azure
Active Directory Single Sign-On (SSO) option also need to implement a
web service to do a token exchange. Accessing these via localhost is
no problem; no tunnel is required.
[However Teams does require the web server to use a trusted https connection or it won’t display. ngrok translates trusted https requests into local http requests, so it just works. But if you’d rather not have a tunnel to the Internet as part of your setup, you can do this all locally. It’s just more work.
Setting up a trusted https server
On a NodeJS server, you can usually enable https by editing
the .env file and setting the HTTPS property to true. For .NET
projects in Visual Studio, under project properties on the “Debug”
tab, check the “Enable SSL” box to enable https.
But alas, just turning on the https protocol is generally not enough to
satisfy this requirement; the connection must be trusted. Trust is
established by a digital certificate; if the certificate comes from a
trusted authority, is up-to-date, and matches the hostname in the URL,
the little padlock in your web browser lights up and all is well. If
not, you get errors that you can bypass in most web browsers, but not in
Microsoft Teams.
The people over at ngrok acquired their certificate from a trusted
authority, and it’s set to match hostnames ending in ngrok.io, so it
just works without any fuss. The local web server, on the other hand,
will most likely have a self-signed, untrusted certificate. So the trick
is to get your browser and/or Microsoft Teams to trust it.
An option that often works is to browse to the local server from a
regular web browser, select the security error, and tell the browser to
trust the certificate. You can then run Teams in the same browser and
bypass the issue. If the Teams client shares the same certificate store
as your browser, it will also work. However these default certificates
generally expire after a month or so, and the process will need to be
repeated.
A better option is to generate your own certificate and tell your computer to trust it. That way you can control the expiration date and reuse the certificate on multiple projects, so you only need to do the setup once. This is explained in the article, Setting up SSL for tabs in the Teams Toolkit for Visual Studio Code. The instructions are for a Create React App application using the Teams Toolkit but they shouldn’t be too difficult to adapt to other tool chains since the certificate creation and trust parts are the same regardless.
Mobile device testing
It’s prudent to test Teams applications using the mobile versions of Teams (iOS and Android) to make sure everything looks good and works properly. ngrok makes this a breeze; since your local service is exposed on the public Internet, you can test using any device with an Internet connection, no special setup required. If you’d prefer not to expose your local server to the Internet, you can always connect your phone locally using wifi and leave the Internet out of it. This picture shows two phones; phone 1 is connected via ngrok and phone 2 is connected locally.
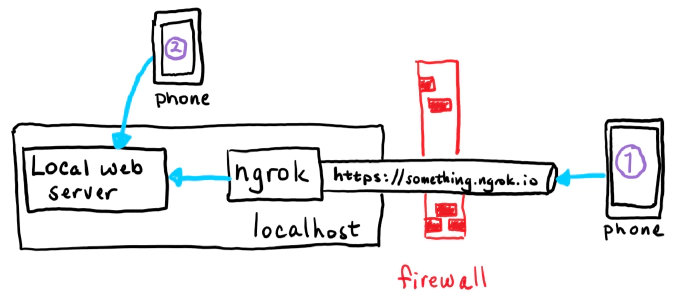
localhost[,
and you’ll need to open a path on the local network from your phone to
your local web server. Here are the high-level steps; the details vary
depending on your phone OS, development computer OS, and network
configuration.
- Connect your mobile device via wifi to the same network as your development computer.
- Open an incoming port on your development computer’s built-in firewall (port 3000, 3978, 8080, or whatever your local web server is using).
- Determine the local IP address of your development computer; ideally reserve it so it doesn’t change. This can be accomplished in the DHCP section of most home routers or by using a fixed IP address.
- Set up a
hostsentry (phones have them too!) or local DNS name to point to your development computer. Again, many home routers have the ability to register a local DNS name so you don’t have to configure it in each device. - Make sure the https certificate is for this same hostname and not
just
localhost, and install it as a trusted certificate on your phone. While this might not seem easy, it is possible! And it’s a one-time setup that you can use over and over. But you can see that ngrok makes it a whole lot easier.
Developing Bots and Messaging Extensions with and without ngrok
Several features of Teams applications are based on a web service within your application that is called from the cloud. These are:
- Bots (called by Azure Bot Service)
- Messaging Extensions (called by Azure Bot Service)
- Microsoft Graph change notifications
- Outgoing webhooks All of these are implemented as REST services and could be built with any tool chain, but the requests will come from the cloud, so you need to have a port listening on the Internet to receive those requests.
Option 1. Use the Bot Framework Emulator
If you’re building a bot, consider using the Bot Framework Emulator, which allows you to run bots locally without using the Azure Bot Service. Instead of running your bot in Teams, you run it in the emulator. The drawback is that the emulator doesn’t currently understand some Teams-specific features such as messaging extensions or other Invoke activities. However it does a great job running conversational bots! Adaptive cards work as well, though Invoke card actions do not. If your bot isn’t too Teams-specific, consider using the Bot Framework Emulator for most debugging and just do final integration testing in Teams, perhaps when the bot deployed in a staging environment which is set up for handling incoming requests.
Option 2. Don’t debug locally
Another approach is to move away from the strategy of local debugging entirely. For example, you could publish your app to Microsoft Azure app service and use the remote debugger. Here are the instructions for Visual Studio Code (NodeJS) and Visual Studio 2019 (.NET). You could even set up a development virtual machine (VM) in Azure or your cloud service of choice and open an incoming port for the Azure Bot Service. Or just run ngrok in the VM, away from the concerns of a corporate network.
How many services do you have?
Teams applications generated by the yo teams generator have a single web server, so if your app has a combination of features - say, tabs and a bot - you can use one ngrok tunnel or one for all your application features. Teams applications generated by the Microsoft Teams Toolkit generate multiple web servers (one for tabs, another for bots, and a third for the SSO web service if you use it). If you want to use ngrok, you’ll need a tunnel for each one. This requires the paid service and you’ll have to start up multiple copies each time you begin debugging. Another option is to use a single ngrok tunnel for your bot, potentially with the free service, and then use local connections for the tab and SSO web service. Of course you don’t have to use either of these tools; they’re really just a convenience! You can use any tools you wish and create the Teams application package in App Studio or by editing your own manifest.json file and zipping it up with a couple icons.
Summary
While ngrok isn’t a requirement for Teams development, it does make it a lot easier. However if you can’t or don’t want to open up a tunnel from the Internet, there are other strategies. Many of these, such as local https servers with self-signed certificates, have been around for a long time and may already be familiar. There is nothing magic about Teams development! It was designed to use standard web tooling, and you can use the same tools that you’d use for any web development project. Trust your knowledge of web development to come up with a configuration that works for you. Just be aware of which services will be called from the Internet and plan accordingly.