Excel File Tricks with PowerAutomate
A little secret
First of all, if you don’t know already and you want to quickly create an excel or word file on your OneDrive, try http://excel.new or http://word.new. In the following post I will cover three ideas:
- Splitting a workbook with many worksheets into unique workbooks containing one sheet
- Creating a new excel file and populating it with data
- Converting a CSV into an Excel File
Splitting a Workbook
This solution requires a bit of Office Script typescript in order to identify the number of worksheets in a workbook and delete the sheets that are no longer required. I’ve written two basic scripts to do the following:
- “GetSheetNames”: retrieve a list of sheets and returns an array to PowerAutomate and;
function main(workbook: ExcelScript.Workbook) {
    // Get all the worksheets in the workbook.
    let sheets = workbook.getWorksheets();
    // Get a list of all the worksheet names.
    let names = sheets.map((sheet) => sheet.getName());
    return (names)
}
2. “DeleteSheets”: delete the sheets from a workbook based on an array input, returning the number of sheets in the workbook (hopefully 1!)
function main(workbook: ExcelScript.Workbook,
  SheetsToDelete: Array<string> = [],
)
{
//for each of the worksheets in the array
  for (let worksheet of SheetsToDelete) {
    //delete the worksheet
    workbook.getWorksheet(worksheet).delete();
  }
//get current worksheets in workbook
  let sheets = workbook.getWorksheets();
  let names = sheets.map((sheet) => sheet.getName());

  //return the number of sheets left
  return(names.length)
}
This allows us to create a flow that will:
- return an array of sheet names in our first office script action
- create a copy of the original excel file with the sheet name prefixed to the file name
- delete all but the unique sheet for each copy
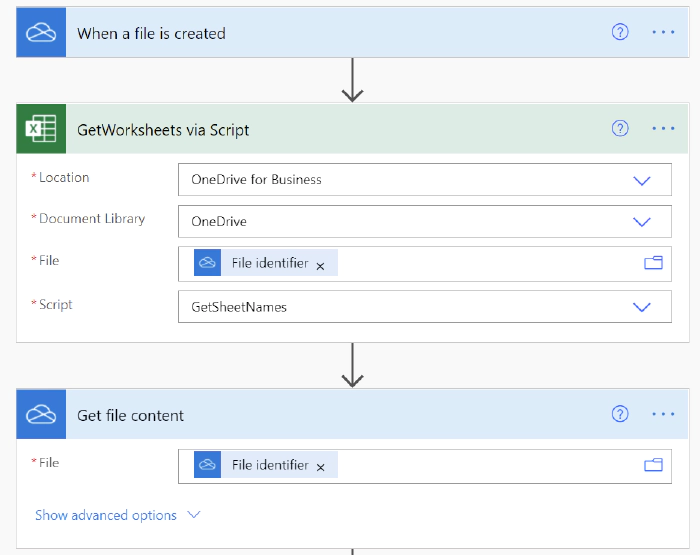
This is what the flow looks like:
When a file is created in our folder location (in this case OneDrive but
equally it would work on SharePoint), we get the worksheet names and
then get the file content of the original file.

Then in an apply to each, we use the results array from the
“GetSheetNames” office script, and iterate through each item using a
filter array to return an array of all but the current sheet name (i.e.
where item() is not equal to items(‘Apply_to_each’) or “Current
Item”). If we have an array of five sheets, the filter will return
four sheets. Then we can create a copy of the original file using the
file content and a prefix of “Current Item”. Finally calling the
“Delete Sheets” Office Script using the dynamic Id of the Create File
Action, based on the result of the filter array.
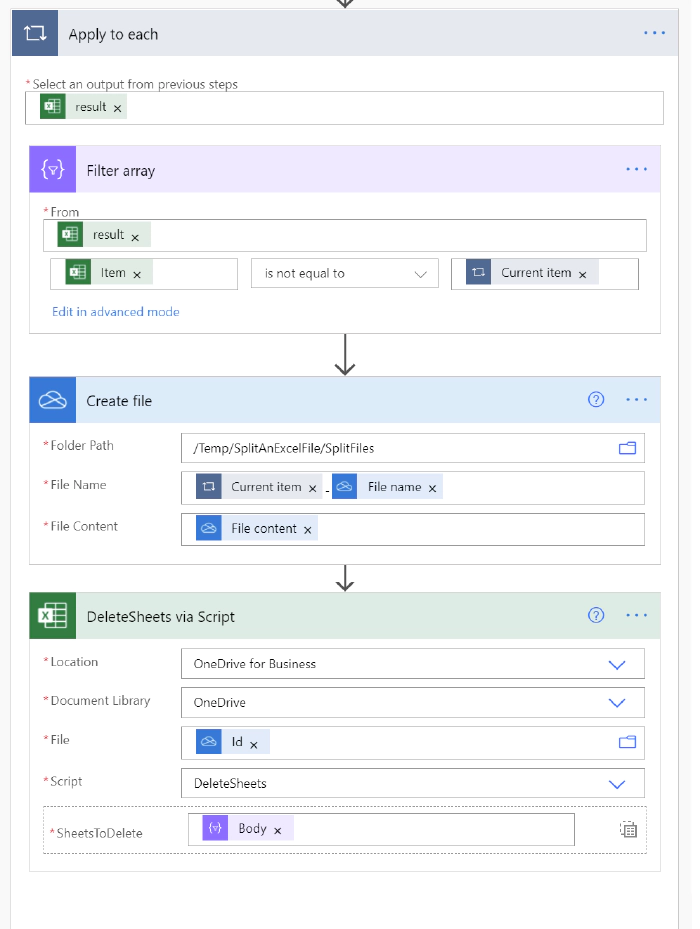
The end result is an excel workbook, containing one sheet and as we are in an apply to each, we end up with five worksheets, each with a unique worksheet. Below we have the original workbook containing five worksheets. 
Now we have a single workbook with a unique sheet, called “ATable”:
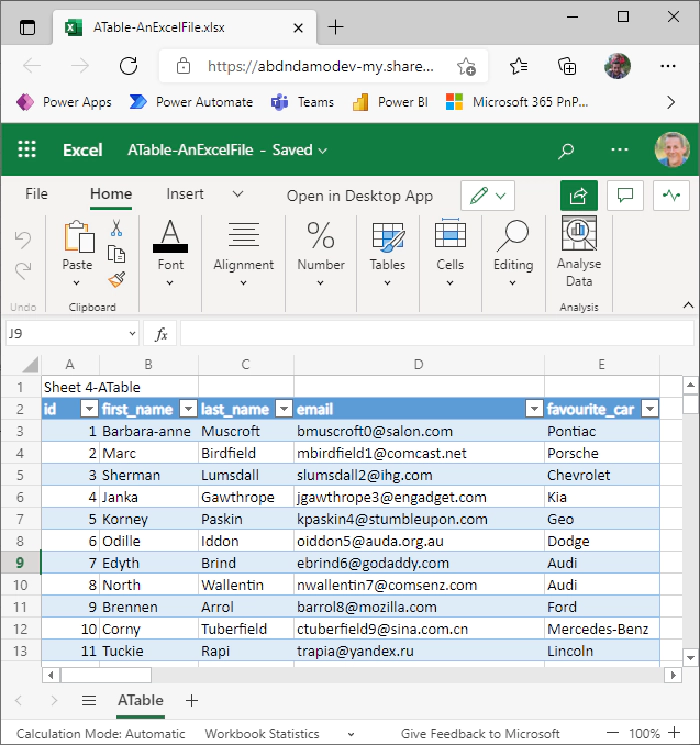
Why might you want to do this? If you maintain a single workbook with multiple sheets and want to share a copy of each worksheet with individuals or teams, this would allow you to achieve that without compromising the original file. You could routinely split up your workbook and send a copy of each worksheet to your colleagues via email or Teams. Watch the full build and demonstration here:
Create an empty Excel File
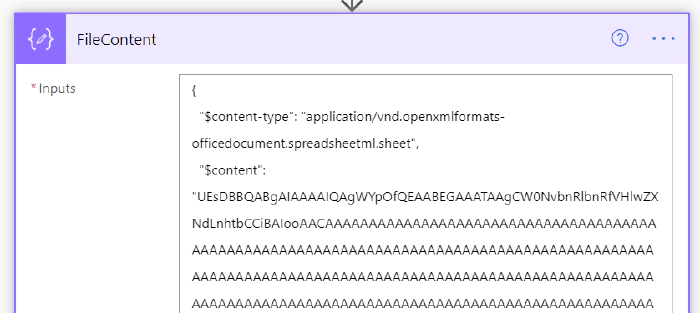
Natively, PowerAutomate doesn’t allow you to create a new Excel file. By creating an empty Excel file on SharePoint and using the get file content action, it’s possible to save the JSON output to a compose and re-use the empty template file when using the “create file” action.
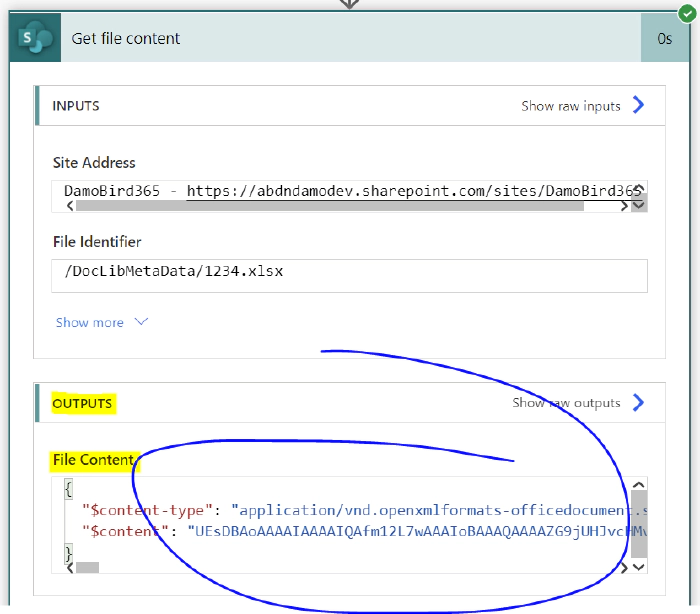
A compose action with the File Content copied into it.
By doing it this way, we achieve two things.
- no need for the donor empty excel file, we can delete it and not have to worry about it being deleted accidentally
- we can remove the get file content action and rely entirely on the
compose action we have created
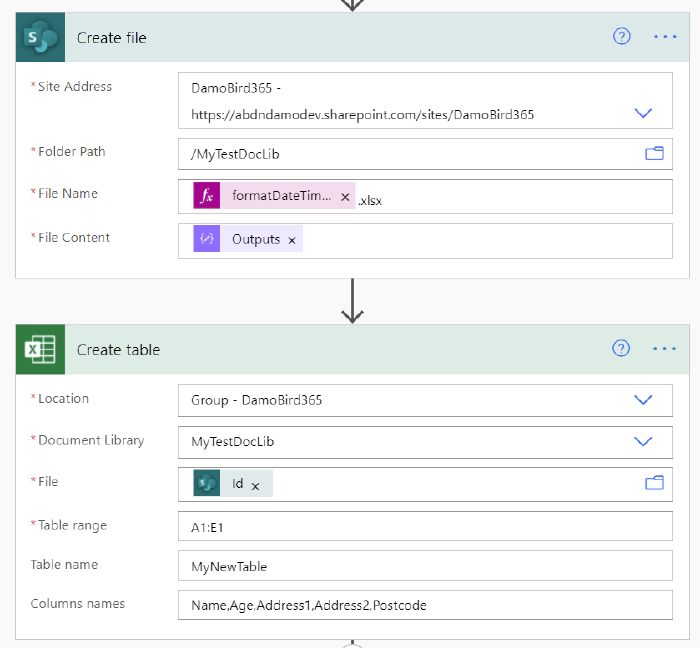
By using the output of the compose action we can create a new file (in
this case named with a unique datetime string
formatdatetime(utcnow(),'yyyyMMddhhmmss').xlsxand then create a new table to allow data to be inserted. Here we have a table range from column A to E on row 1, i.e. 5 columns with headers Name, Age, Address1, Address2, PostCode.
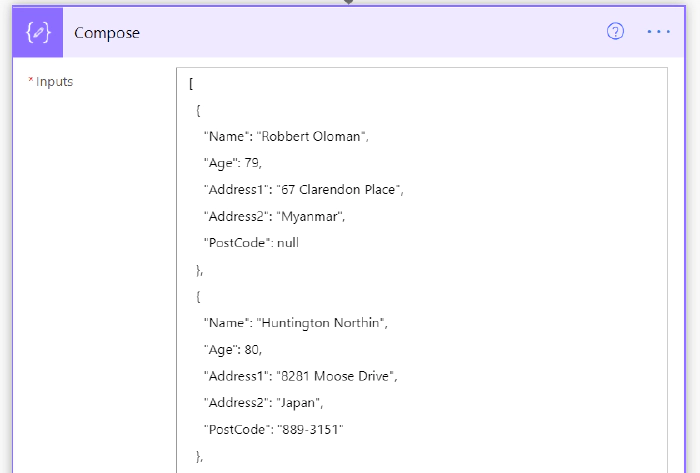
To populate our excel file, I have an array contained within a compose,
this data array could be the result of another action or a filter or
OData query on another Excel Worksheet that you simply want to save a
copy of:
{
  "Name": "@{items('Apply_to_each')?['Name']}",
  "Age": "@{items('Apply_to_each')?['Age']}",
  "Address1": "@{items('Apply_to_each')?['Address1']}",
  "Address2": "@{items('Apply_to_each')?['Address2']}",
  "Postcode": "@{items('Apply_to_each')?['Postcode']}"
}
The table name is provided dynamically from the create table action and
the File Id is the dynamic value from the create file action.
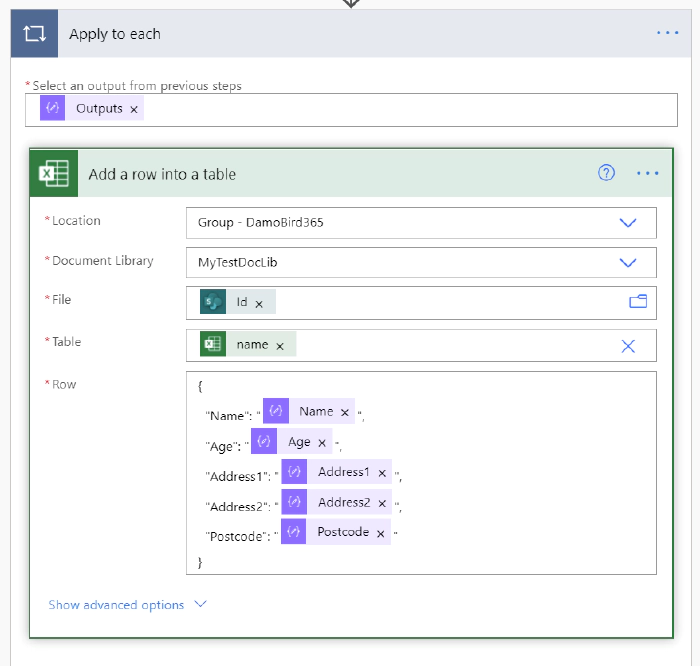
If we turn on concurrency, we can add 50 rows to the newly created excel file in a matter of seconds. Whilst I haven’t covered this here, it would be possible to write an office script to take an array of objects and populate an excel file without a table. I have previously covered this concept here Excel Scripts and Cloud Flows - Data Manipulation - Microsoft Tech Community. Watch how you can create a new file via PowerAutomate here:
And Finally, converting a CSV to Excel File
All we are doing is swapping out the array contained within the compose
action and converting a CSV to an Array.
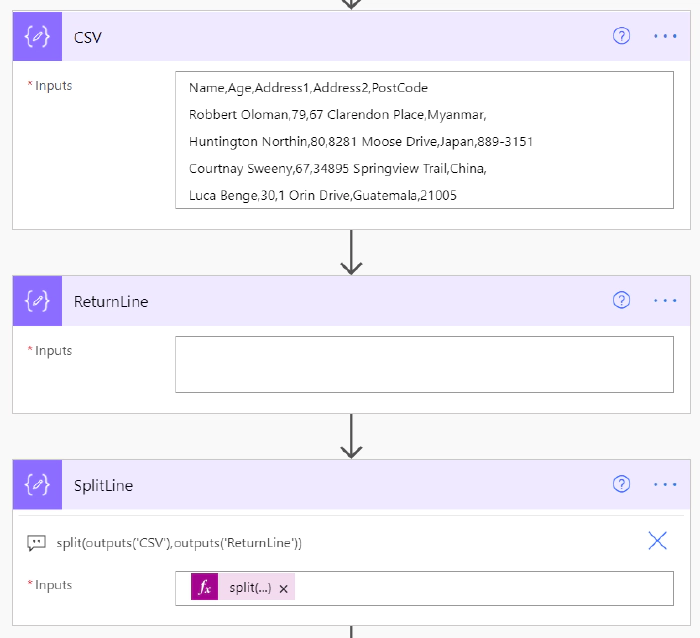
Here we have a CSV contained within a compose and another compose action
with a return line (literally press return on your keyboard). Then
using split, we turn the CSV into an array of separate lines.
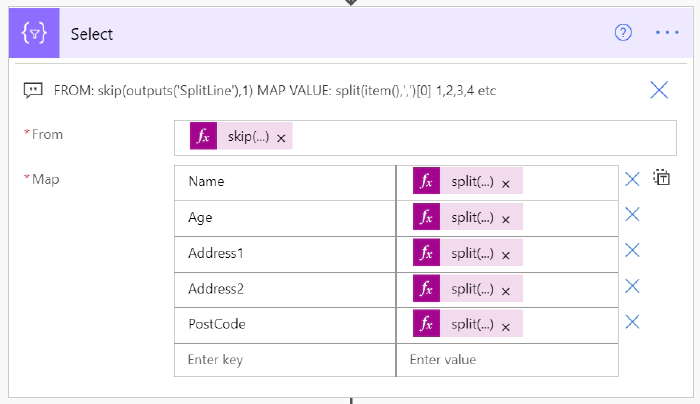
Using the select action, the from array input is the output from the compose splitline array (skipping object one, which contains the header line) and in this case I have supplied the key names manually. Finally the expression used to obtain the value is a split of each item (Or line) based on the separator, the comma ‘,’. This will allow us to call each value by integer index split(item(),’,’)[0].
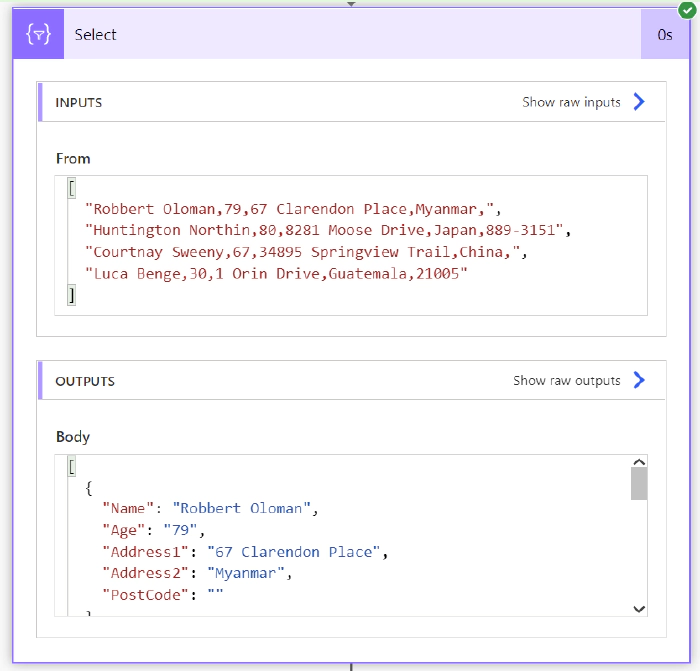
Our select action take an array of comma separated lines and outputs an array of key/value pairs like follows:
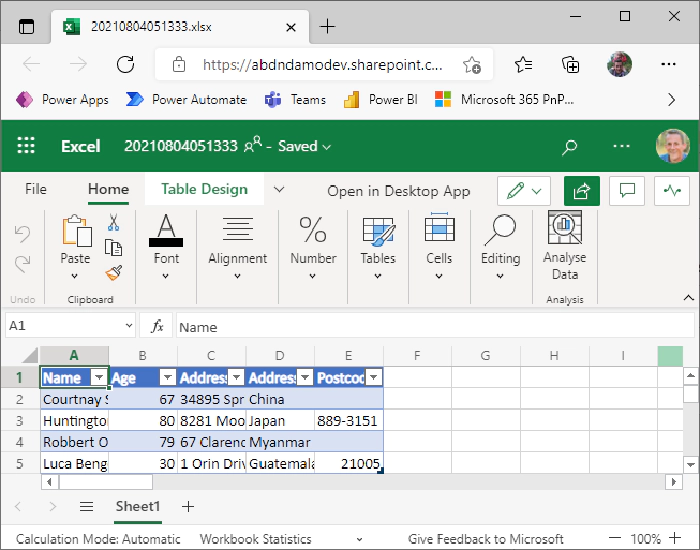
And if we update the apply to each source as the select output, we end up with a new excel file using a CSV file as our input:
For more information about parsing CSV files in PowerAutomate, please read my blog article How To Parse any CSV to JSON Array - DamoBird365. More ideas and concepts on my YouTube or Blog. Please feel free to reach out if you have any questions.