
Get started with Adaptive Cards
 Tomasz Poszytek
- 9 minutes to read
- 10 Feb, 2021
Hello dear digital technology enthusiast. I heard you would like to find out what Adaptive Cards are? In this article I will help you to understand what[Adaptive Cards technology is, how it works and how you can use it. Follow me through the next chapters and I will try to explain it as clear.
In short words – Adaptive Cards is a technology, that lets you to focus on content and layout, not how it will be displayed on a specific device or browser. What you are responsible for is to prepare what you would like to show and how it should be organized, e.g. should there be any tables, images, columns. However, the display side is taken care by the host. The host is an application, that displays Adaptive Card. It controls the colors, fonts, specific parts of layout, buttons’ shapes, backgrounds and almost everything that makes the Card to look, once displayed, as if this is just another piece of the user interface.
Like a YouTube video in Facebook Messenger conversation. You see how seamlessly it displays within other chat messages? This is an example of a similar cards’ technology too.
In Microsoft landscape we do have Adaptive Cards already in various places. Have you known it? You can find them when you talk to Cortana.
They are also in Windows Timeline (access it by pressing Win+Tab).

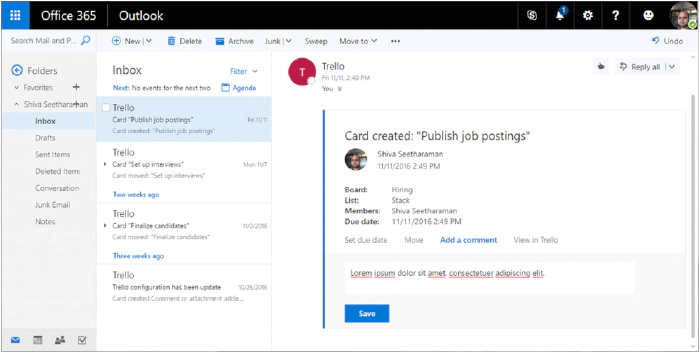
You can find them in your Outlook when you receive a message containing an interactive form inside.
And what is the most obvious – they are also present are very commonly used in Microsoft Teams – this is the platform on which I will focus in this article. Apart from the places I mentioned, Adaptive Cards are also present in multiple services from Microsoft, like Microsoft Search, Microsoft GraphAPI explorer, Azure Bot Framework and many more. This technology however is not limited and exclusively used only by Microsoft. Cisco is using it to display cards in their Webex Teams and Adaptive Cards’ SDK (Software Development Kit – set of tools used to build and run software) is open-source and hosted on GitHub, therefore anyone can use it in their development own projects, for example when building apps for Android or custom web sites with JavaScript or .NET.
How do Adaptive Cards work?
Adaptive Card is a technology that uses JSON (JavaScript Object Notation – structured method to describe information, learn more from Bob German here: https://techcommunity.microsoft.com/t5/microsoft-365-pnp-blog/introduction-to-json/ba-p/2049369) to declare how the final card should look like. The defined code is then parsed by the host that has Adaptive Cards SDK installed. Using SDK and JSON schema (schema defines what information can be used by authors in their cards) for the specific version translates code into valid HTML that is being displayed to users.

Thanks to this approach, creation of user interface using Adaptive Cards is not only fast (no need to design separate card for desktop and mobile, for Android and iOS etc.), but also secure, since if part of JSON code that is used in card does not exist in SDK, it will not be rendered, so no malicious code can be then executed at user side.
All right. Now that we know what they are and how they work, let me tell you how to create them.
Adaptive Cards authoring
The best place to start authoring your first (and every next) Adaptive Card is the designer, that you can find at https://adaptivecards.io/designer. There you can, following drag&drop visual designing approach create Adaptive Card and then configure all required properties. The designer is built from the following functionalities:
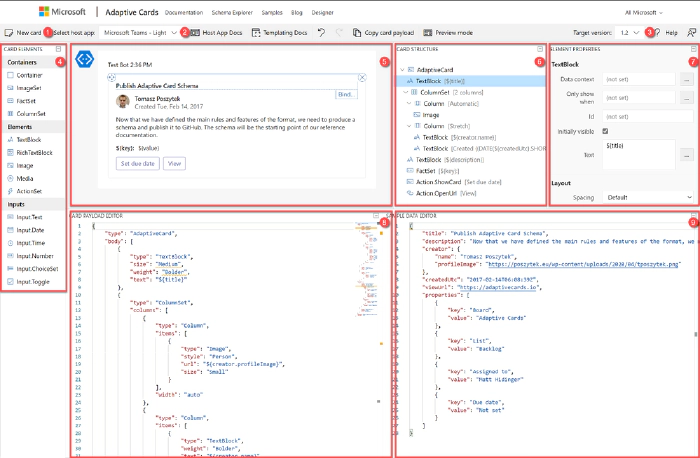
- New card – allows to create a card from a blank canvas or to start using one from existing templates.
- Select host app – is used to switch between hosts. Remember what I wrote at the beginning? Host control how the card is going to be displayed. Just experiment for example by choosing Microsoft Teams – Dark and Light host. See the differences.
- Target version. Each host has different version of Adaptive Cards implemented. Therefore, once you select host, the version will be automatically selected for you. Version determines what functionalities can be used.
- Card elements are the building bricks of the card. Here you need to choose between:
- Containers – they define the layout, like imageSet will be displayed as a gallery, whereas FactSet as a table with two columns.
- Elements – those are the pieces used to display the information like text or image. Why ActionSet is here? Good question. This container is lets you to define actions within any place of the card.
- Inputs – with their help card can not only be used for displaying data, but also for its collecting. With inputs authors can build rich forms and request information from users.
- Main canvas – here you can, following drag&drop method, place elements and build final card’s interface.
- Card structure displays hierarchy of elements. Like TextBlock will be always below a container etc.
- Element properties – here authors define parameters specific per each element. Like font size, align, id, values and much more.
- Payload editor displays working JSON code, that author can simply copy and paste e.g. in Power Automate to display the card in Microsoft Teams.
- Data editor is used to bind data placeholders in card with specific values from data object. This is called Adaptive Cards Templating and since is not yet supported in Microsoft Teams will not be explained in this article.
What are the Actions?
Actions can be added to the card via the ActionSet or simply defined at
the bottom of the main container. 
There are four types of actions that author can choose from:
- OpenUrl – lets to open an external URL. Like hyperlink.
- Submit – sends back data from the card and inputs back to the host. Host is then responsible for the data processing and further operations.
- ShowCard – displays or hides sub-card – like a card within a card.
- ToggleVisibility – shows or hides defined elements on the card.
Adaptive Cards in Microsoft Teams
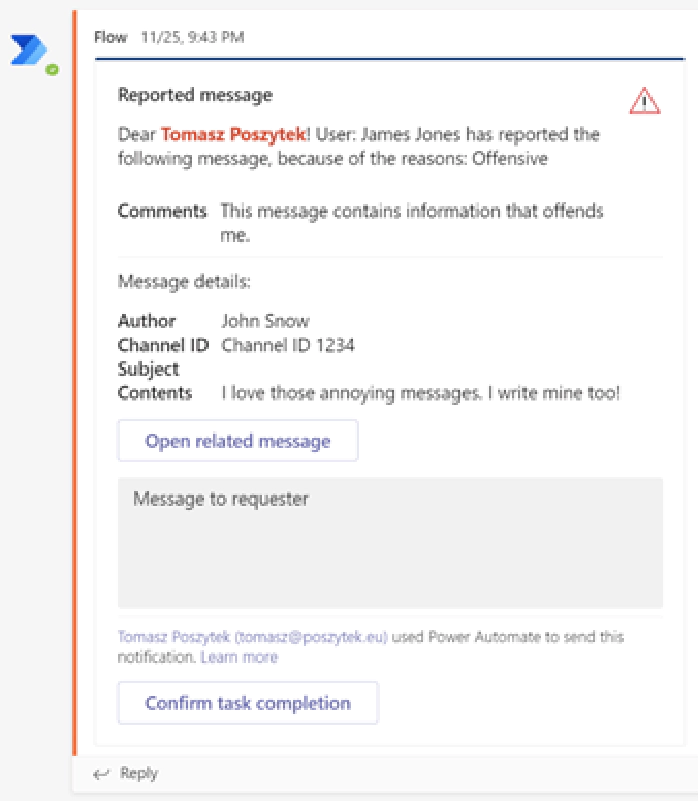
In Microsoft Teams the host that displays Adaptive Cards is called Flow Bot. This is a bot built using Azure Bot Framework technology. Its job is not only to display custom cards, but also Power Automate Approvals and some more.
Today there is just one option to display Adaptive Cards in Microsoft Teams without a need to develop custom bots. This is through Power Automate. How? Flow sends Adaptive Cards JSON code to the Flow Bot which renders it and display in Microsoft Teams conversation.
In Power Automate there are several actions that allows to generate Adaptive Cards in MS Teams, however each has significantly different purpose.

Post a choice of options as the Flow bot to a user – action allows to send an Adaptive Card in a pre-defined layout, where author can define message and options – that will be displayed as button. After card is sent, flow is paused for up to 30 days waiting for user’s response. This action can be used in simple approval/ collecting feedback scenarios, where no fancy layout is expected.

Post an Adaptive Card to a Teams user and wait for a response – allows to send custom built Adaptive Card to a specific Microsoft Teams user and to pause the flow for up to 30 days while waiting for response.
Post an Adaptive Card to a Teams channel and wait for a response – the same as above, but Adaptive Card is sent to a channel.
Post a message as the Flow bot to a user – sends a pre-defined Adaptive Card to a chosen user but does nothing more. Author cannot embed here custom JSON code.
Post a message as the Flow bot to a channel – the same as above, but message is sent to a channel.
Post your own adaptive card as the Flow bot to a user – allows author to send custom Adaptive Card to a user, however it is not waiting for the response so in case card contains form,
Action.Submitresults in error.Post your own adaptive card as the Flow bot to a channel. As above, however the card is sent to a channel. The above two actions simply allow to send the card, but they do not offer any way to collect feedback. They are a good choice if you are planning to simply send informative card, without forms.


Exercise
Now it is your turn. Build an easy flow, that is triggered manually and all it does is posting an Adaptive Card to a Teams channel (of your choice), using Post your own adaptive card as the Flow bot to a channel action. 
Then copy paste the following Adaptive Card JSON code and paste as Message inside the action:
{
    "$schema": "http://adaptivecards.io/schemas/adaptive-card.json",
    "type": "AdaptiveCard",
    "version": "1.2",
    "body": [
        {
            "type": "TextBlock",
            "text": "Hey @{triggerOutputs()['headers']['x-ms-user-name']}! Here are some cool cats photos",
            "size": "Large",
            "wrap": true
        },
        {
            "type": "TextBlock",
            "text": "I hope you like them ;)",
            "size": "Medium",
            "weight": "Lighter",
            "wrap": true
        },
        {
            "type": "ImageSet",
            "imageSize": "medium",
            "images": [
                {
                    "type": "Image",
                    "url": "https://4.bp.blogspot.com/-XkviAtJ1s6Q/T3YFb2RUhDI/AAAAAAAAAVQ/EHomLZlFMKo/s1600/small+cat.jpg",
                    "size": "Medium"
                },
                {
                    "type": "Image",
                    "url": "https://images4.fanpop.com/image/photos/18500000/Kitten-cats-18565791-1024-768.jpg",
                    "size": "Medium"
                },
                {
                    "type": "Image",
                    "url": "https://tse2.mm.bing.net/th?q=Funny+Cats&pid=Api&mkt=en-US&adlt=moderate&t=1",
                    "size": "Medium"
                },
                {
                    "type": "Image",
                    "url": "https://tse3.mm.bing.net/th?q=Grumpy+Cat&pid=Api&mkt=en-US&adlt=moderate&t=1",
                    "size": "Medium"
                }
            ]
        }
    ]
}
Now save and test your flow. You should see the below cool Adaptive Card in Microsoft Teams channel: 
Further learning
Adaptive Cards is not just a simple technology. It is also the community that is behind. If you are interested in learning more about it, check the assets under the links below:
- https://adaptivecards.io – here is the documentation, JSON schema explorer to tell you what is possible and what is not plus several samples.
- https://adaptivecards.io/designer – the already known visual designer.
- https://aka.ms/acroadmap – here is the roadmap, release log and user voice, where you can submit your ideas.
- https://madewithcards.io/ – the repository of community built Adaptive Cards examples, ready to use.
- https://aka.ms/adaptivecardscommunitycall – add monthly, community call about Adaptive Cards to your calendar and be up to date with the latest ideas the team behind is planning.
- https://github.com/microsoft/AdaptiveCards – the official GitHub repository for Adaptive Cards code, where you can find the latest SDK if you plan to begin your journey as a developer.
Wrap up
Adaptive Cards is a modern technology built by Microsoft to help content creators author parts of user interface much faster and with less issues, due to device-specific aspects.
Knowledge about JSON code is useful, however it is not mandatory to successfully design cards.
With the easy to use designer and intuitive actions in Power Automate, anyone can easily create and use Adaptive Cards for communication purposes and to enrich user experience in processes taking place inside Microsoft Teams.
The technology can be used for many scenarios, that turns Microsoft Teams powered with Power Automate into a real digital workplace, where users can take part in the processes directly from conversations or chats, not being disturbed by the need to navigate between different systems.
I encourage you to try it right away.