
How to get started with HTTP requests in Power Automate
If you ever wondered what is an HTTP request and why you would want to know how this works - this post is made for you.
What is a HTTP request and why would I need it?
HTTP requests are a super powerful thing - not only in Power Automate! We will first need to understand what this is in order to determine why we would like to know how to use them. But wait - HTTP?
What is HTTP?
Let’s first get us all an the same page. HTTP is the acronym for Hypertext Transfer Protocol. Its purpose is to structure requests and responses over the internet (yeah, you heard of that one 😇
) - Data needs to be transferred from Point A to Point B over the network.
The transfer of resources (like html files, images, videos etc) happens with TCP - which again is acronym, for Transmission Control Protocol. When you read this blog post, TCP manages the channels between your browser (hope you are using Microsoft Edge) and the server. TCP is used a lot for scenarios in which one computer sends something to another. Now what has TCP to do with HTTP? Think of HTTP as the command language for both computers so they are able to communicate.
When you type a URL like https://www.m365princess.com into the address bar of your browser, your computer establishes first a TCP connection and then makes a request. We will call your computer now client. The request is a HTTP GET request, as we nicely ask to retrieve the website that the browser shall display. And as we send a (nice) request, the server (site that you requested) will send a response and close the TCP connection afterwards. Of course, there are more methods than just the GET method, you will learn later more about methods POST, PUT, PATCH, DELETE.
Now that we know what an HTTP request does, we want to learn what it could do in Power Automate
What can HTTP requests do in Power Automate?
Power Automate offers you a huge variety of connectors and within those connectors, many actions which you can use to automate your processes. But although we have so many options, this won’t cover everything you need or that you might want to build in Power Automate, which is why we have an HTTP action in Power Automate as well. With the HTTP action we can invoke a REST API.
What is a REST API?
Wait but what? Ok, let’s slow down a little bit. What is a REST API and would we want to invoke that?
API is -yet again- an acronym for application programming interface and it is a set of rules and mechanisms. By these an app or a component interacts with others. RESTful APIs (REST means representational state transfer) can return data that you need for your app in a convenient format (for example JSON or XML). By using the HTTP action in Power Automate we can invoke/call an API by using methods GET (read), POST (write), PUT (update), PATCH (update, but only partially) or DELETE (remove). The same way as our browser made a call towards a website and getting a response using HTTP, we now use HTTP to send a request to a service. In my example, I will use Microsoft Graph. Microsoft Graph is a RESTful API that enables you to access Microsoft Cloud service resources. It is literally THE way to read, create, update and delete resources (like files, teams, meetings etc.).
Microsoft provides us with an amazing tool to try out Microsoft Graph, it’s the Graph Explorer.
How to create a HTTP request in Power Automate
Now how do we create an HTTP requests in Power Automate? First let me introduce everyone to our little
Use case
We want to use Power Automate to create a Team with some predefined content in it. To make things easier, we will use the mobile trigger and ask for Team Name, Team Description, and if a user wants a channel for Learning and wants to pin training material (a website) as a tab to this channel
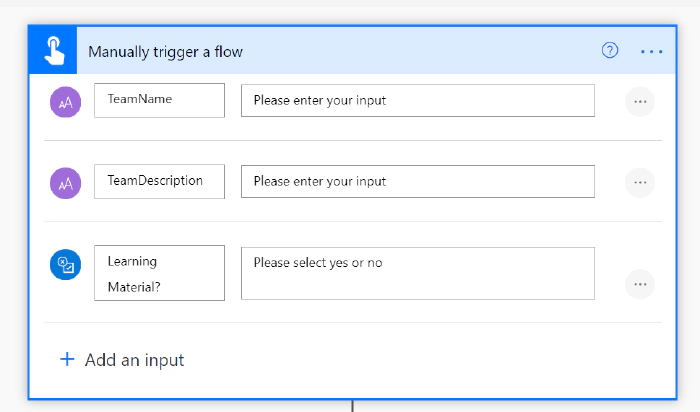
(Of course, we would do that later in a form, an app, or a bot, but for understanding the logic of HTTP requests in Power Automate I will keep this as simple as possible)
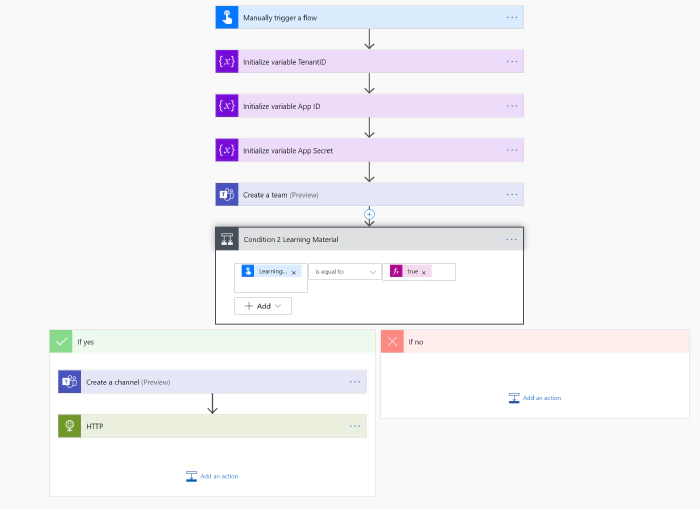
We will now add actions to create the team and then we add a condition: If user wants learning material, we want create a channel called Learning and want to pin a website to it.
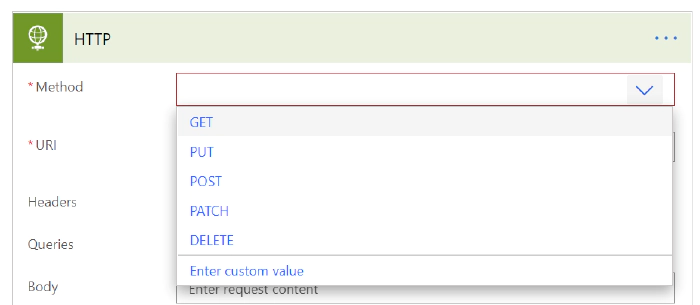
Unfortunately, there is no action “pin a website to a channel in Teams” in Power Automate. Fortunately, we can still do this by making an HTTP request towards Microsoft Graph. This is why I added the HTTP action into the flow:
What do we need to make a successful HTTP request?
It is a very good idea to open documentation on docs.microsoft.com while building your flows that call Microsoft Graph. You will find in nearly all pages four things, that we need to consider when doing an HTTP request:
Endpoint
First things first, if we want to call an API with HTTP, we need to know the right endpoint. Think of an endpoint like a phone number that you want to call. You need to know it, because otherwise you won’t reach the right person.
An endpoint is a URL like
this: https://graph.microsoft.com/v1.0/{resource}?[query_parameters] and
we will later
use https://graph.microsoft.com/v1.0/teams/{team-id}/channels/{channel-id}/tabs to
create this tab.
Method
Second thing we need to know is which method we want to use. As already explained, GET == Read
POST == Write
PUT == Update
PATCH == partially update
DELETE == remove If we now open the dropdown menu for the Method field in the HTTP action, we will see a representation of that:

As we want to create a new tab in a channel, we will use POST.
Headers
Headers are not mandatory for all requests, but look like
this: Content-type: application/json - If they are needed,
documentation will tell you.
Data (or body)
If we call an endpoint, it’s not enough to specify the URL the request needs to make to, but we will also need to post some additional info into the body of our requests. Most GET requests though don’t need information in the body, as they will only list the requested resources.
Fill in the HTTP action
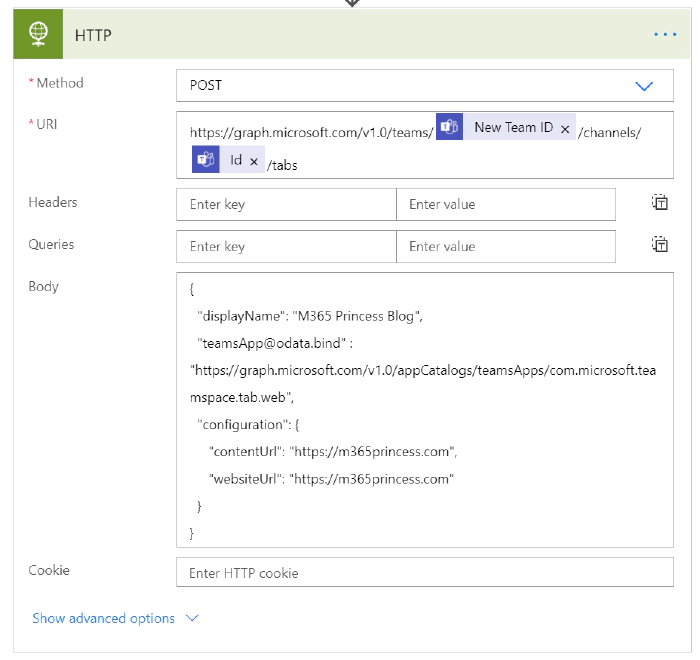
If we carefully follow the Docs, we will see that we should do this:
POST https://graph.microsoft.com/v1.0/teams/{team-id}/channels/{channel-id}/tabs
{ "displayName": "M365Princess Blog",
"teamsApp@odata.bind" :"https://graph.microsoft.com/v1.0/appCatalogs/teamsApps/com.microsoft.teamspace.tab.web",
"configuration":
 {
    "contentUrl": "https://m365princess.com",
    "websiteUrl": "https://m365princess.com"
    }
}
Some remarks on that:
- Choose Method POST - we already figured that out
- https://graph.microsoft.com/v1.0/teams/%7Bteam-id%7D/channels/%7Bchannel-id%7D/tabs is
our URL, but we will need to
replace
{team-id}and{channel-id}with the actual dynamic content - Choose a
displayNamefor the Tab as you wish "teamsApp@odata.bind"is “https://graph.microsoft.com/v1.0/appCatalogs/teamsApps/com.microsoft.teamspace.tab.web”- Both
websiteUrlandcontentUrlare the full URL of the website you want to pin includinghttps://. If your website is onlyhttp://you can’t use that inside of Teams.
In total, this looks like this:
Authentication in Azure AD
We are almost there, but some critical parts are missing. As you can see in the last image, there is a Show advanced options link in the HTTP action and we need to select it. Our HTTP request need authentication. We can authenticate via Azure Active Directory OAuth, but we will first need to have a representation of our app (yes, this flow that calls Graph is an application) in Azure AD.
We will follow these steps to register an app in Azure AD:
- Go to portal.azure.com and log in
- Click app registrations
- Click New App registration
- Give your app a nice name
- Save tenant ID and Client(app) ID somewhere (notepad or similar)
- Click API PERMISSIONS and select Microsoft Graph
- Now look up the permissions needed for this action: Add tabs to a channel
Permission type Permissions (from least to most privileged)
Application TeamsTab.Create.Group*, TeamsTab.Create, TeamsTab.ReadWriteForTeam.All, TeamsTab.ReadWrite.All, Group.ReadWrite.All, Directory.ReadWrite.All
- Select all these permissions
- Grant Admin consent
- Click Certificates & secrets
- Click New client secret
- Type in a description
- Click Add
- Copy the value and save it in your notepad (you will need that later)
Write the IDs into variables
In our flow, we will now initialize three variables at first level (before any condition) and set their values the copied values of Tenant ID, App ID and App Secret. All three variables are of type string.
Complete the HTTP request
Now we will fill in some more information in the HTTP request:
- Authority:
https://login.microsoftonline.com - Audience:
https://graph.microsoft.com
Besides that, we will use our three variables for Tenant ID, App ID and App Secret.
Our flow should look like this:
Celebrate
If we now run the flow and take a look at the new team in Microsoft Teams:
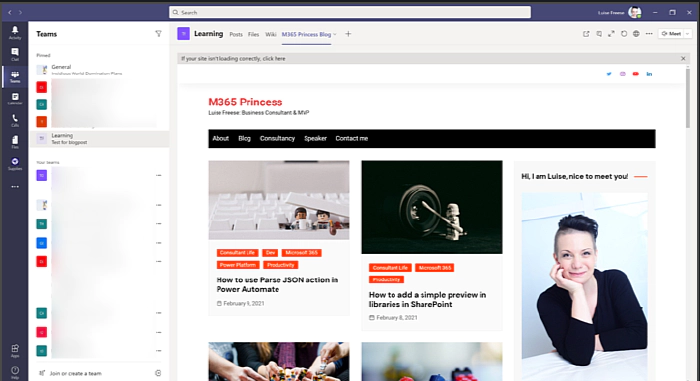
we can spot our freshly created tab with the the content we wanted to provide!
Conclusion
HTTP requests re a super coo method to achieve a lot of things that are
not actions in Power Automate, but can still be executed using Microsoft
Graph (or other APIs!).
What are you using HTTP requests for?
First published
on m365princess.com