
Init API permissions for your SPFx projects without deploying them
When developing your SPFx components, you usually first run them locally before deploying them (really?). And then comes the time to work with API such as Microsoft Graph. If you never use those permissions before in your SPFx projects (and the tenant with which you’re working), you realize that you have to:
- Add required API permissions in your
package-solution.jsonfile - Bundle / Ship your project
- Publish it
- Go to the SharePoint Admin Center Web API Permissions page
- Approve those permissions All of this, just to play with the API as you didn’t plan to release your package in a production environment. So what if you could bypass all these steps for both Graph and owned API?
Warning
This trick is just for development purposes. In Production environment,
you should update your package-solution.json file to add required
permissions and allow them (or ask for validation) in the API
access page.
Prerequisites
- An Office 365 (Dev) Tenant or a Partner Demo Tenant
- The following Azure AD role at least
- Application Administrator
With Graph API
First, we’re going to play with Graph API through the Microsoft Graph Toolkit.
Prepare your sample
Init a SPFx project (WebPart one with React, let’s call it HelloApi),
then add the Microsoft Graph Toolkit by
executing npm i @microsoft/mgt @microsoft/mgt-react from the
project’s root path.
Once done, open your main component file (let’s say
here HelloApi.tsx) and add the PeoplePicker component like this:
import * as React from 'react';
import styles from './HelloApi.module.scss';
import { IHelloApiProps } from './IHelloApiProps';
import { escape } from '@microsoft/sp-lodash-subset';
import { PeoplePicker } from '@microsoft/mgt-react';

export default class HelloApi extends React.Component<IHelloApiProps, {}> {
  public render(): React.ReactElement<IHelloApiProps> {
    return (
      <div className={ styles.HelloApi }>
        <div className={ styles.container }>
          <div className={ styles.row }>
            <div className={ styles.column }>
              <span className={ styles.title }>Welcome to SharePoint!</span>
              <p className={ styles.subTitle }>Customize SharePoint experiences using Web Parts.</p>
              <p className={ styles.description }>{escape(this.props.description)}</p>
              <a href="https://aka.ms/spfx" className={ styles.button }>
                <span className={ styles.label }>Learn more</span>
              </a>
            </div>
          </div>
        </div>
        <PeoplePicker />
      </div>
    );
  }
}
Run it in remote workbench
Now run your sample with gulp serve and display your web part in your
remote workbench
(https://contoso.sharepoint.com/_layouts/15/workbench.aspx). Try to
use the PeoplePicker component: you’ll see that just by clicking on
the search box, you’ll get We didn’t find any matches.
Display your developer toolbox (F12) and go to the browser console, you
should see the following error:
Add Graph API through UI
From the Azure portal, display the Azure Active Directory (AAD), then
select the App Registration menu and select All Applications,
then select SharePoint Online Client Extensibility Web Application
Principal. It’s the AAD Application that holds the connection to the
API (Microsoft and others) from SharePoint (SPFx or every other
development) using the Implicit Flow.
Once here, select Add a permission, then select Microsoft
Graph and add the [People.Read] Graph API [delegated
permission]{.underline} (you can type the name of the permission in the
available search box to get it easily).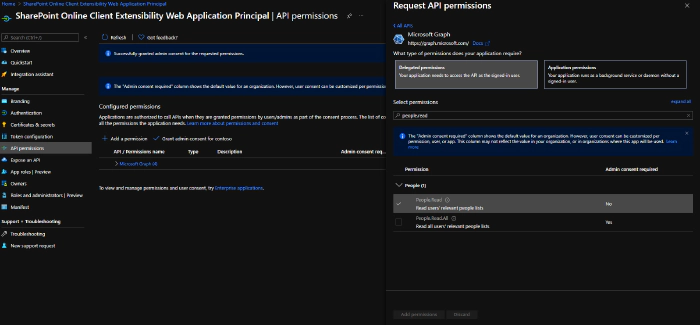
https://contoso-admin.sharepoint.com/_layouts/15/online/AdminHome.aspx#/webApiPermissionManagement),
you should see something like this: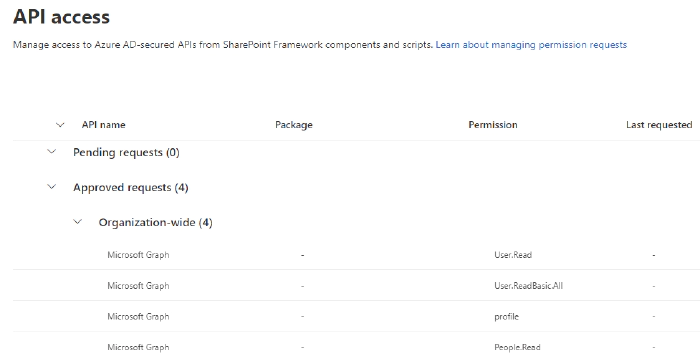
It can take a couple of minutes before consented permissions is effective, so don’t be surprised if it’s not working right away after approval.
Add Graph API through CLI for Microsoft 365
m365 login # Don't execute that command if you're already connected
m365 spo serviceprincipal grant add --resource 'Microsoft Graph' --scope 'People.Read'
Info
Don’t be surprised if by that way, the permission appears in the "Other permissions granted for [your tenant]": it won’t prevent your SPFx solution to work.
Try again
Now try to use the PeoplePicker component again: you’ll see that with
the addition of the Graph API permission, you should be able to use that
component!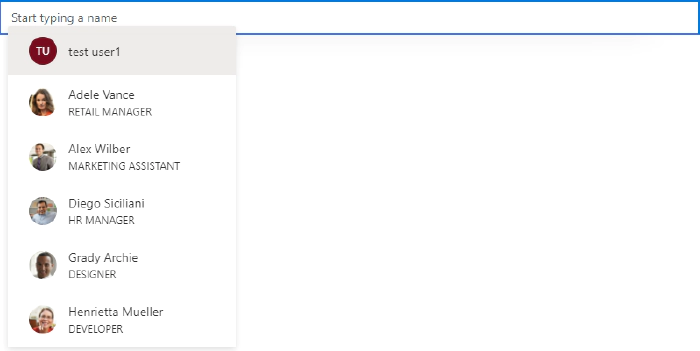
With custom API
When using a custom API, it’s a little bit more tricky but easy to handle anyway. You can follow this Microsoft article until the “Deploy the solution” part. Instead of bundling and shipping, we’ll add the AAD App (called contoso-api-dp20200915 if we follow the mentioned article) created from the Azure Function Authentication part in the SharePoint Service Principal.
Add your AAD Application to the SharePoint Service Principal
Display again the AAD page, then select the App Registration menu,
select All Applications and select SharePoint Online Client
Extensibility Web Application Principal. Once here, select Add a
permission, then select the My APIs tab and select the fresh added
AAD App created before. Select the user_impersonation permission,
then confirm.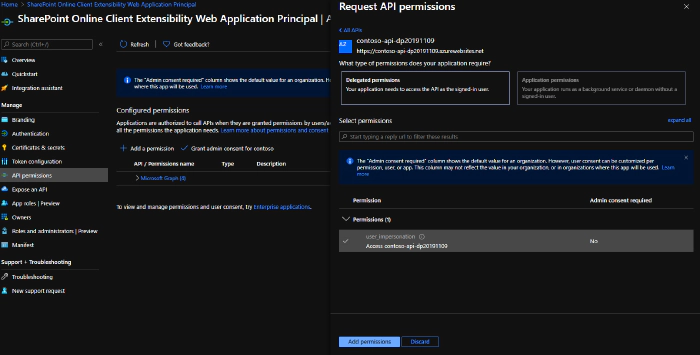
Finally, grant this permission by clicking on Grant admin consent for
contoso.
If you go again in the API access page, you should see something like
this: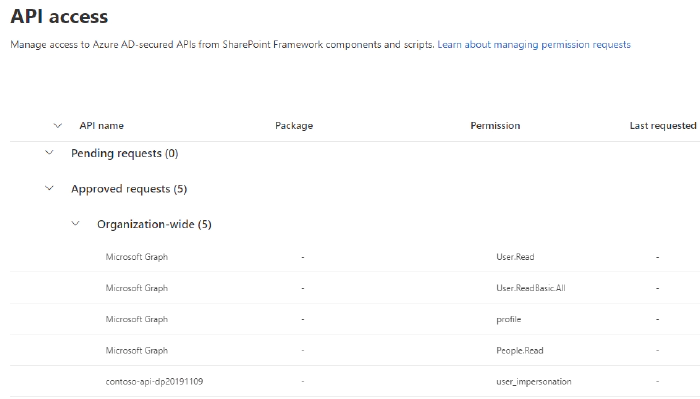
Add custom API through CLI for Microsoft 365
m365 login # Don't execute that command if you're already connected
m365 spo serviceprincipal grant add --resource 'contoso-api-dp20200915' --scope 'user_impersonation'
Info
Don’t be surprised if by that way, the permission appears in the "Other permissions granted for [your tenant]": it won’t prevent your SPFx solution to work. Warning
If you use an Azure Function as an API and enable Managed Identity for any reason, you better have to rename the linked AAD Application to give it a different name than both your Function and its Managed Identity. Otherwise, the command will try to find a scope on it instead of the AAD App and fail.
Updated sample
To run your custom API from your SPFx component, you can update your sample like below: IHelloApiProps.ts
import { AadHttpClientFactory } from '@microsoft/sp-http';

export interface IHelloApiProps {
  aadFactory: AadHttpClientFactory;
  description: string;
}
HelloApiWebPart.ts
// ...
export default class HelloApiWebPart extends BaseClientSideWebPart<IHelloApiWebPartProps> {

    // ...

    public render(): void {
        const element: React.ReactElement<IHelloApiProps> = React.createElement(
        HelloGraph,
        {
            description: this.properties.description,
            aadFactory: this.context.aadHttpClientFactory,
        }
        );

        ReactDom.render(element, this.domElement);
    }

  // ...
}
HelloApi.tsx
import * as React from 'react';
import styles from './HelloApi.module.scss';
import { IHelloApiProps } from './IHelloApiProps';
import { AadHttpClient, HttpClientResponse } from '@microsoft/sp-http';

interface IHelloApiState {
  ordersToDisplay: any;
}

export default class HelloApi extends React.Component<IHelloApiProps, IHelloApiState> {

 public constructor(props) {
    super(props);

    this.state = {
    ordersToDisplay: null
    };
 }

 public componentDidMount() {
    this.props.aadFactory
      .getClient('https://contoso-api-dp20191109.azurewebsites.net')
      .then((client: AadHttpClient): void => {
        client
          .get('https://contoso-api-dp20191109.azurewebsites.net/api/Orders', AadHttpClient.configurations.v1)
          .then((response: HttpClientResponse): Promise<any> => {
            return response.json();
          })
          .then((orders: any): void => {
            this.setState({
              ordersToDisplay: orders
            })
          });
      }).catch((err) => {
        console.log(err);
      });
  }

  public render(): React.ReactElement<IHelloApiProps> {
    return (
      <div className={ styles.HelloApi }>
        <div className={ styles.container }>
          <div className={ styles.row }>
            <div className={ styles.column }>
              <span className={ styles.title }>Welcome to SharePoint!</span>
              <p className={ styles.subTitle }>Customize SharePoint experiences using Web Parts.</p>
              <p className={ styles.description }>
               <ul>
                    {this.state.ordersToDisplay &&
                        this.state.ordersToDisplay.map(o => {
                            return <li>{o.rep}: {o.total}</li>
                        })
                    }
                </ul>
              </p>
            </div>
          </div>
        </div>
      </div>
    );
  }
}
Now you can run your sample locally and try it in your hosted workbench,
playing with it and updating your WebPart as you want!
... And don’t forget to update your package-solution.json file to
include the required APIs before
shipping!
Happy coding! This article was cross-posted on my blog.