
Quick SharePoint Approvals using List formatting JSON to set field values
 Michel Mendes
- 4 minutes to read
- 19 Nov, 2021
This week it came to attention two new possible actions to be used in buttons created using list formatting:
- setValue: Updates a field value
- openContextMenu: Displays the default context menu for the list item
With the first one, we can update the values of any field in the list item. And update multiple field values with a single click. Not only this but we can use dynamic values and do calculations using the JSON formatting formulas, for example, we could increment/decrement a number value by clicking a custom button created with JSON formatting. With that in mind, after seeing some samples on Twitter published by @techan_k, I thought this could be useful for approvals scenarios. For example, we can update the item status and who approved the item with a single click, so as in the example below:
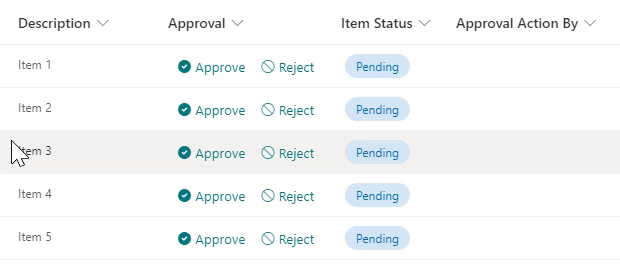
The structure behind the example
Three list columns are needed:
- A Choice column for the status (Suggested name: ‘Item Status’), with the possible values: Pending, Approved, Rejected. The standard configurable formatting for the Choice column can do the trick as below:
- A user field to register who approved or rejected the item (Suggested name ‘Approval Action By’)
- A dummy field to add the JSON template and display the buttons separately. The suggestion is to add a calculated field named ‘Approval’.
The logic behind the sample To make the functionality cleaner, the buttons would need to be displayed only when the items have not been approved. So we simply set the CSS display property to ‘none’ when the status is not empty and is different than ‘Pending’. And display a text message stating that the item was already approved or rejected. On each button, we set as the customRowAction, an action using the new setField action, and pass two fields on each using their internal names. Note that to set the current user as the value, we simply pass the @me formula. Approval:
"customRowAction": {
              "action": "setValue",
              "actionInput": {
                "ItemStatus": "Approved",
                "ApprovalActionBy": "@me"
              }
}
Rejection:
"customRowAction": {
              "action": "setValue",
              "actionInput": {
                "ItemStatus": "Rejected",
                "ApprovalActionBy": "@me"
              }
}
Full sample To add this to any SharePoint list, create the columns as stated above, and add the following JSON template to the Approval field (resize it to get the buttons to be displayed horizontally/vertically as you wish). Tweak the internal names as needed in case your list uses different field names:
{
  "$schema": "https://developer.microsoft.com/json-schemas/sp/column-formatting.schema.json",
  "elmType": "div",
  "style": {
    "flex-directon": "row",
    "justify-content": "left",
    "align-items": "center",
    "flex-wrap": "nowrap"
  },
  "children": [
    {
      "elmType": "div",
      "style": {
        "display": "=if([$ItemStatus] == 'Pending' || [$ItemStatus] == '', 'inherit','none')",
        "flex-directon": "row",
        "justify-content": "left",
        "align-items": "center",
        "flex-wrap": "wrap"
      },
      "children": [
        {
          "elmType": "button",
          "customRowAction": {
            "action": "setValue",
            "actionInput": {
              "ItemStatus": "Approved",
              "ApprovalActionBy": "@me"
            }
          },
          "attributes": {
            "class": "ms-fontColor-themePrimary ms-fontColor-themeDarker--hover"
          },
          "style": {
            "border": "none",
            "background-color": "transparent",
            "cursor": "pointer",
            "display": "flex",
            "flex-directon": "row",
            "justify-content": "left",
            "align-items": "center",
            "flex-wrap": "wrap"
          },
          "children": [
            {
              "elmType": "span",
              "attributes": {
                "iconName": "SkypeCircleCheck"
              },
              "style": {
                "padding": "4px"
              }
            },
            {
              "elmType": "span",
              "txtContent": "Approve",
              "style": {
                "word-break": "keep-all"
              }
            }
          ]
        },
        {
          "elmType": "button",
          "customRowAction": {
            "action": "setValue",
            "actionInput": {
              "ItemStatus": "Rejected",
              "ApprovalActionBy": "@me"
            }
          },
          "attributes": {
            "class": "ms-fontColor-themePrimary ms-fontColor-themeDarker--hover"
          },
          "style": {
            "border": "none",
            "background-color": "transparent",
            "cursor": "pointer",
            "display": "flex",
            "flex-directon": "row",
            "justify-content": "left",
            "align-items": "center",
            "flex-wrap": "wrap"
          },
          "children": [
            {
              "elmType": "span",
              "attributes": {
                "iconName": "Blocked"
              },
              "style": {
                "padding": "4px"
              }
            },
            {
              "elmType": "span",
              "txtContent": "Reject",
              "style": {
                "word-break": "keep-all"
              }
            }
          ]
        }
      ]
    },
    {
      "elmType": "div",
      "children": [
        {
          "elmType": "span",
          "txtContent": "='This item is ' + toLowerCase([$ItemStatus])",
          "style": {
            "display": "=if([$ItemStatus] == 'Pending' ||[$ItemStatus] == '' , 'none','inherit')",
            "padding-left": "5px",
            "word-break": "keep-all"
          }
        }
      ]
    }
  ]
}
Conclusion
By using list formatting and the new setValue action, we can now
update field values, expanding a lot the possibilities of what can be
done in SharePoint/Microsoft Lists without the need of the SharePoint
Framework field customizers or other techniques (calling a Flow for
example).
This example is just a simple one to show how to update two fields at
the same time and use the native formulas as values, but the
possibilities now have expanded massively.
Note:
For this approach to work correctly, all fields used in the JSON template need to be added to the list view where the custom buttons will be added.