Use your own Microsoft Entra identity
When you use the CLI for Microsoft 365 to connect to your tenant for the first time, you can either start with the m365 setup command or define the appId and tenant options directly during login.
To simplify the process of creating an Microsoft Entra application registration with all the necessary permission scopes, you can use the m365 setup command. This command can set up an application registration with a wide range of permissions, including those that require administrative consent. This makes it easy to get started with the CLI and try out commands across many CLI for Microsoft 365 workloads in your tenant without having to manually manage permissions for different commands in Azure.
While this approach is convenient for development and test environments, using these levels of permissions against production environments may be inconvenient. Administrators might be uncomfortable granting such permissions to an application within their environment. Therefore, it's important to carefully consider the permissions you grant when setting up your application registration for production use.
In this scenario, administrators will want to provide their own Microsoft Entra application registration to use with the CLI to enable greater control over the permissions that are granted.
This tutorial will walk you through how to create your own Microsoft Entra application with permissions restricted to only read information about SharePoint Online Site Collections and how to use this custom application with the CLI for Microsoft 365.
Register Microsoft Entra application in your tenant
We first need to register a new Microsoft Entra application in your tenant, to do this we will need to navigate to the Azure Portal.
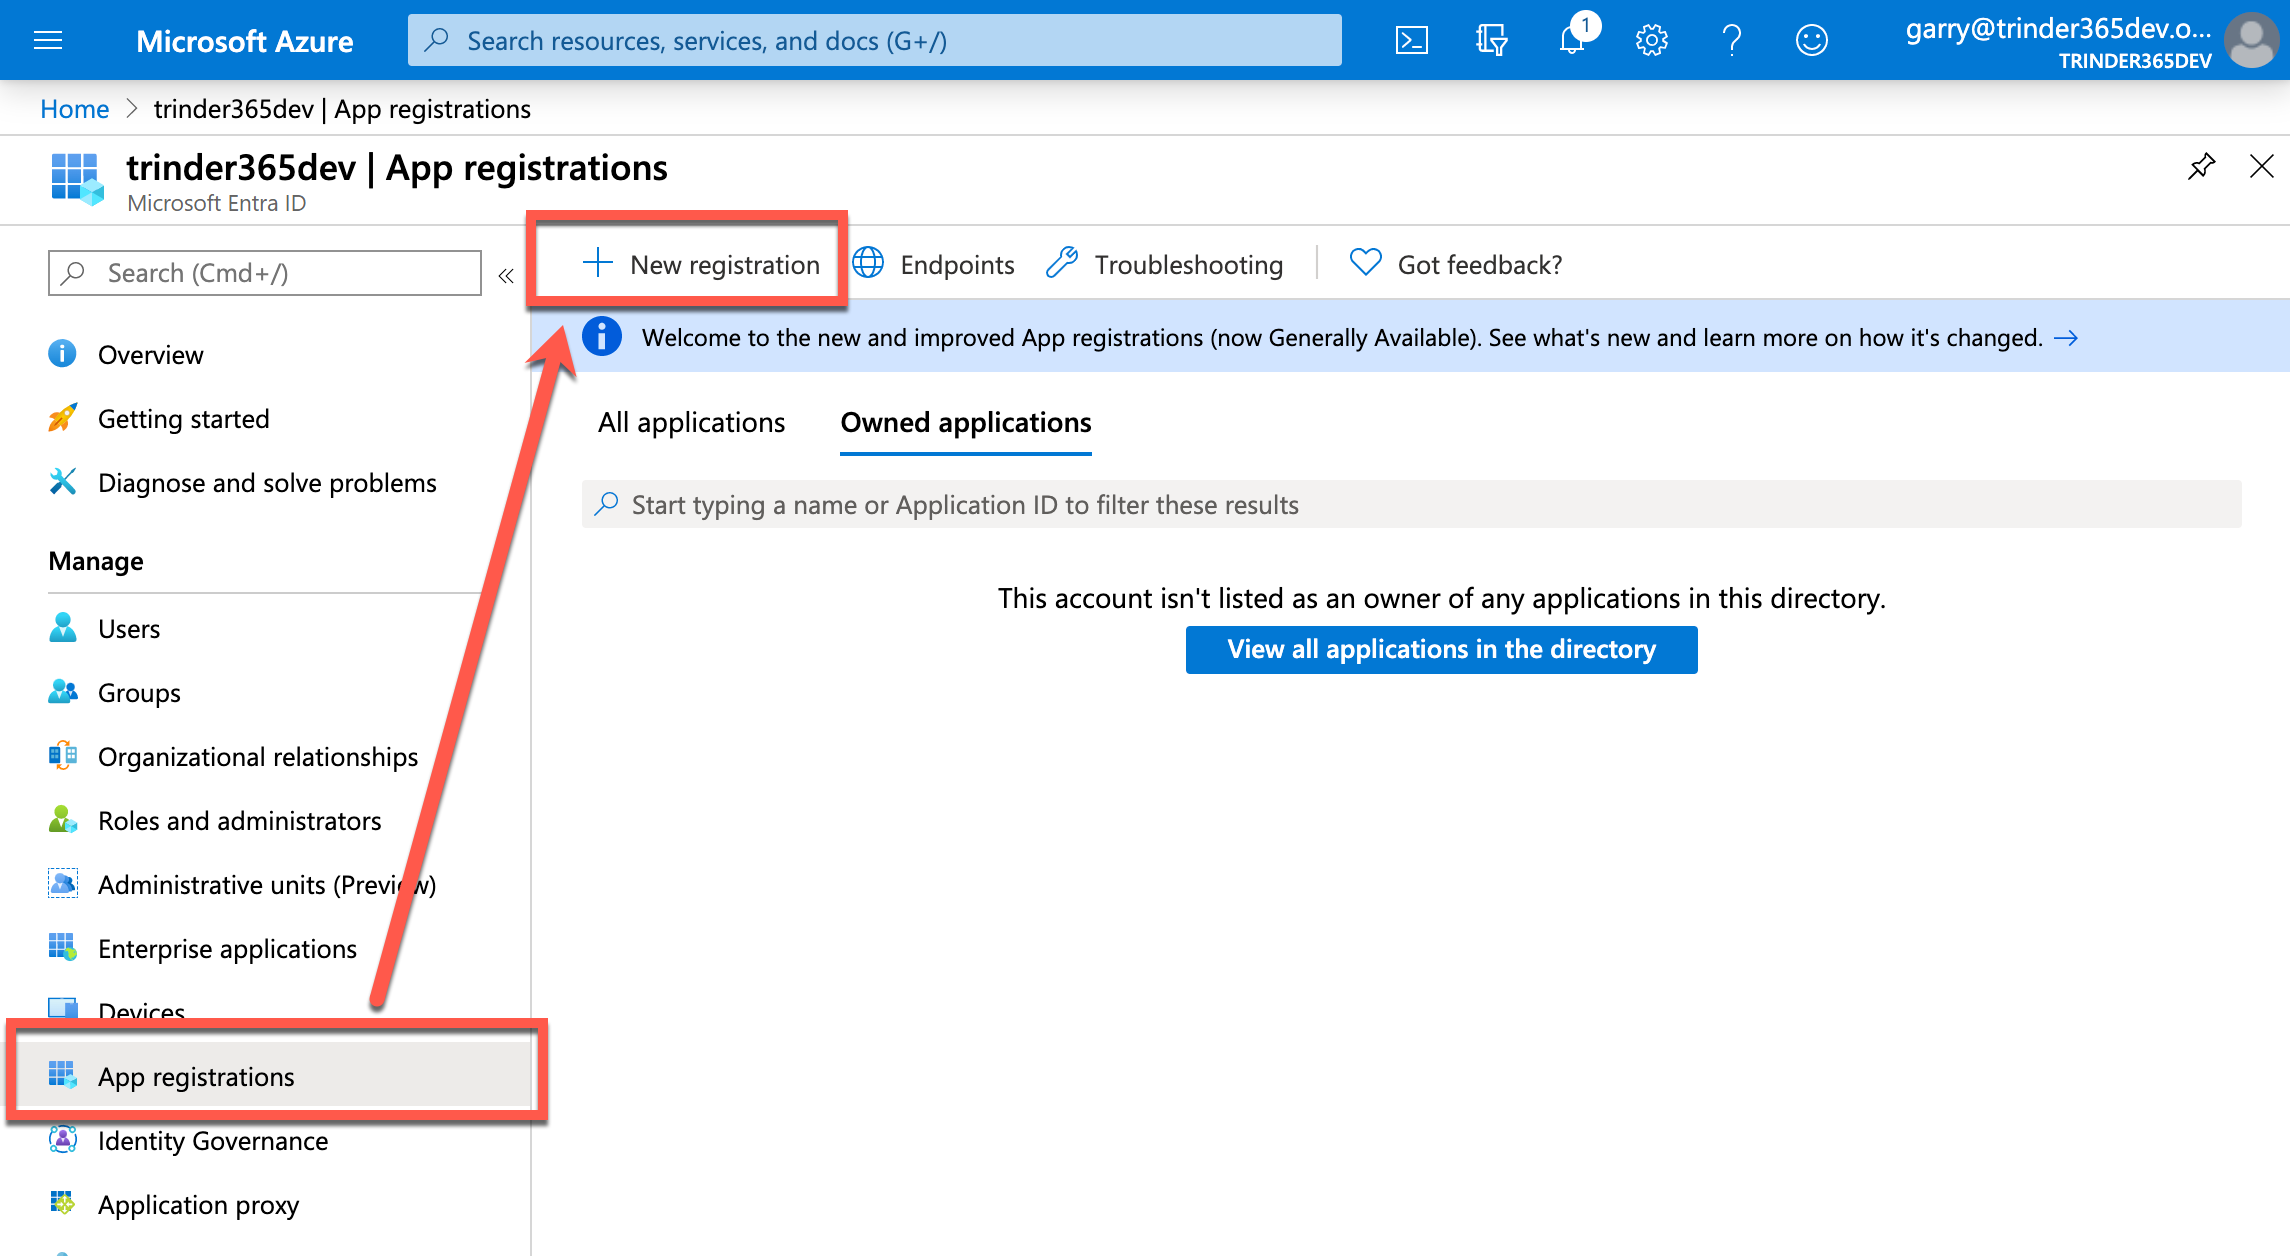
Select Microsoft Entra ID from the global menu, select app registrations in the Microsoft Entra ID blade and then select the New registration action button to open the Register an application form.
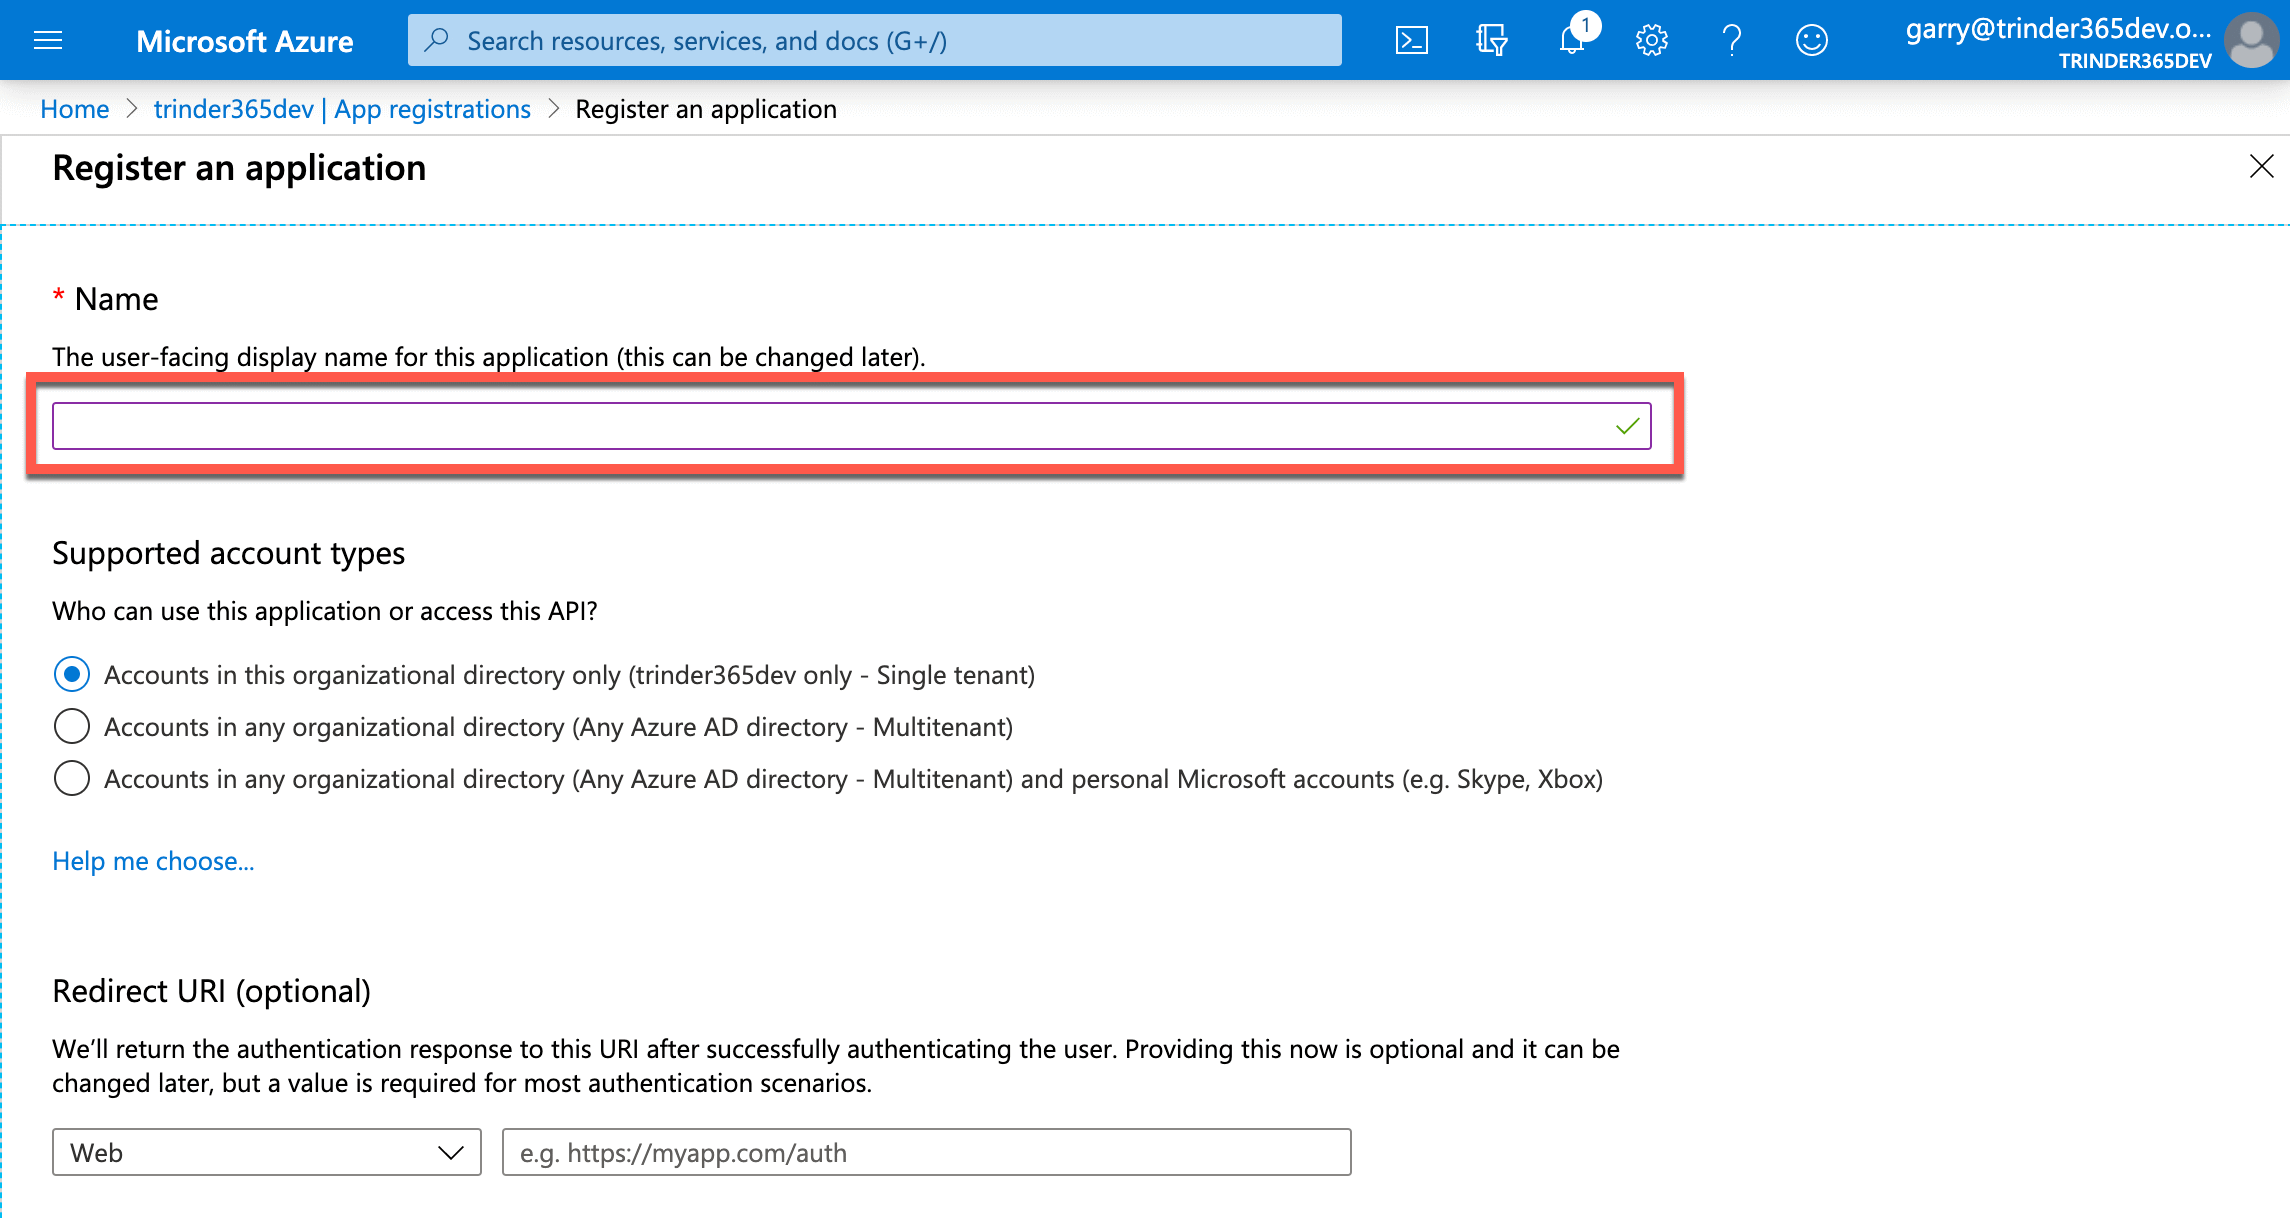
In the form, enter a name for your new application, for the purpose of this tutorial let's use Custom PnP CLI for M365. You can always change this later if you want. Leave the Supported account types and Redirect URI values as they are and select the Register button at the foot of the form to create your custom application.
After the application has been created, you will be presented with the blade for your application displaying an overview of some properties of the application. At this point it is a good idea to take note of two key pieces of information that we will need later.
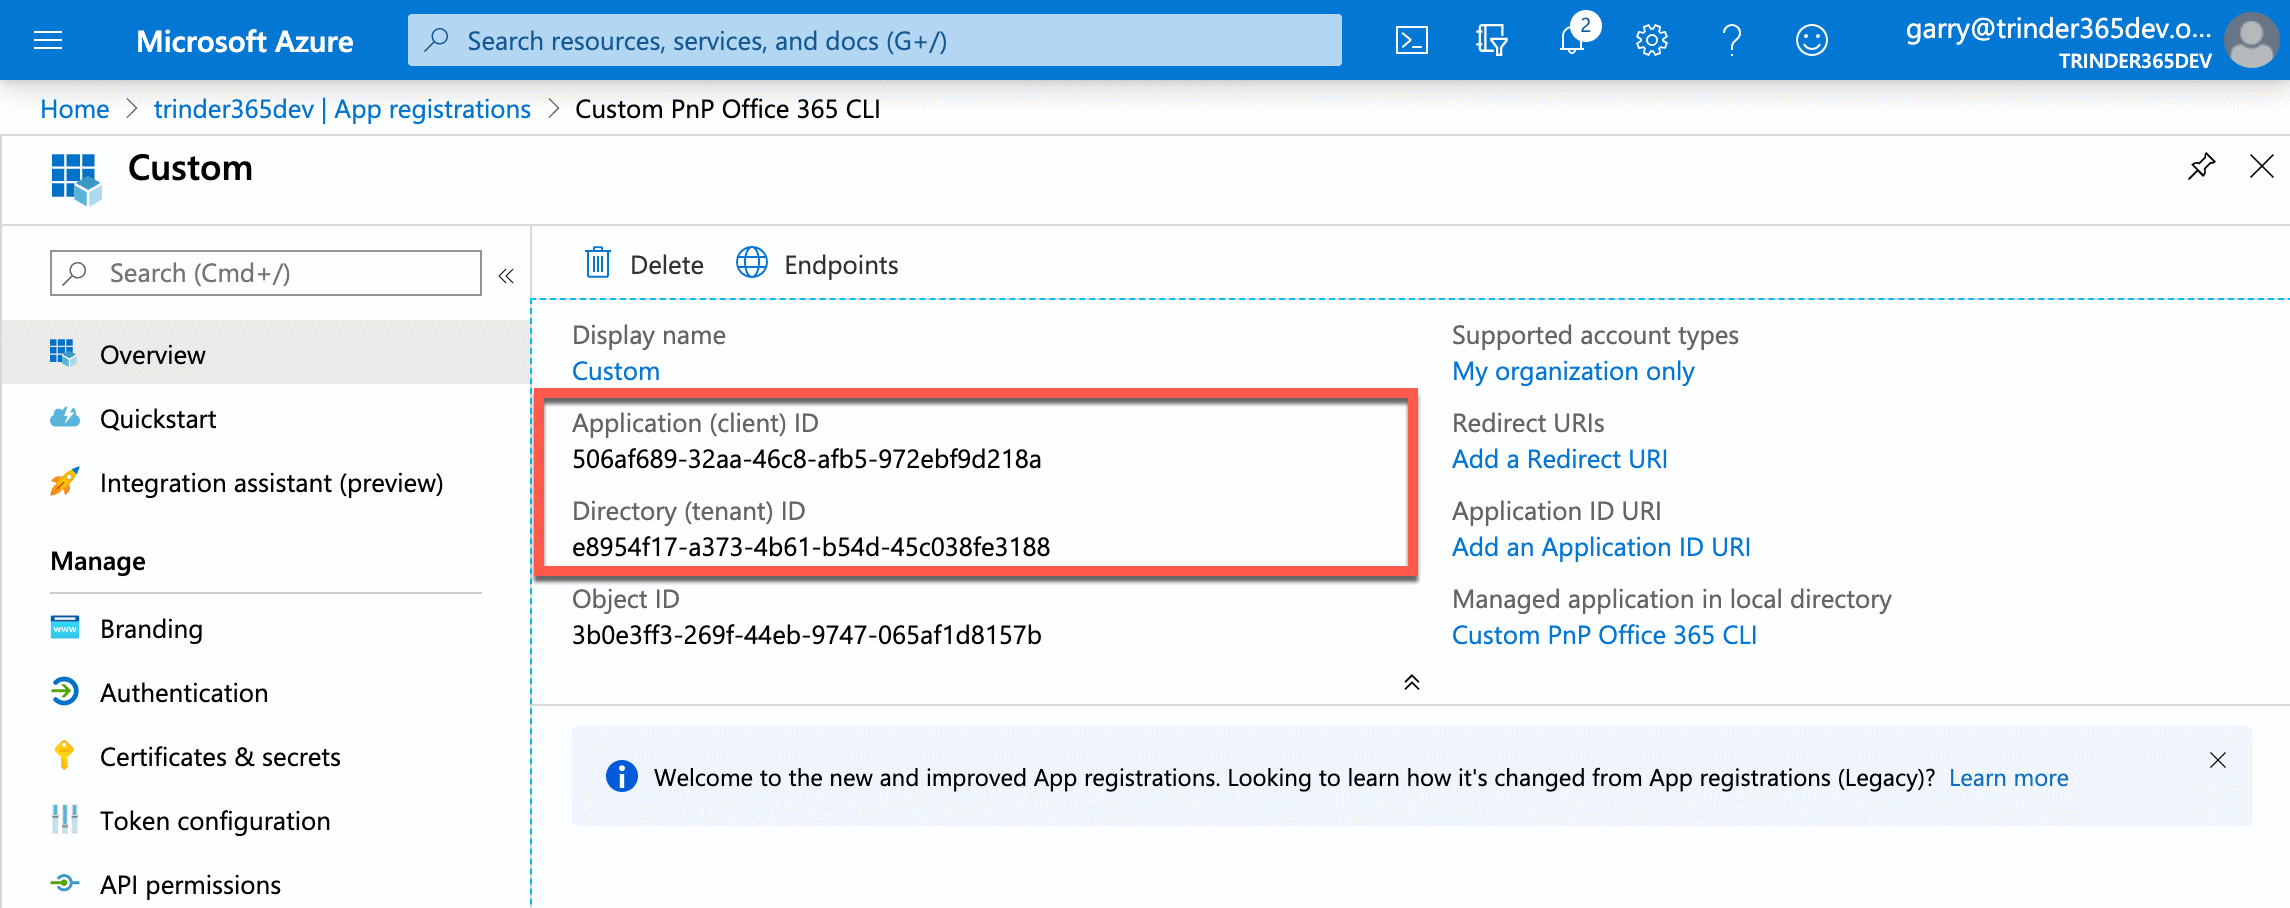
Take a copy of both the Application (client) ID and Directory (tenant) ID values and save them to a place for you to refer back to them later.
Configure Authentication settings
We next need to configure our new application so that it can be used with the CLI for Microsoft 365. To do this we need to select Authentication in the Custom PnP CLI for M365 blade menu.
This will present you with three sections: Platform configuration, Supported account type and Advanced settings.
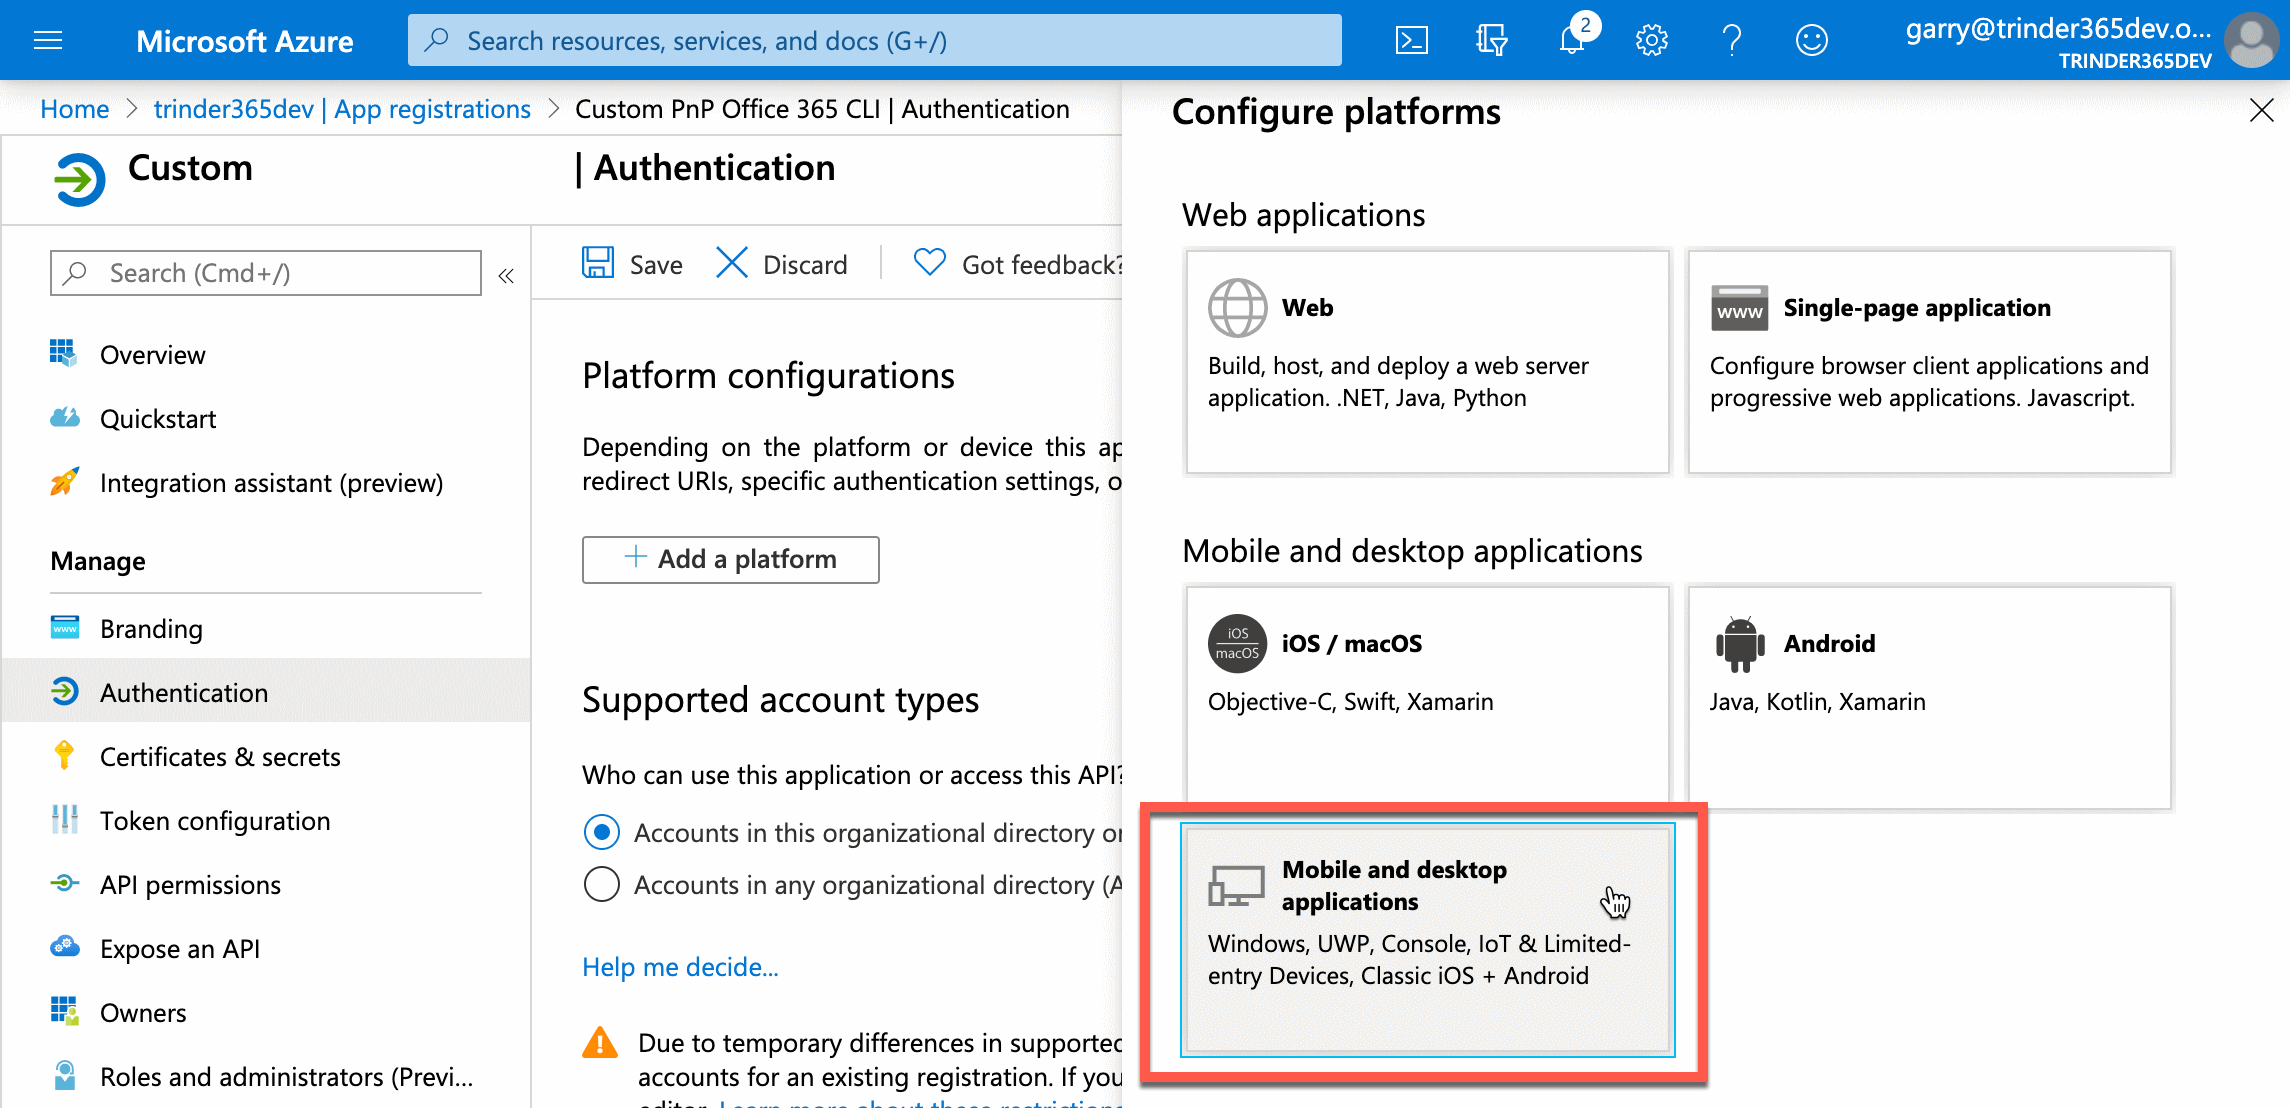
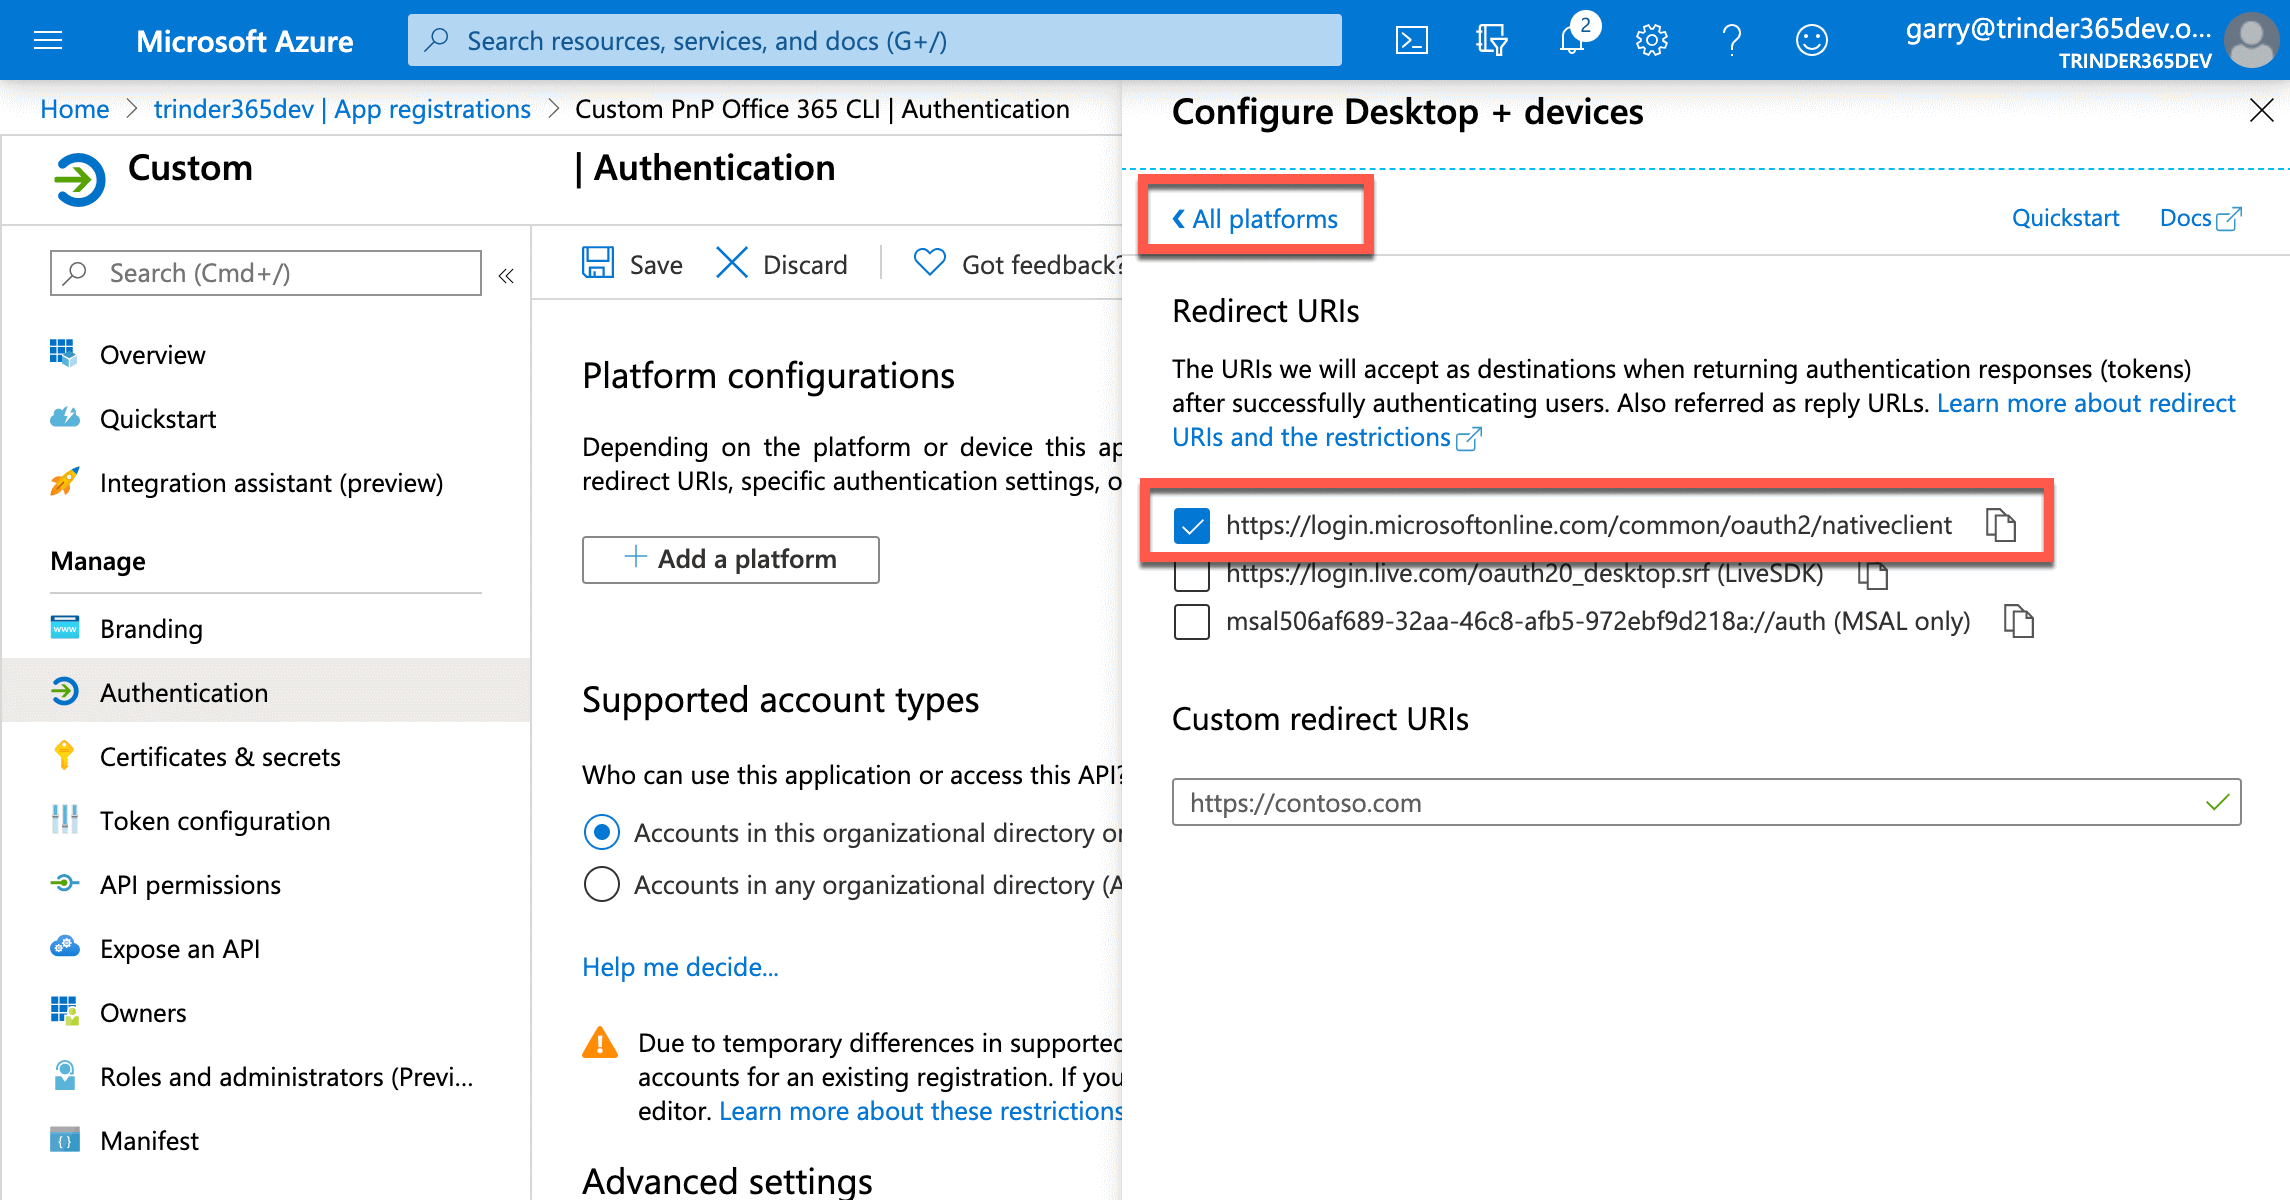
Select the Add a platform button to open up the Configure platforms menu and under the Mobile and desktop applications heading, select Mobile and desktop applications. This will open another menu called Configure Desktop + Devices displaying a section called Redirect URIs and a list of checkboxes with some pre-defined URIs.
Select the first option in the list, https://login.microsoftonline.com/common/oauth2/nativeclient and select the Configure button at the foot of the menu.
This will refresh the Authentication blade and will display the Redirect URI we just chose from the menu.
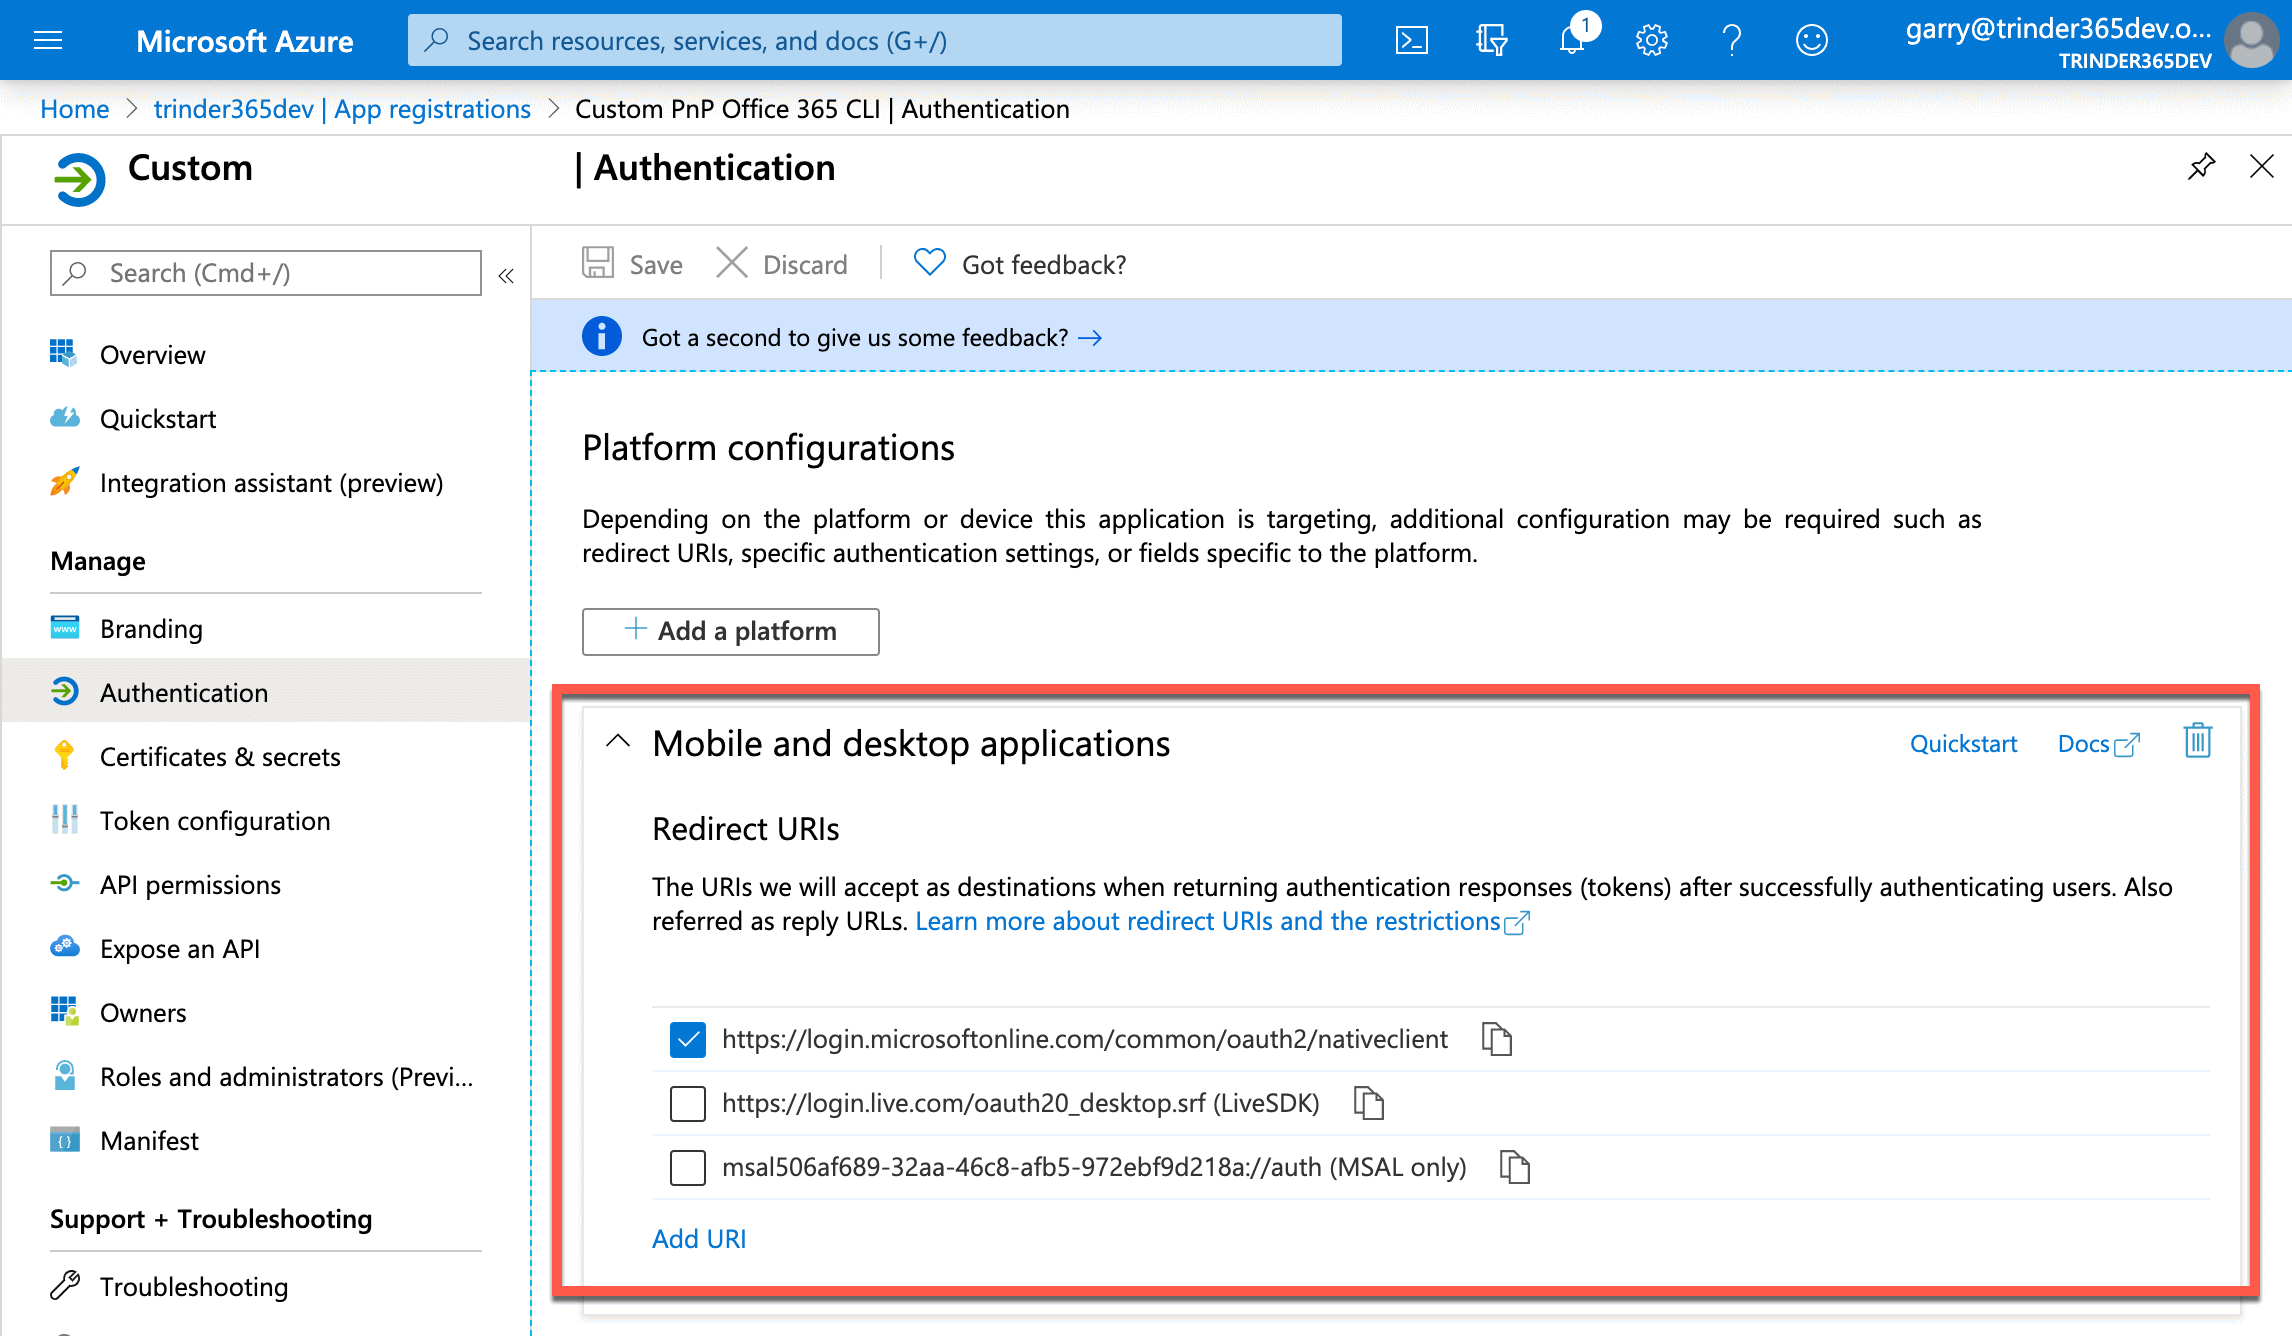
This Redirect URI is specific to the use of authentication methods that do not use a web interface for authenticating users and are therefore called Native Clients. This is the category that the CLI for Microsoft 365 falls into.
Moving on, we can skip over the Supported account type section, as this is defaulted to Accounts in this organizational directory only (<tenant> only - Single tenant) meaning, that only users within the current tenant directory can use this application. In the Advanced settings section, we need to enable the Allow public client flows toggle, as we are using the Device code flow method to authenticate to our tenant using the CLI for Microsoft 365.
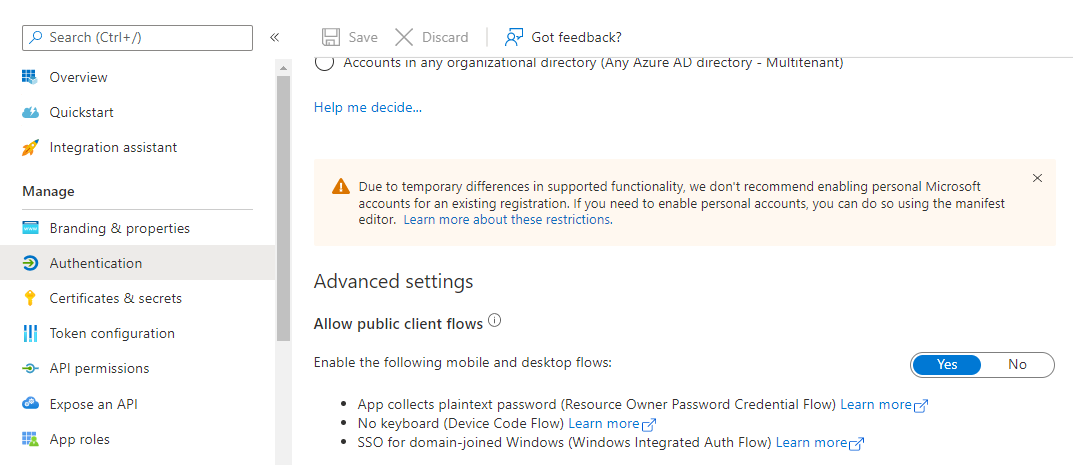
To make sure all these changes are applied, select the Save button before moving on.
Configure API Permissions
Now that we have configured the application to work with the CLI for Microsoft 365, we next need to grant what permissions the CLI will have within our tenant. Select the API permissions in the Custom PnP CLI for M365 blade menu.
You will see a section called Configured permissions with one permission already granted. This is the default permission which allows the application to sign in the user account used when authenticating to the Microsoft Graph.
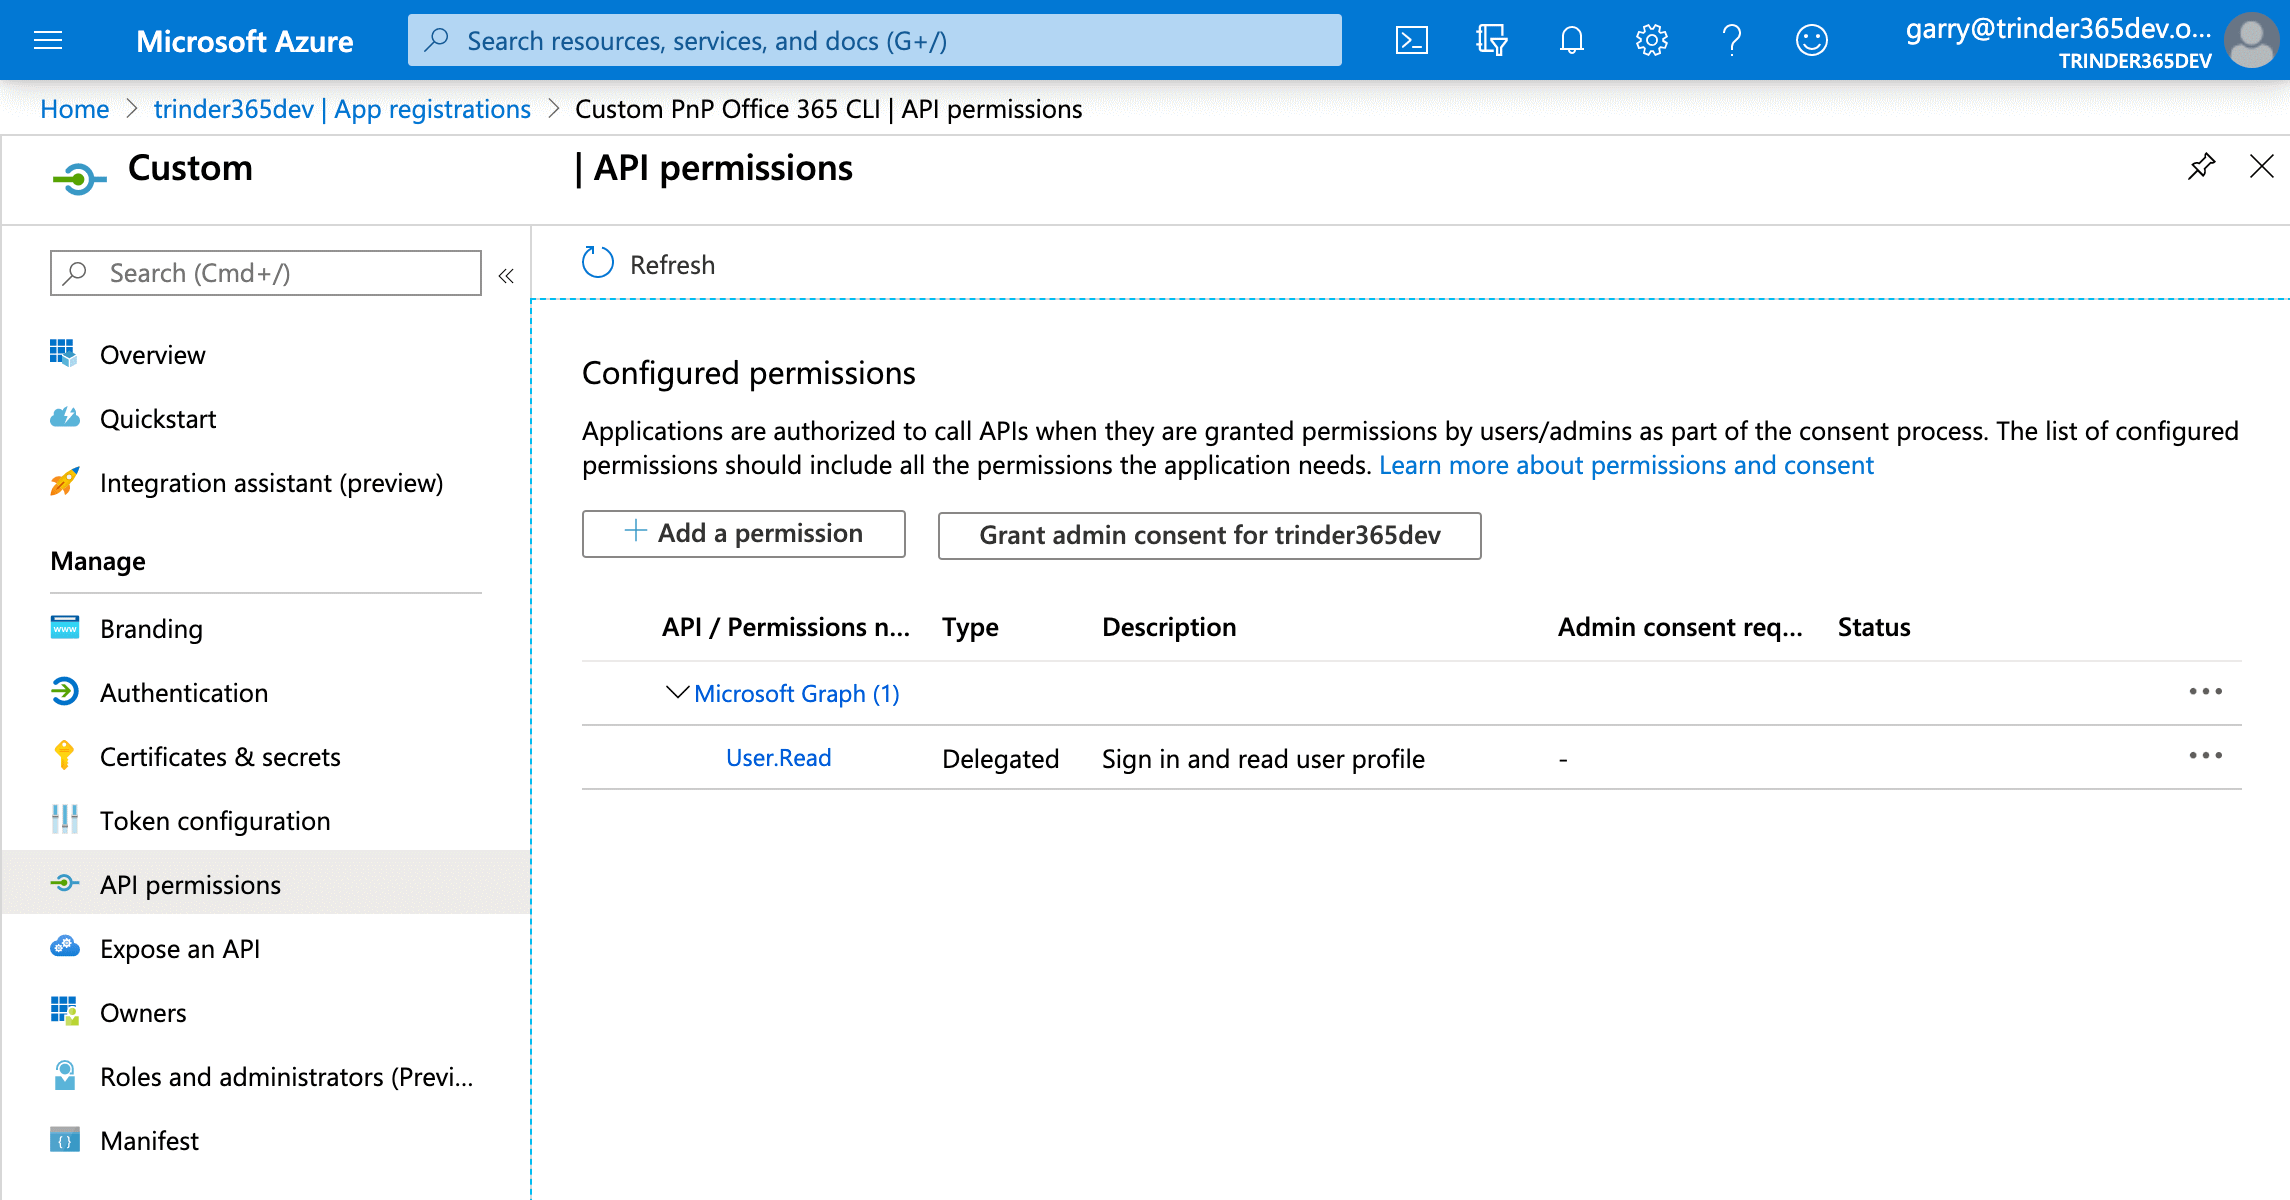
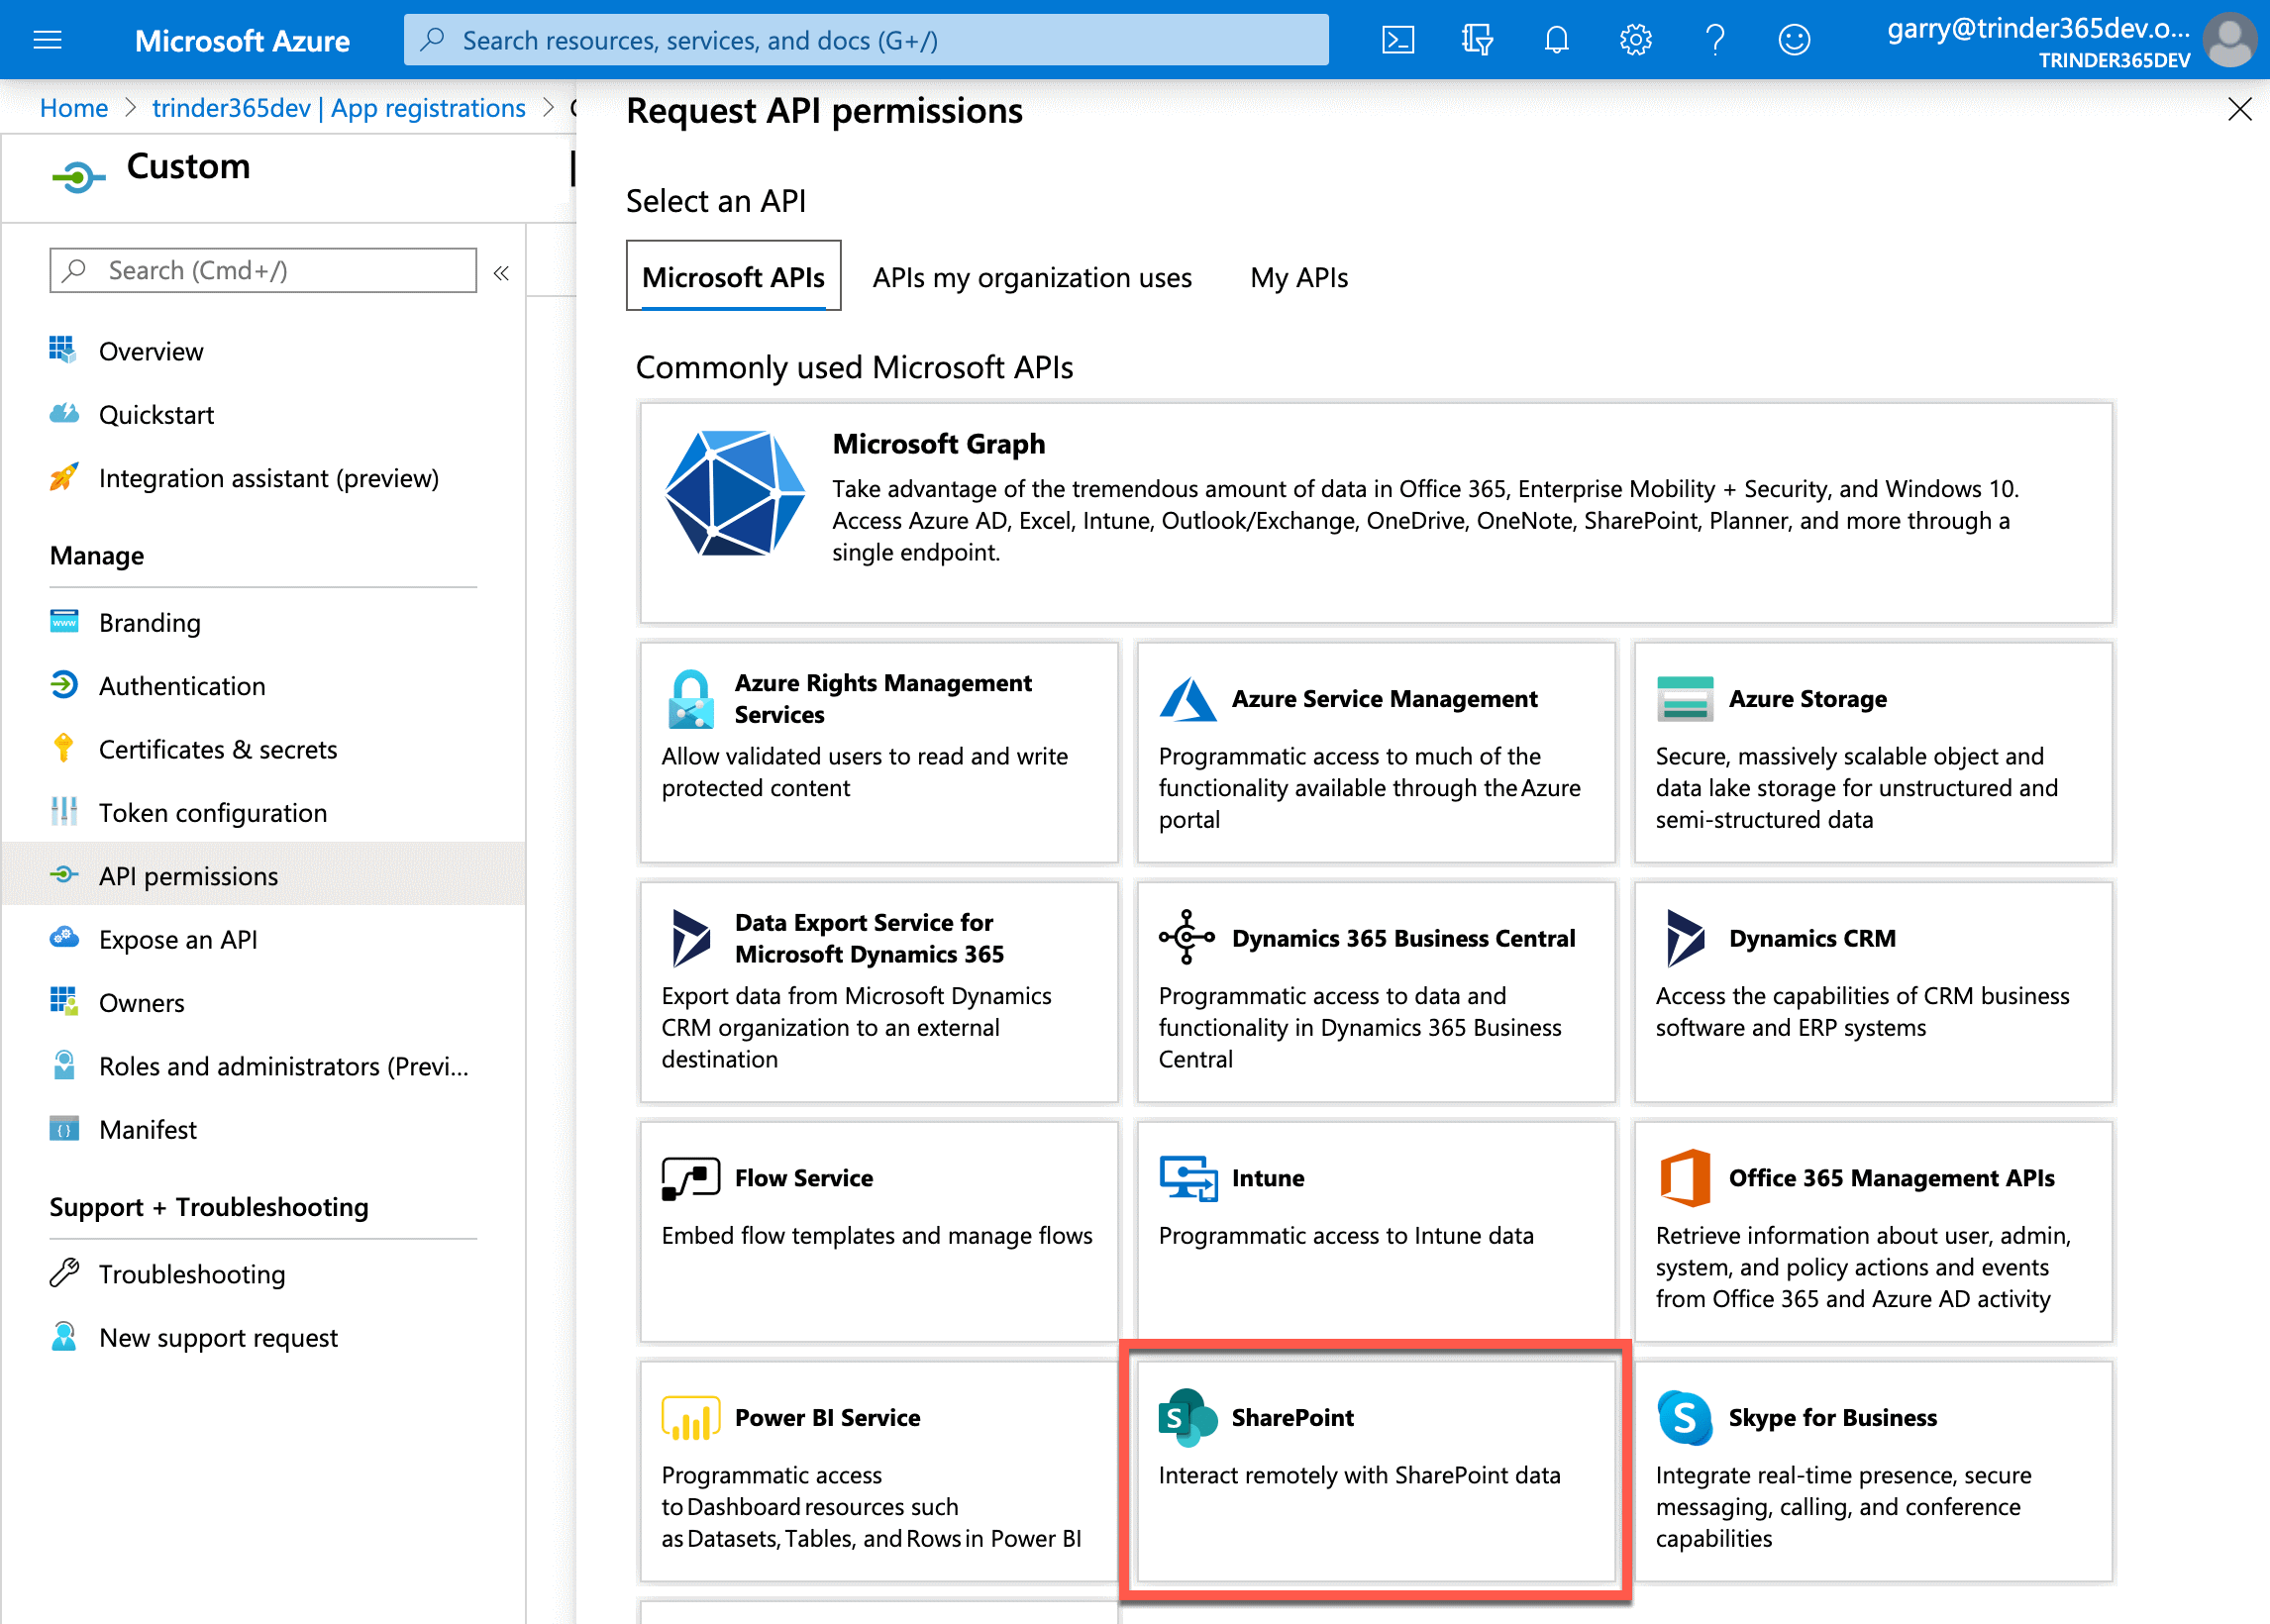
Select the Add a permission button to open the Request API permissions menu. As we are only interested in granting our application access to SharePoint Online for the purpose of this tutorial, select SharePoint in the list of APIs that are available.
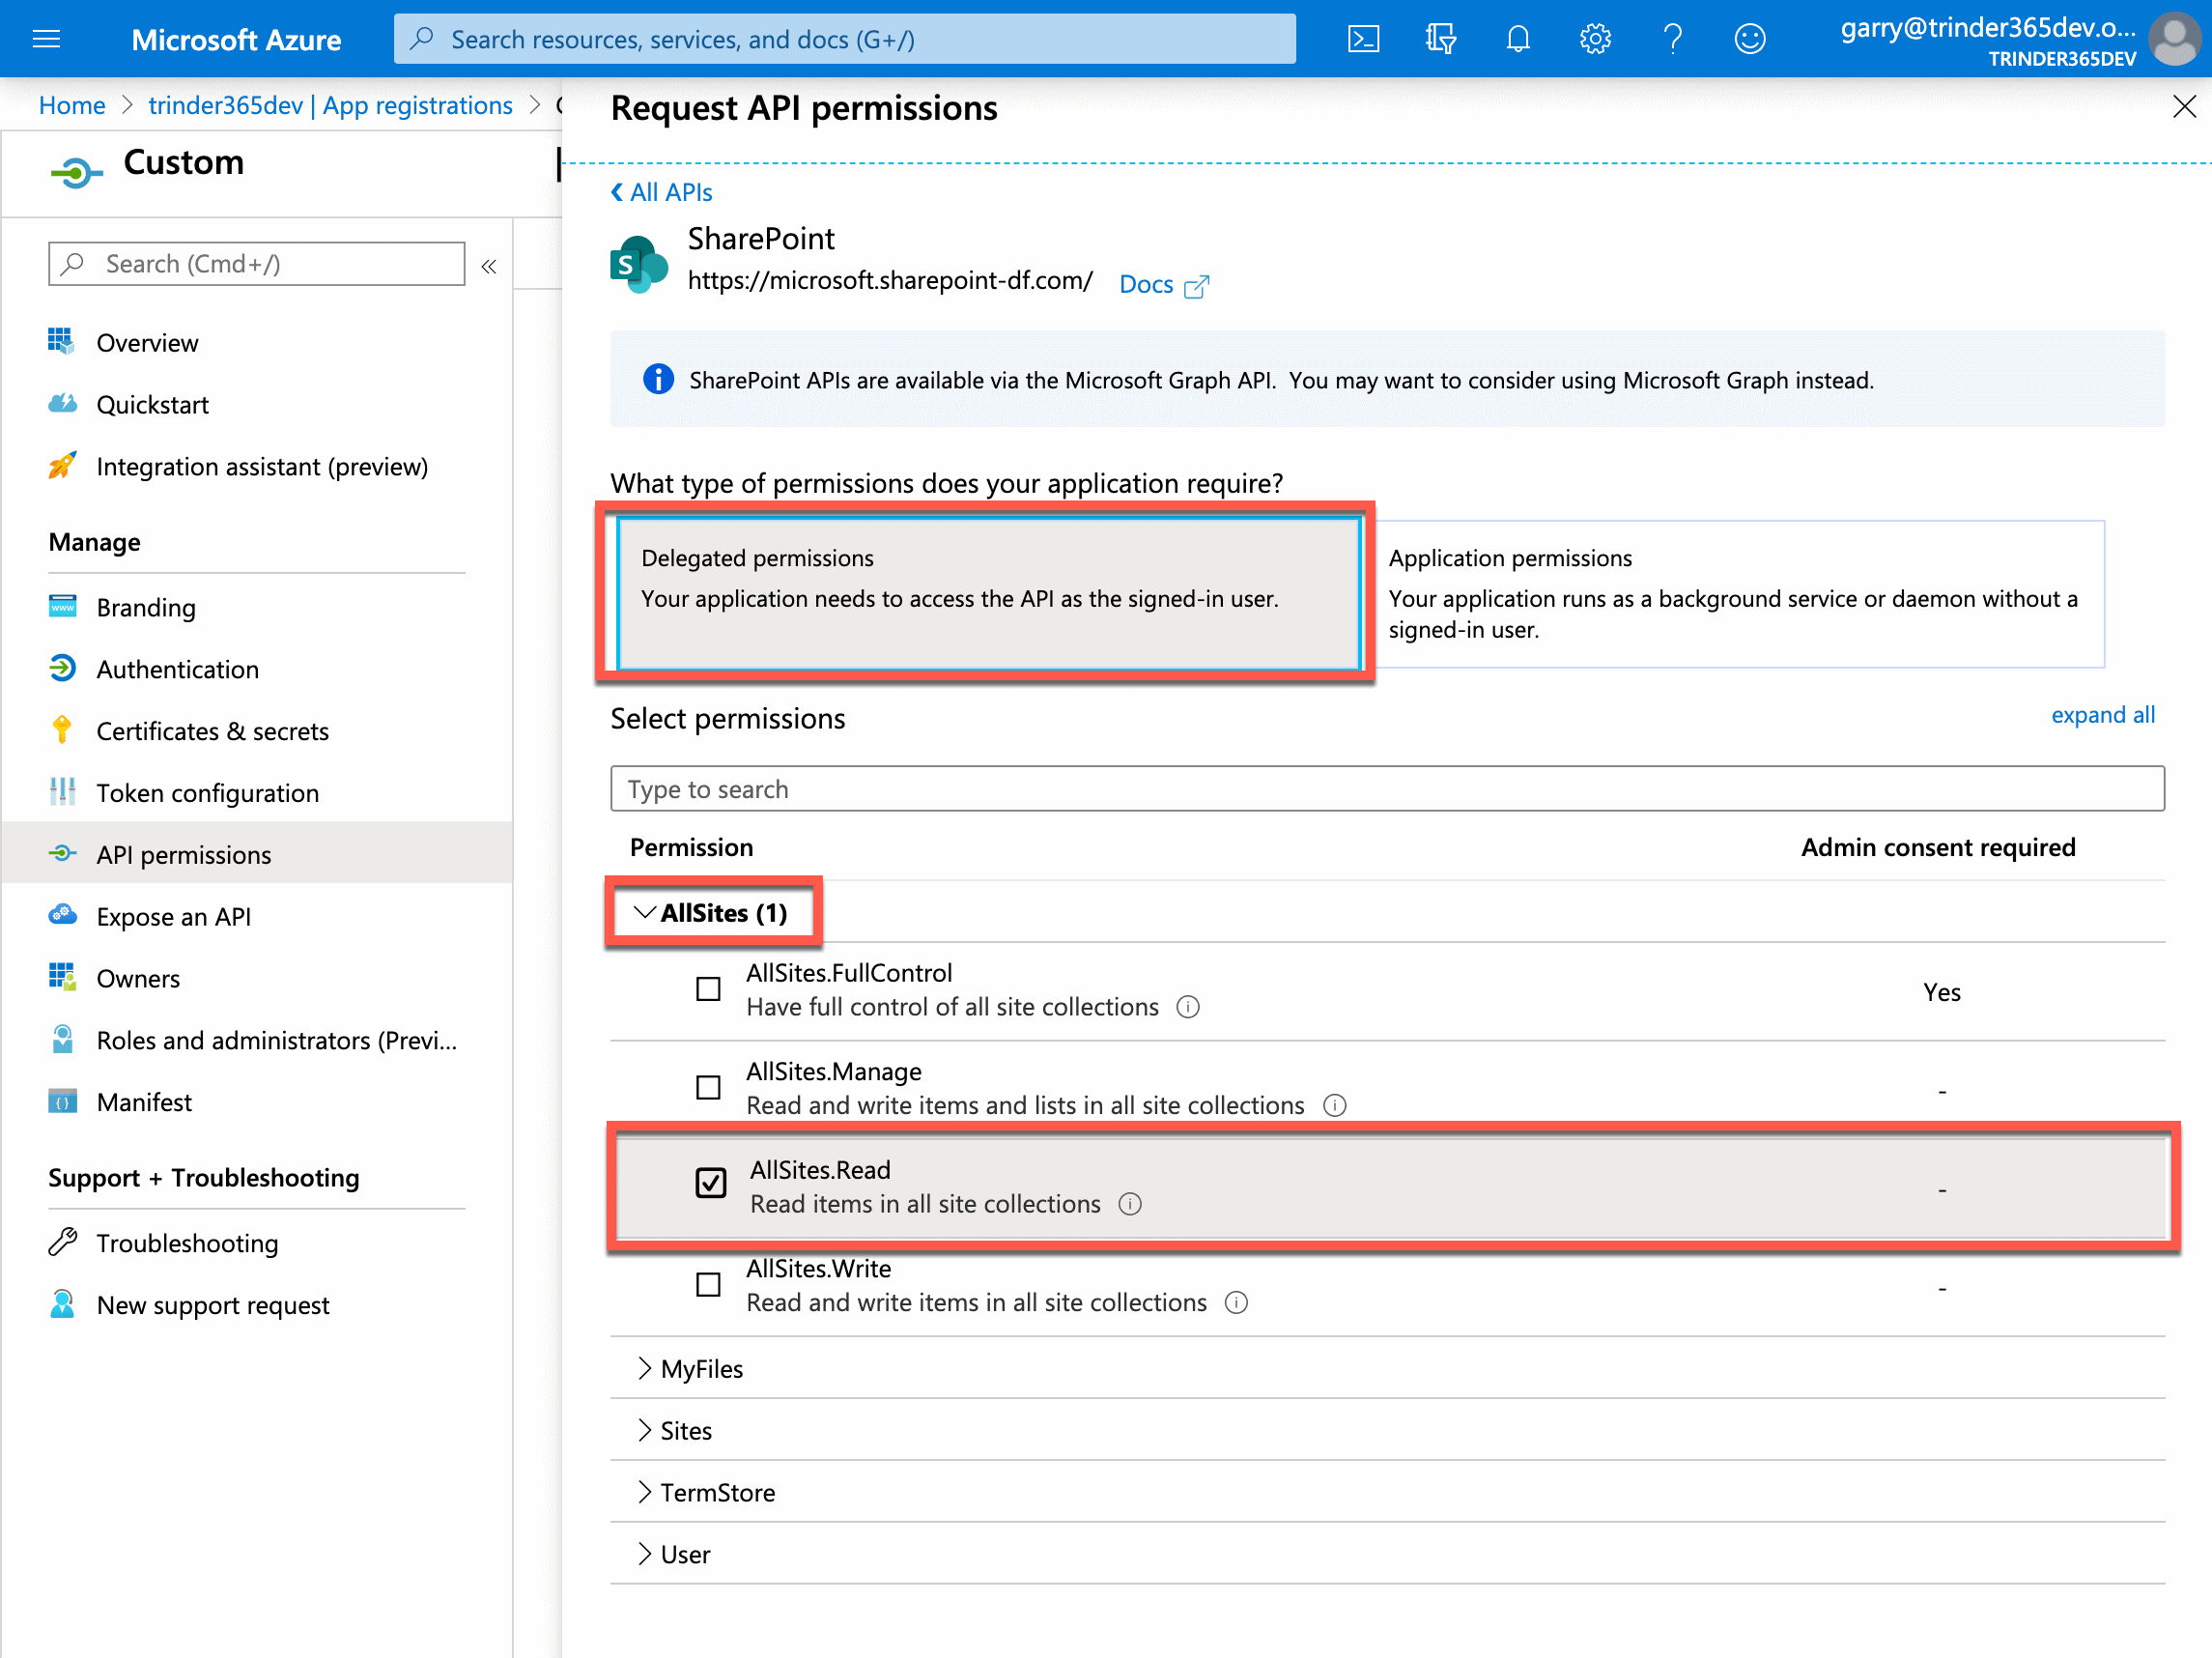
This opens the menu with two options: Delegated permissions or Application permissions. As we are going to be communicating with the SharePoint Online APIs as the authenticated user, select Delegated permissions. This will display a list of available permissions that we can choose from.
For the purpose of this tutorial we only want to grant read access to SharePoint Online, so expand the AllSites grouping and select the AllSites.Read permission. Next, select the Add permissions button to apply these permissions.
Note that the AllSites.Read permission does not directly grant the signed-in user access to all sites in SharePoint Online. As we authenticate as the signed-in user, that user must still have access to the SharePoint sites that we want to return information about, otherwise the SharePoint Online API calls will fail with a 401 Unauthorized error.
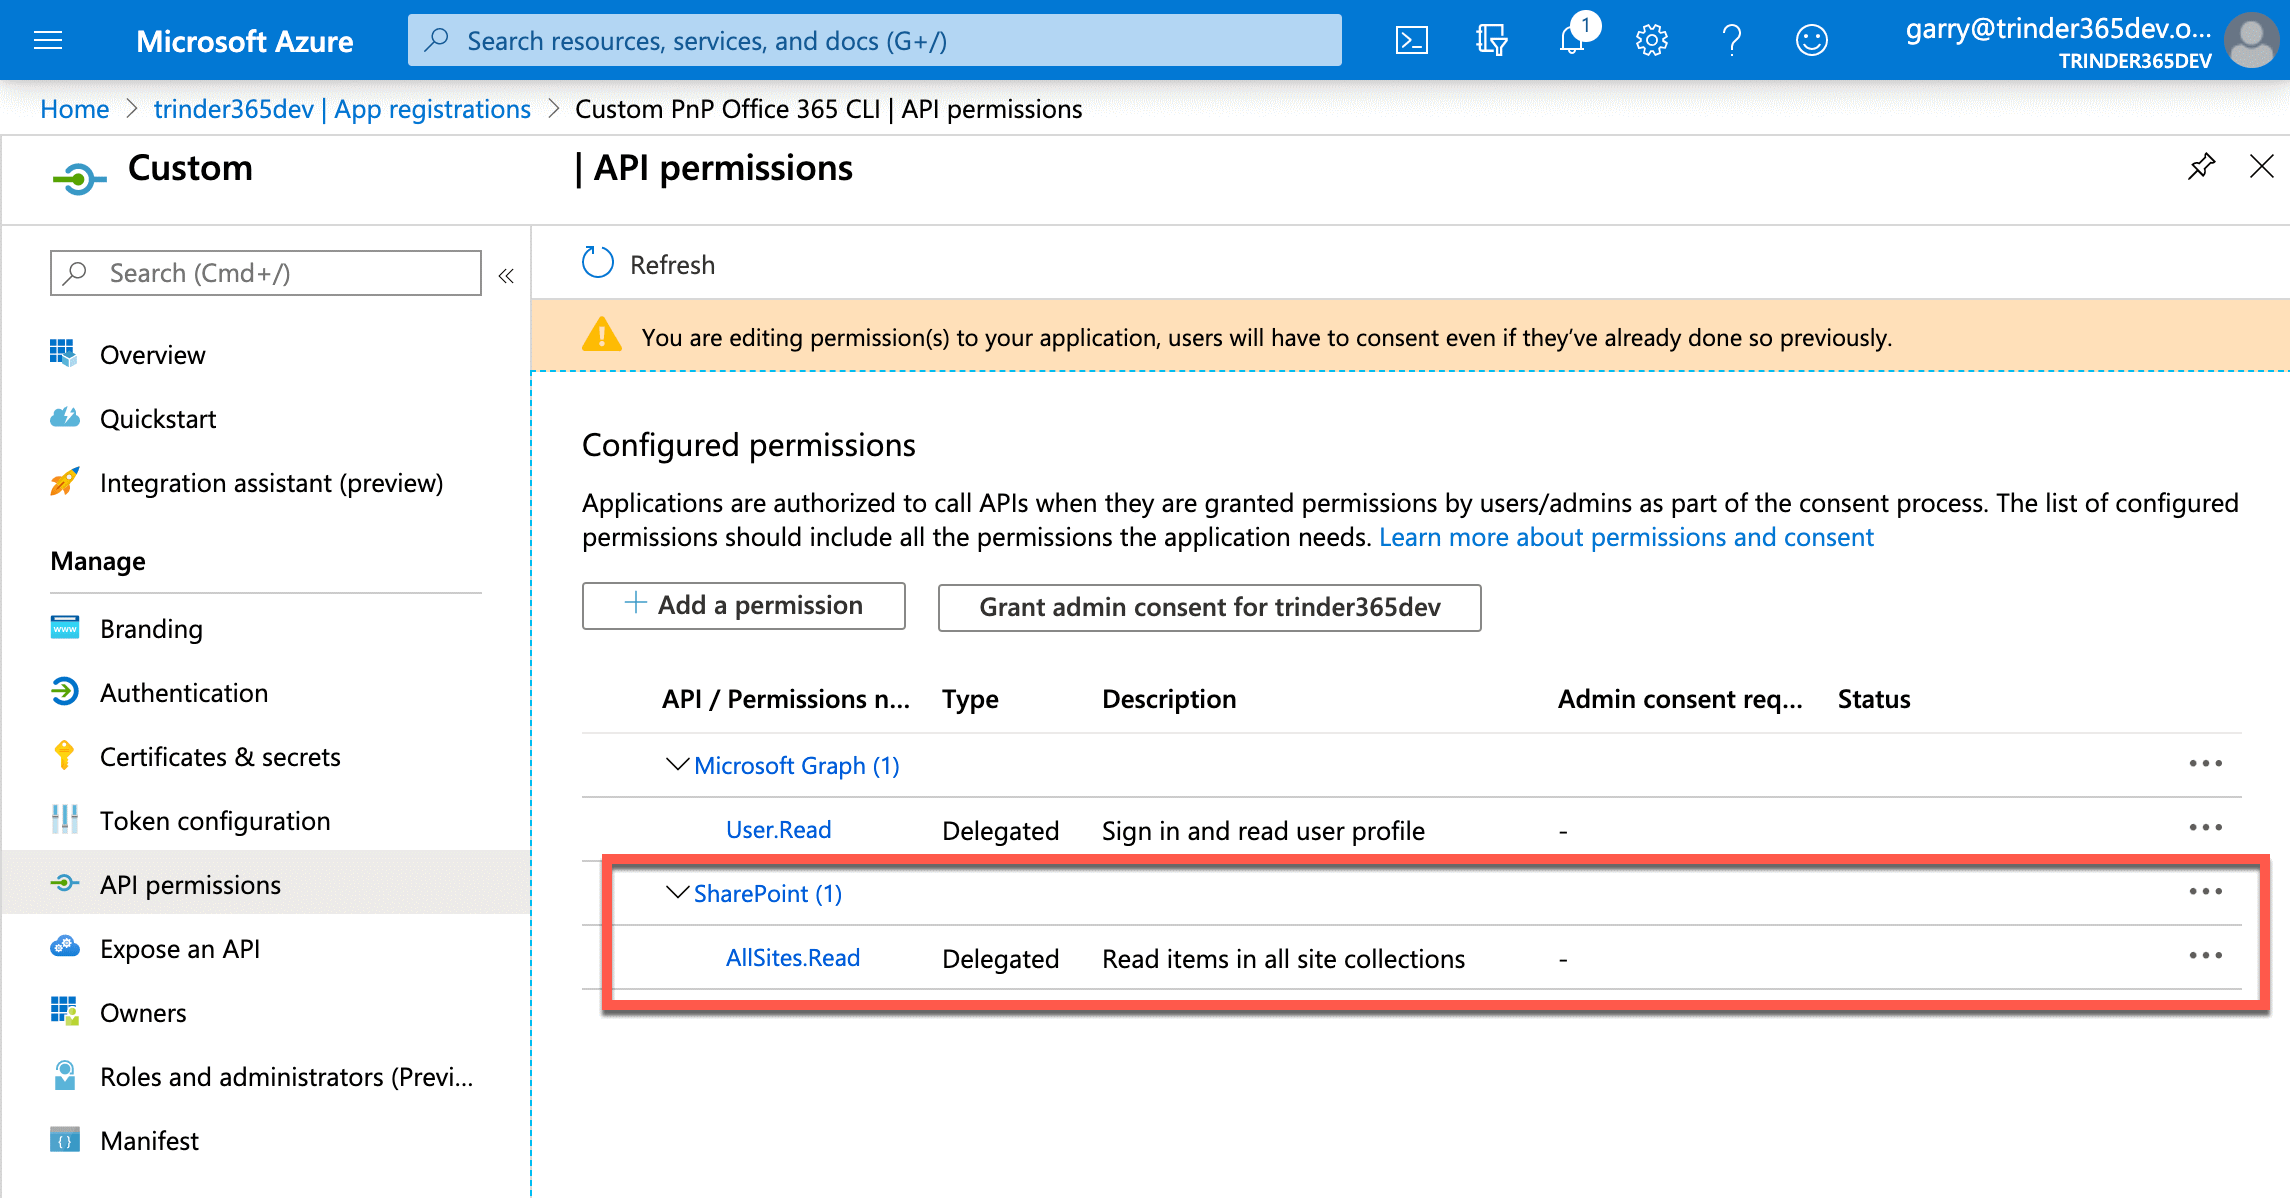
You will be presented with the Configured permissions section again but this time the AllSites.Read permission will be shown under the SharePoint grouping.
Note that when executing tenant level SharePoint Online commands, the CLI will attempt to autodiscover your tenant URL.
It will first check for the presence of an environment variable containing the tenant URL, which can be set by using m365 spo set command.
If this cannot be found, a request will be made to the Microsoft Graph. For this request to be successful, you must ensure that you have at least the Sites.Read.All permission granted to your application.
This completes the configuration required in the Azure portal. We can now move onto configuring the CLI for Microsoft 365 to use our custom application to login to Microsoft 365.
Create environment variables
To configure the CLI for Microsoft 365 to use our newly created custom application, we need to tell it the Client ID of our custom application and the Tenant ID of where the custom application has been created.
To do that, we need to create two environment variables, named CLIMICROSOFT365_ENTRAAPPID and CLIMICROSOFT365_TENANT, giving them the values that you saved earlier.
How you set the environment variables depends on the operating system and shell that you are using.
If you are on Windows, you can set the environment variables using the $env:<variable-name> approach in a PowerShell session.
$env:CLIMICROSOFT365_ENTRAAPPID="506af689-32aa-46c8-afb5-972ebf9d218a"
$env:CLIMICROSOFT365_TENANT="e8954f17-a373-4b61-b54d-45c038fe3188"
Execute $env:CLIMICROSOFT365_ENTRAAPPID and $env:CLIMICROSOFT365_TENANT to verify that the environment variables have been created correctly
If you are using Linux or macOS, you can set the environment variables using the export command from your terminal prompt.
export CLIMICROSOFT365_ENTRAAPPID=506af689-32aa-46c8-afb5-972ebf9d218a
export CLIMICROSOFT365_TENANT=e8954f17-a373-4b61-b54d-45c038fe3188
Execute printenv to verify that the environment variables have been created correctly
Now that we have set our environment variables, we are now ready to use our custom application to log in with using the CLI for Microsoft 365.
Login and consent
For the purpose of this tutorial, we will be using the Device code flow to interactively authenticate with an Microsoft 365 tenant. As this is the first time that we will have used the custom application to authenticate, we will also be required to give our consent.
At your terminal session, execute m365 login to start the authentication process, a login device code will be displayed along with a link to a web page where it needs to be entered. Navigate to https://microsoft.com/devicelogin, enter the code into the input field and select Next. You will then be presented with either a login screen or accounts that you have already logged in to Microsoft 365 with. Login with or choose the account from the list that you want to use with CLI for Microsoft 365.
You will now be prompted to consent that the custom application, Custom PnP CLI for M365, can use the two permissions that we configure earlier, Read items in all site collections and Sign you in and read your profile on your behalf. Select Accept to consent and complete the sign-in process.
Returning back to your command line, you can now verify that the sign in has been successful by executing the m365 status command.
Finally, to test that we can indeed read SharePoint Online site collections, let's invoke the following command
m365 spo site get --url https://contoso.sharepoint.com -o json
The JSON representation of the SharePoint Online site will be returned to the console.
Congratulations! You have just configured the CLI for Microsoft 365 to use your own custom application with custom permissions from your own Microsoft Entra ID.
Persisting environment variables
As mentioned earlier, the way in which we set the environment variables meant that they are only set for the lifetime of the session, if the terminal session is closed, you will need to repeat those steps, which may be undesirable.
How you permanently set the environment variable is dependant on the operating system and shell you are using.
If you are on Windows, you can set the environment variables using the Edit the system environment variables approach in the Windows UI.
Search for Edit the system environment variables in Start Menu and launch it. Select Environment Variables, under the User variables for <user-name> section, select New... to add a new variable. In the dialog, in the variable name field enter CLIMICROSOFT365_ENTRAAPPID and set the value using the Client ID (quotes should be omitted). Select OK to save the value and repeat the process for the CLIMICROSOFT365_TENANT variable. Select OK until all windows are closed to persist the changes.
Open a new PowerShell session and execute $env:CLIMICROSOFT365_ENTRAAPPID and $env:CLIMICROSOFT365_TENANT to verify that the environment variables have been created correctly.
If you are on Linux or MacOS, depending on your terminal, add the export lines to .bashrc or .zshrc file in your home directory.
If you are using PowerShell, it is worth noting that environment variables set in bash or zsh will persist to the pwsh session and the same applies to Windows.