PnP Core SDK - Azure Function with Managed Identity Sample
Important
Beginning 10 November 2026, the in-process model for .NET apps in Azure Functions will no longer be supported. To ensure that your apps that use this model continue being supported, you'll need to transition to the isolated worker model by that date. Retirement: Support for the in-process model for .NET apps in Azure Functions ends 10 November 2026. Please use the new version of this sample: Azure V4 Function using managed identity (isolated)
This solution demonstrates how to build Azure function that connects to a SPO site using:
- System-Managed Identity, when running in Azure and
- Azure Ad application (App Registration) during local development.
The Authentication Provider is selected based on the presence of the MSI_SECRET token, which is only available if Managed Identity is enabled.
When the function is executed in Azure, it uses custom ManagedIdentityTokenProvider authentication provider, which invokes Azure.Identity.ManagedIdentityCredential class to attempt authentication using a managed identity that has been assigned to the Azure Function.
For local development, certificate-based authentication with X509CertificateAuthenticationProvider is required.
App-only authentication against SharePoint Online requires certificate based authentication for calling the "classic" SharePoint REST/CSOM APIs. The SharePoint Graph calls can work with clientid+secret, but since PnP Core SDK requires both type of APIs (as not all features are exposed via the Graph APIs) you need to use certificate based auth.
This solution follows the principle of least privilege, by using Sites.Selected application permissions for Graph and SharePoint APIs, and Read/Write/FullControl permissions granted to a specific SPO site.
Always choose minimum required permissions.
Source code
Note
This sample was authored by Kinga Kazala 💪🥇.
You can find the sample source code here: /samples/Demo.AzFunction.ManagedIdentity
Note
This sample was created with Visual Studio Code using .NET 6.0 and has been created as an Azure Function v4 running in-process.
Sample configuration
Note
For the sample setup, you will need to have a recent version of PnP.PowerShell installed on your machine.
Create and configure the Azure AD applications
The Azure Function must have System-Managed Identity enabled. Before you execute the next steps, make sure you enable System-Managed Identity.
The configuration script:
- Creates a new App Registration with a name
{$appName}-LocalDevand generates a new self-signed certificate - Grants
Sites.SelectedAPI Permissions to the{$appName}Managed Identity and the{$appName}-LocalDevAzure AD application - Grants permissions defined in
Permissionsparameter to the{$appName}Managed Identity and the{$appName}-LocalDevAzure AD application - saves the site and tenant information, client id and the certificate thumbprint to the
local.settings.jsonconfiguration file.
{
  "IsEncrypted": false,
  "Values": {
    "AzureWebJobsStorage": "UseDevelopmentStorage=true",
    "FUNCTIONS_WORKER_RUNTIME": "dotnet",
    "SiteUrl": "",
    "TenantId": "[TENANT ID]",
    "ClientId": "[CLIENT ID]",
    "CertificateThumbPrint": "[CERTIFICATE THUMBPRINT]",
    "WEBSITE_LOAD_CERTIFICATES": "[CERTIFICATE THUMBPRINT]"
  }
}
Important
Currently, you cannot manually grant API Permissions to the System-Managed Identity
Execute the Configure.ps1, defining the Permissions level that your application requires.
This sample requires FullControl permissions because it creates a new list.
Note
You may decide to only grant Write permissions to see the REST errors once the code reaches method requiring FullControl permissions.

.\Configure.ps1 -SiteUrl $siteUrl -TenantId $tenantId -AzureADAppName $appName -Permissions FullControl -CertificatePwd ""
Important
- To consent to the application permissions, make sure you are an Azure AD admin or a global admin in your tenant
Run the sample locally
Note
Before you get started, make sure to configure your environment.
To test your code locally, follow the Run the function locally procedure.
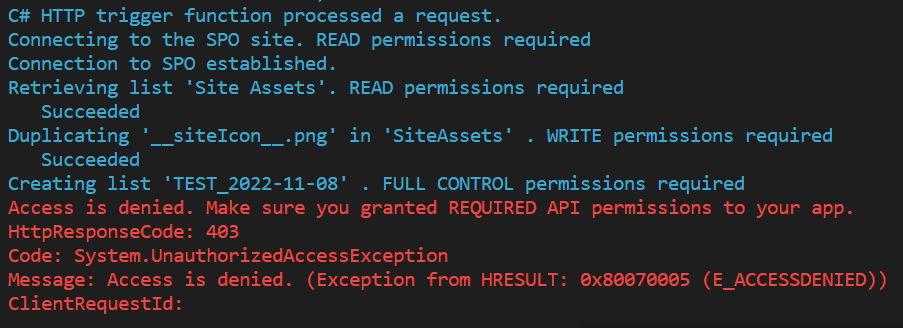
Observe the output printed to the Terminal. It will confirm you are running your code locally ("Local DEV using cert auth"), authenticate to the SharePoint site and attempt to execute functions requiring Read, Write and FullControl permissions.
In case you only granted Write permissions to the app, you will see an error message when the function attempts to create a new list.
If you granted FullControl permissions, all the steps will be completed successfully.
Deploy the sample to Azure
Create Azure Function App
Go to the Azure Portal and create a new Function App (consumption plan) using following settings:
- Publish: Code
- Runtime stack: .NET
- Version: 6
- Region: pick the region that works best for you
- Plan type: Consumption (Serverless)
Click Review + create, verify the settings and click Create. Now your function is provisioned in Azure.
Configure the Function App
Once the Function App has been created navigate to Settings -> Configuration and add the following Application setting:
| Name | Value |
|---|---|
| SiteUrl | the Url of your SPO site, e.g. https://contoso.sharepoint.com/sites/subsiteName |
Click Save to persist the changes.
Note
You don't need TenantId, ClientId, CertificateThumbPrint or WEBSITE_LOAD_CERTIFICATES application settings when using Managed Identity authentication.
Under Function runtime settings verify the Runtime version is set to ~4.
Deploy the Function App code from Visual Studio
To deploy the project to Azure:
Test your Function App in Azure
Test the function in Azure using the run the function in Azure procedure.

