Using CLI in an Azure Function with PowerShell
This guide will walk you through setting up an Azure Function that uses PowerShell to run scripts leveraging CLI for Microsoft 365. We'll start from scratch, covering all necessary Azure resources, permissions, and configurations.
Prerequisites
In order to follow this guide smoothly, we assume that certain things are already present in your environment. The tools listed below are used in this guide. While they are not mandatory to use, they are recommended when you are following this guide.
Apart from this IDE, you will need the following extensions for Visual Studio Code:
Setting up Azure resources
-
Navigate to the Azure portal.
-
Create a new resource group.
Create a new resource group by searching for "resource group" in the search bar and clicking the
Createbutton. Pick a suitable name and location for your resource group.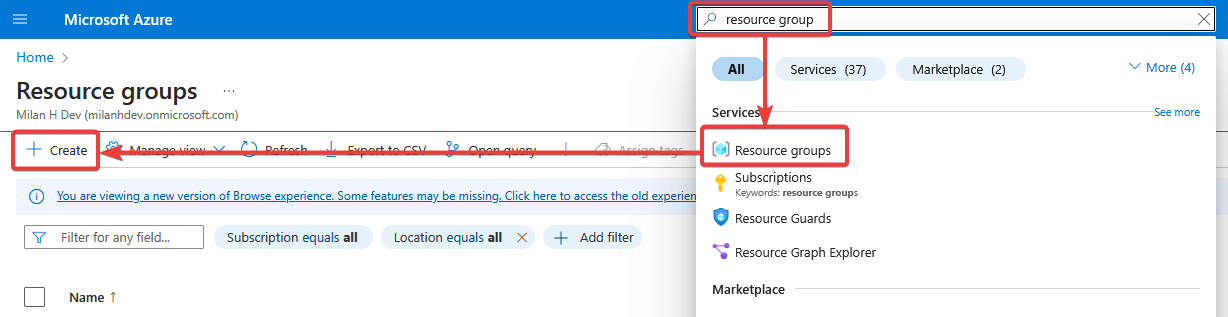
-
Create a new Function App.
Create a new Azure Function App in the resource group you just created.

In this guide, we are creating an Azure Function with a consumption plan. Fill out the required fields of the form and click the
Review + createbutton. While CLI for Microsoft 365 works on multiple platforms, this guide only explains the setup on a PowerShell Azure Function running on Windows.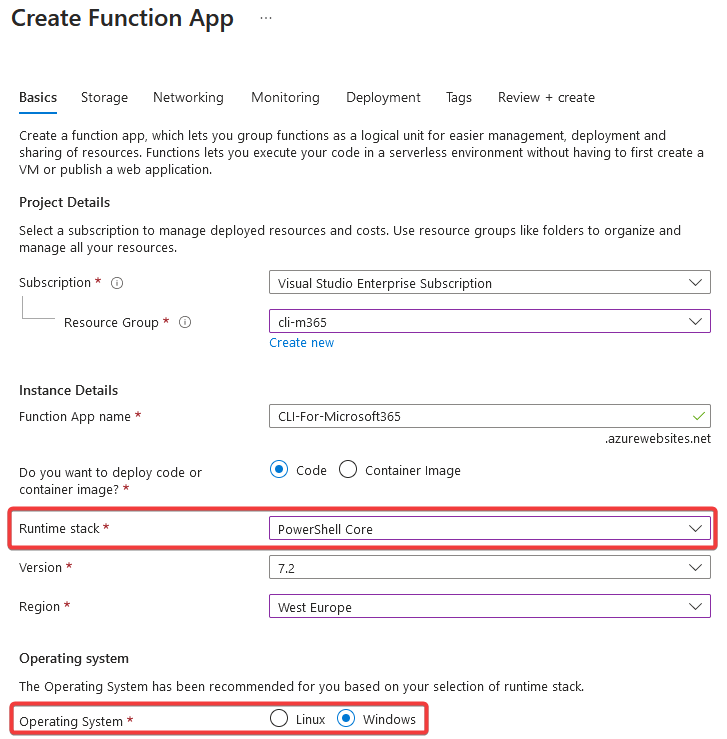
-
Wait for the creation to complete and open the Azure Function app.
-
Set up the environment variables.
Navigate to the
Environment variablestab. Over there, add a new environment variable with the nameWEBSITE_NODE_DEFAULT_VERSIONand value~20to set the right Node version. Finally, pressApply.noteAt the time of writing, the LTS version of Node.js is v20. We recommend running CLI for Microsoft 365 on the LTS version of Node.js. Visit the website of Node.js to discover the current LTS version of Node.js and update the
WEBSITE_NODE_DEFAULT_VERSIONenvironment variable accordingly.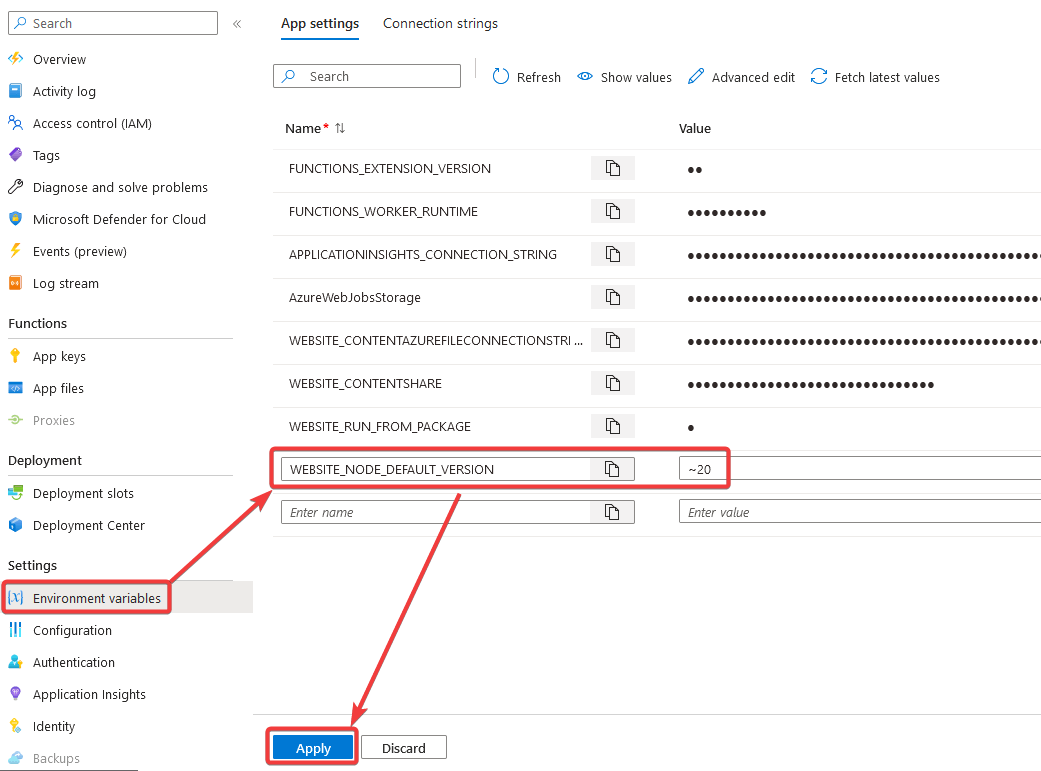 tip
tipTo prevent automatic update checks in your Azure Function, add an additional environment variable with the name
CLIMICROSOFT365_NOUPDATEand value1. This will prevent CLI from checking if new versions are available, not giving you unwanted update notifications in your logs. -
Reboot the Azure Function.
On the overview tab of your Azure Function, reboot your Azure Function in order to use the configured Node version.

Setting up local project
-
Use the right Node.js version.
On your local environment, make sure that you have the same Node.js version installed as configured on the Azure Function app.
-
Create a new Azure Function project.
Using the Azure plugin from Visual Studio Code, let's create a new Azure Function project. Select
PowerShellas the language andHTTP triggeras the template. For this demo, let's use the authorization levelanonymous.
-
Create
package.jsonfile in the root of the project.To use CLI for Microsoft 365 in this Azure Function, we have to install it locally in the project. When everything is ready to go, we will publish CLI for Microsoft 365 with our own code to the Azure Function. This will prevent the need to install the CLI for Microsoft 365 on the Azure Function itself at every execution. The easiest way to achieve this is to create a
package.jsonfile in the root of your project (or runnpm init). Make sure your file looks like this (choose your own project name and version):package.json{"name": "azure-function-cli-microsoft-365","version": "1.0.0"} -
Install CLI for Microsoft 365 in the project.
Run the following command in your terminal at the root of your project. This will install the CLI for Microsoft 365 in the project locally.
npm i @pnp/cli-microsoft365 -
Update
profile.ps1file.The
profile.ps1file is a script that runs every time your function app starts up on a new instance. This behavior is similar to how PowerShell profiles work on your local machine but tailored for the Azure Functions environment. The primary purpose ofprofile.ps1is to allow you to run initialization code for your function app. This could include setting up environment variables, loading custom modules, or executing any startup tasks required before your functions can run. In the case of the CLI for Microsoft 365, we need to ensure that it is available in the context of the Azure Function.Replace the content of the
profile.ps1file with the following code:profile.ps1# Ensure CLI for Microsoft 365 environment path is available in the Azure Function# This way, PowerShell will understand where to find the CLI for Microsoft 365$functionPath = "$PSScriptRoot\node_modules\.bin"if ($Env:PATH.Contains($functionPath) -eq $false) {[System.Environment]::SetEnvironmentVariable('PATH', $Env:PATH + ";$functionPath")}# Ensure CLI for Microsoft 365 is configured properly for executing in an Azure Function.m365 setup --scripting --skipApp# Use Azure managed identity to authenticatem365 login --authType identity --ensure# The next line is not mandatory, but it's a good practice to set the URL of your tenant.# This way CLI for Microsoft 365 doesn't need extra permissions to discover your SharePoint root URL.# Replace with your own tenant URLm365 spo set --url "https://contoso.sharepoint.com"
Creating a new function
Open the Azure tab in Visual Studio Code and click the Create Function button to create a new Function.

HTTP trigger
-
Create a new HTTP trigger function.
Choose
HTTP triggeras the template and give it a proper name. For this demo, let's useGetSitesFromHub. For the sake of this demo, let's use the authorization levelanonymous. -
Configure the Azure Function.
Creating a new Azure Function will create a new folder in your project with the name of the function. Open the
function.jsonfile in this folder to configure your function. In this demo, we want to use theGETmethod. Let's modify the file so it looks like this:/GetSitesFromHub/function.json{"bindings": [{"authLevel": "anonymous","type": "httpTrigger","direction": "in","name": "Request","methods": ["get"]},{"type": "http","direction": "out","name": "Response"}]} -
Add your code to the Azure Function.
Open the
run.ps1file in the function folder and add your code. In this demo, we'll create an HTTP endpoint that returns all sites that are linked to a specific hub site.Click here to see the demo code
/GetSitesFromHub/run.ps1using namespace System.Netparam($Request, $TriggerMetadata)$hubSiteUrl = $Request.Query.UrlWrite-Host "Hub site URL: '$hubSiteUrl'."$hubSite = m365 spo site get --url "$hubSiteUrl" | ConvertFrom-JsonWrite-Host "Hub site ID: '$($hubSite.Id)'."$sites = m365 spo site list --query "[?HubSiteId == '/Guid($($hubSite.Id))/']" | ConvertFrom-JsonWrite-Host "Return '$($sites.Count)' linked sites."Push-OutputBinding -Name Response -Value ([HttpResponseContext]@{StatusCode = [HttpStatusCode]::OKBody = $sites})
Timer trigger
-
Create a new timer trigger function.
Choose
Timer triggeras the template and give it a proper name. For this demo, let's useGroupStats. For the sake of this demo, let's use schedule0 0 6 * * Monto run it every Monday at 6 AM. -
Add your code to the Azure Function.
Open the
run.ps1file in the function folder and add your code. In this demo, we'll create a timer trigger that lists all orphaned Microsoft Entra groups and sends an email with an overview every Monday at 6 AM.Click here to see the demo code
/GroupStats/run.ps1param($Timer)Write-Host "PowerShell Timer trigger function executed at: '$((Get-Date).ToString('yyyy-MM-dd HH:mm'))'"$m365Groups = m365 entra group list --type microsoft365 | ConvertFrom-Json$mailSecurityGroups = m365 entra group list --type mailEnabledSecurity | ConvertFrom-Json$securityGroups = m365 entra group list --type security | ConvertFrom-Json$distributionGroups = m365 entra group list --type distribution | ConvertFrom-Json$total = $m365Groups.Length + $mailSecurityGroups.Length + $securityGroups.Length + $distributionGroups.LengthWrite-Host "Found $total groups."$message = @"<p>There are <b>$total</b> groups in Microsoft Entra ID.</p><table><thead><tr><th>Group type</th><th>Count</th></tr></thead><tbody><tr><td>Microsoft 365</td><td>$($m365Groups.Length)</td></tr><tr><td>Security</td><td>$($securityGroups.Length)</td></tr><tr><td>Mail enabled security</td><td>$($mailSecurityGroups.Length)</td></tr><tr><td>Distribution</td><td>$($distributionGroups.Length)</td></tr></tbody></table>"@# Send an email with the stats# Replace the email addresses with your ownm365 outlook mail send --subject "Microsoft Entra group stats" --to "john.doe@contoso.onmicrosoft.com" --sender "noreply@contoso.onmicrosoft.com" --bodyContents "$message" --bodyContentType HTML --importance high
Granting permissions
In order to run the Azure Function, you need to grant the necessary permissions to the Azure Function. In this guide, we are using the Azure managed identity to authenticate with CLI for Microsoft 365. This way, you don't have to store any credentials in your Azure Function.
There are many ways to authenticate with CLI for Microsoft 365. In this guide, we are using the Azure managed identity. If you want to use a different authentication method, please refer to the log in to Microsoft 365 documentation or the login command documentation.
-
Enable managed identity.
Navigate to the
Identitytab of your Azure Function and enable the system-assigned managed identity. Copy the Object ID of the managed identity, as you will need it in the next step.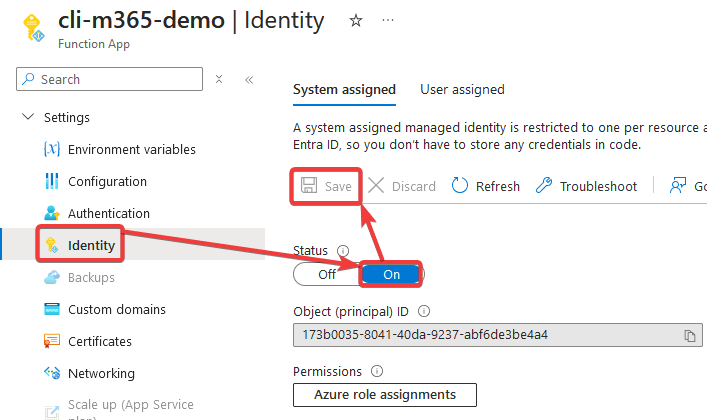
-
Grant permissions to the managed identity.
In order to use CLI for Microsoft 365, you need to grant the necessary permissions to the managed identity. In this guide, our demo code needs the following permissions:
Sites.FullControl.All,Group.Read.AllandMail.Send. Let's grant them to the managed identity.# This script assumes you are logged into CLI for Microsoft 365# Replace the value of appObjectId with the object ID of your managed identitym365 entra approleassignment add --appObjectId "173b0035-8041-40da-9237-abf6de3be4a4" --resource "SharePoint" --scopes "Sites.FullControl.All"m365 entra approleassignment add --appObjectId "173b0035-8041-40da-9237-abf6de3be4a4" --resource "Microsoft Graph" --scopes "Group.Read.All,Mail.Send"
Deploying the project
This section will guide you through deploying your Azure Function to Azure.
-
Sign in to Azure on Visual Studio Code.
In Visual Studio Code, open the command palette by pressing
Ctrl+Shift+P(Windows/Linux) or⌘+Shift+P(macOS). Search forAzure: Sign Inand follow the instructions to sign in to your Azure account.
-
Using the Azure extension, deploy your Azure Function.
Open the Azure tab in Visual Studio Code and select the subscription, resource group, and Function App you created earlier. Right-click your Function App and choose the
Deploy to Function App...option.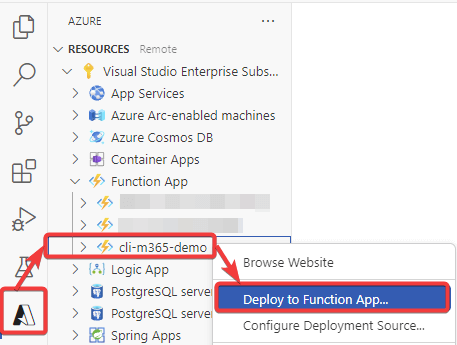
This will deploy the entire project with the CLI for Microsoft 365 package to your Azure Function.
Testing
To verify that the deployment was successful, when you click the Overview tab of your Azure Function, you should see your functions:

HTTP trigger
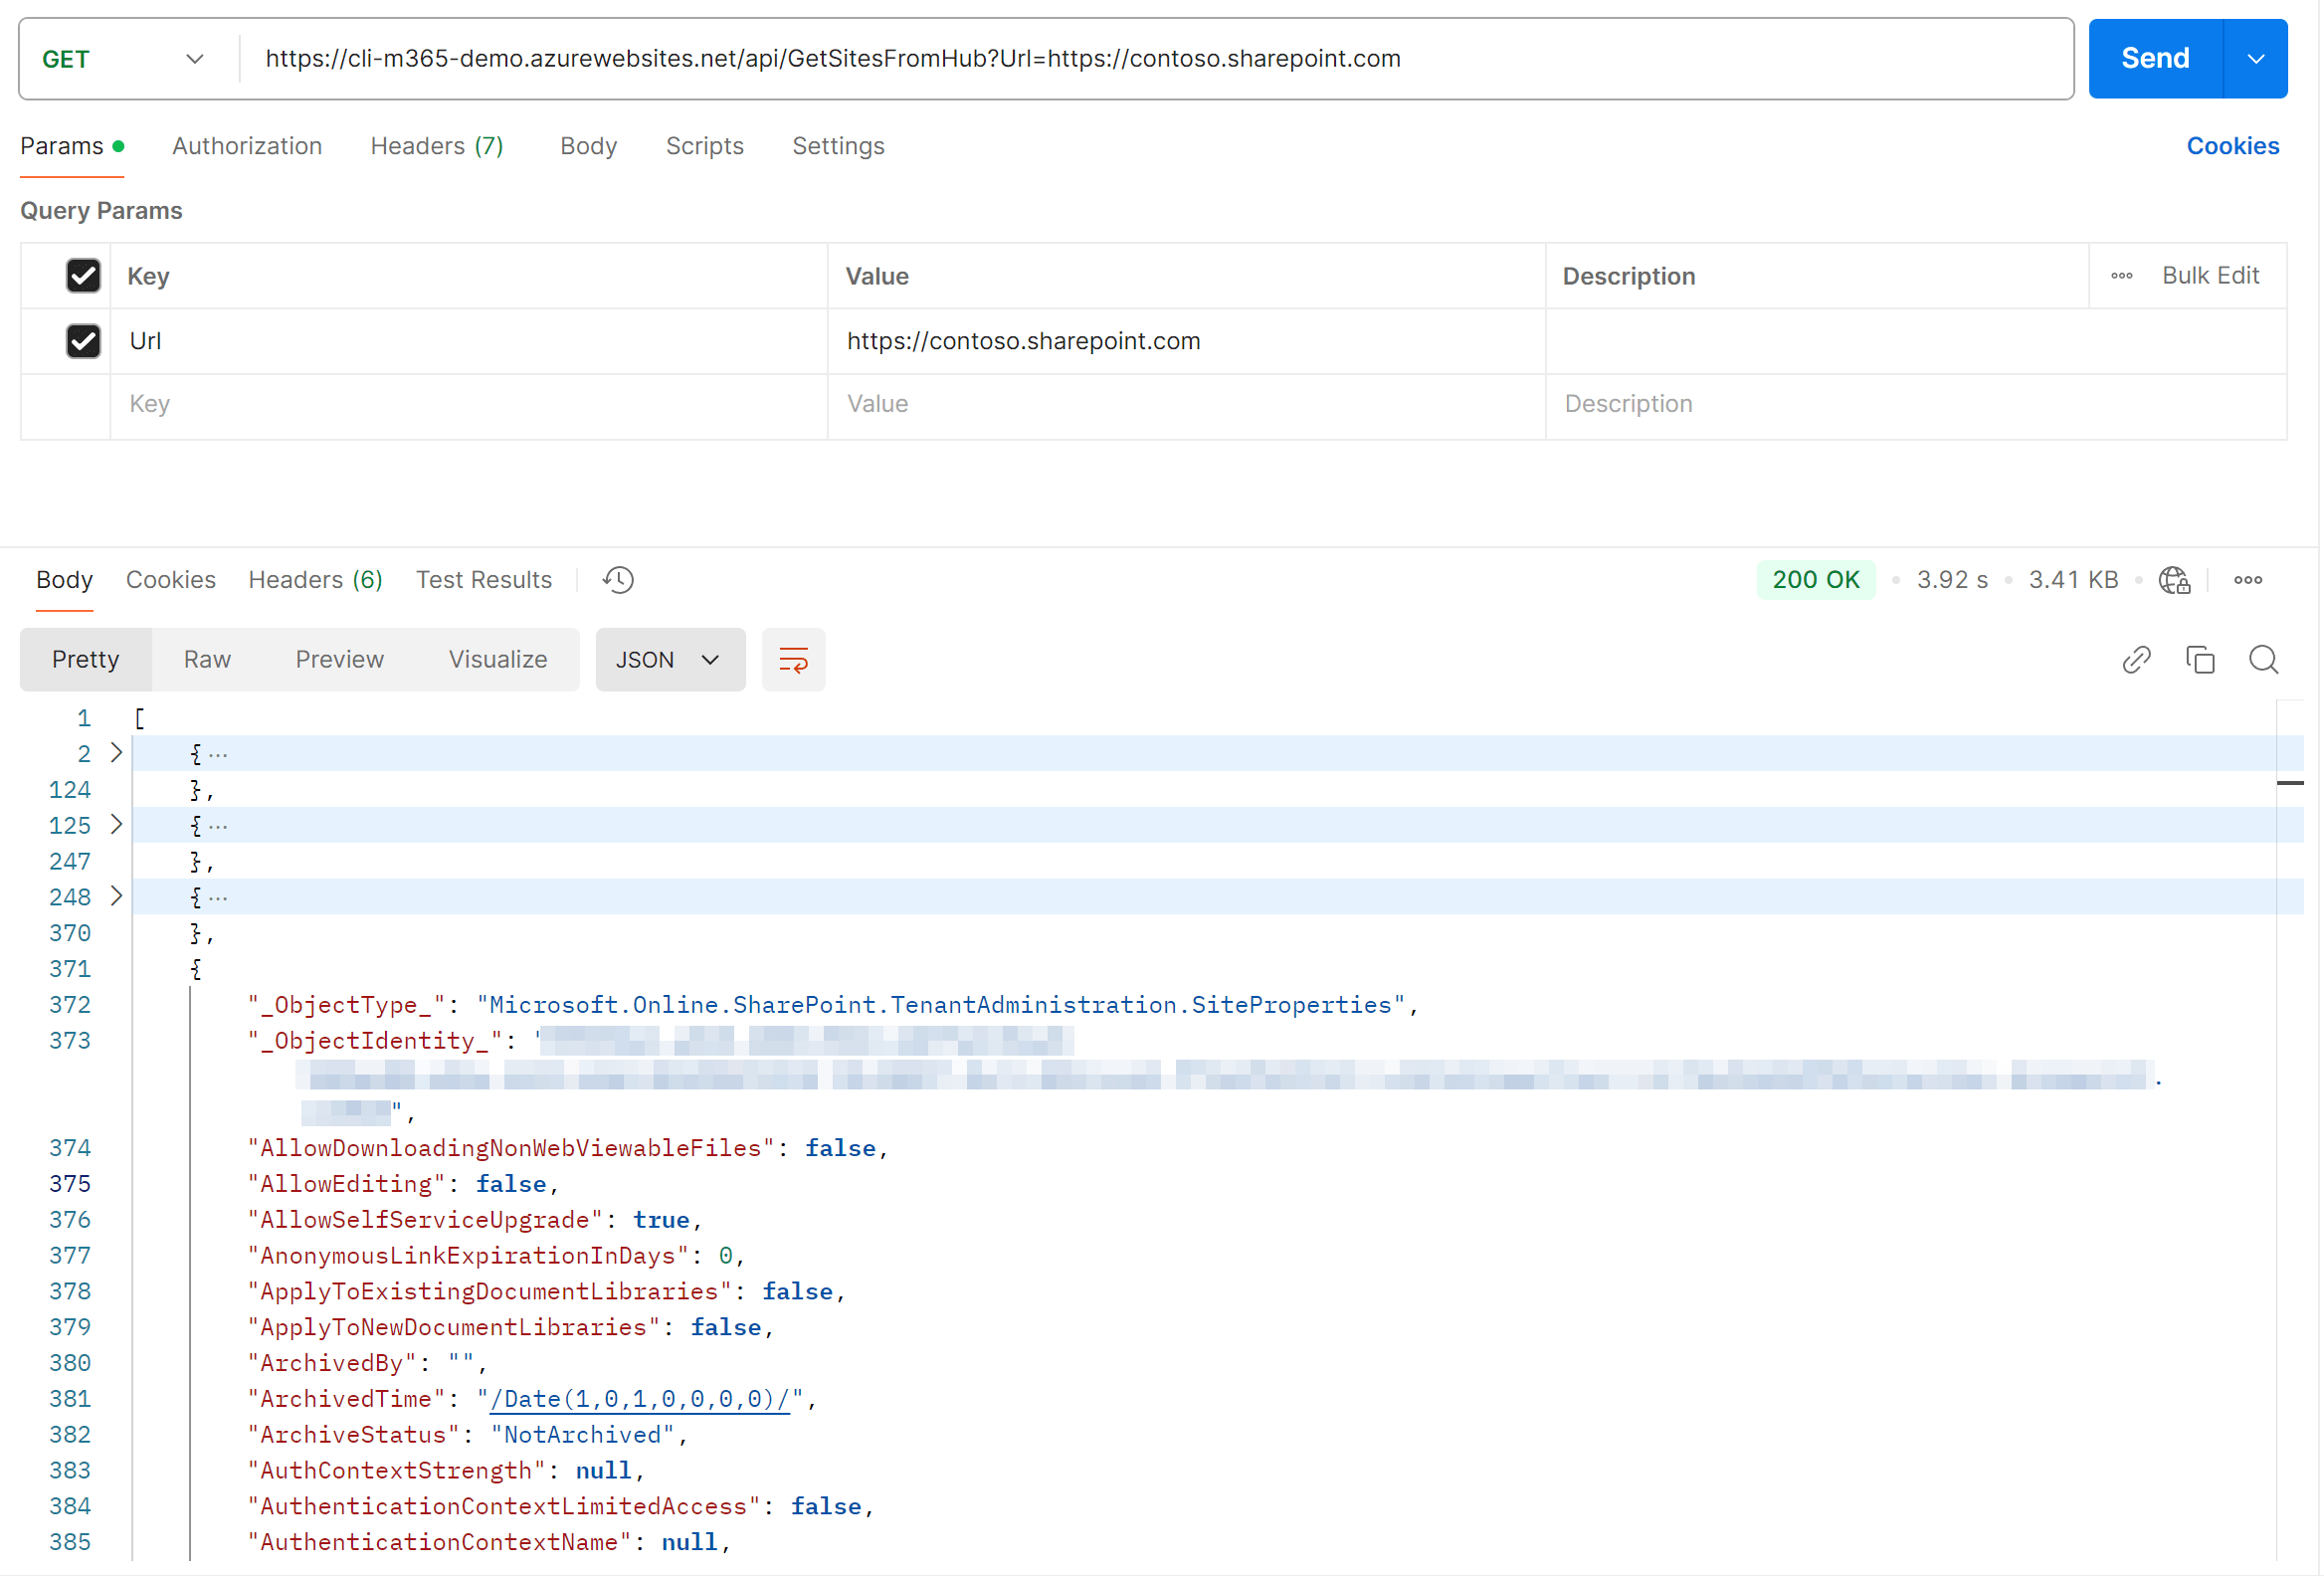
Open the GetSitesFromHub function and click on the Get Function URL button.

Copy the URL and paste it into your browser or an API request tool.
Add the query parameter ?Url= to the URL and append a hub site URL of your tenant.
You should see a list of sites that are linked to the hub site.
Timer trigger
Open the GroupStats function and click the Test/Run button.
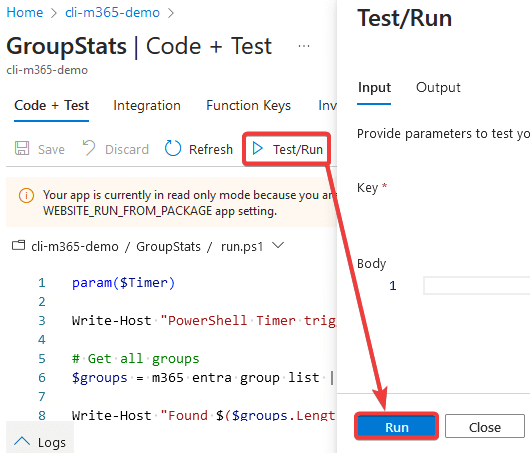
This will run the timer trigger function and send an email with the group stats to the email address you specified in the code.
