
From the contributor
How to use this sample
Summary
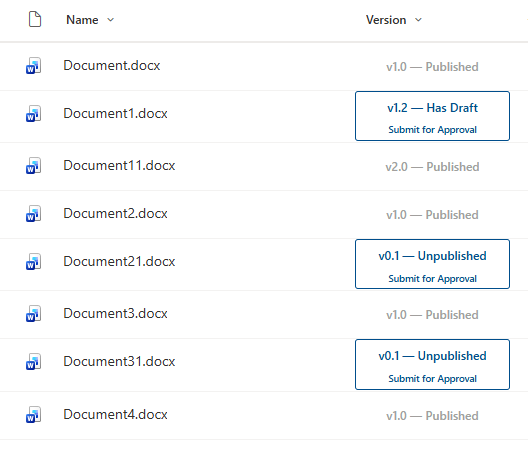
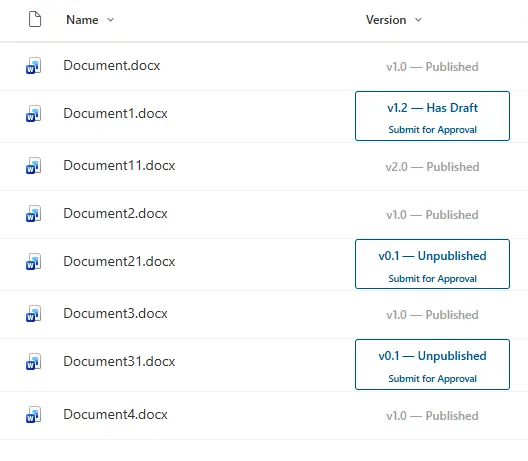
Formats a SharePoint version number column (_UIVersion) as a combined status badge and approval flow trigger. The entire card is a single clickable element — when a minor version (draft) exists, the card displays the version, its status, and a "Submit for Approval" button. When the item is on a major version (published), the card becomes non-interactive and displays a greyed-out "Published" state.
Status is derived entirely from the version number:
- Major version (e.g.
1.0,2.0) → Published — card is grey, non-clickable - Minor version > 1 (e.g.
1.2) → Has Draft — card is blue, flow button shown - Minor version ≤ 1 (e.g.
0.1) → Unpublished — card is blue, flow button shown
View requirements
- Apply this format to the built-in Version column (
_UIVersion) on a SharePoint document library - Major and minor versioning must be enabled on the library (see Setup guide)
- The Version column must be added to the view — it is hidden by default (see Setup guide)
- A Power Automate approval flow must exist and its GUID substituted into the JSON (see Setup guide)
- No additional columns are required — the format is entirely self-contained
Setup guide
1. Enable major and minor versioning
This format relies on SharePoint's built-in major/minor versioning to determine document state.
- Go to your library → Settings (gear icon) → Library settings
- Click Versioning settings
- Under Document Version History, select Create major and minor (draft) versions
- Under Draft Item Security, choose who can see drafts (typically Only users who can edit)
- Optionally enable Require content approval if you want formal approval to publish
- Click OK
2. Create an approval flow in Power Automate
- In your SharePoint library, click Automate in the toolbar → Power Automate → Create a flow
- Choose the Request sign-off template, or build a custom approval flow from blank using the SharePoint - For a selected item trigger
- Add an Approvals - Start and wait for an approval action with your approvers configured
- Add a follow-up action to publish the document (e.g. set the item's approval status or promote a minor version to major) on approval
- Save and test your flow
3. Finding your Flow GUID
- Go to flow.microsoft.com and open your approval flow
- Look at the browser URL — it will contain a segment like
/flows/xxxxxxxx-xxxx-xxxx-xxxx-xxxxxxxxxxxx/ - Copy that GUID and replace
YOUR-FLOW-GUID-HEREin theactionParamsof the JSON
Alternatively, from the SharePoint library:
- Click Automate → Power Automate → See your flows
- Open the flow and copy the GUID from the browser URL
4. Show the Version column in your view
The built-in Version column is not available in the modern Show/hide columns panel — it must be added through the classic view editor.
- Go to your library → Settings (gear icon) → Library settings
- Under Views, click the view you want to edit (e.g. All Documents)
- In the Columns list, tick the checkbox next to Version
- Click OK at the bottom of the page
The column will now appear. To apply the format:
- Click the Version column header → Column settings → Format this column
- Click Advanced mode
- Paste the contents of
number-version-approval-button-drafts.json(with your Flow GUID substituted) into the editor - Click Save
Sample
| Solution | Author(s) |
|---|---|
| number-version-approval-button-drafts.json | bianca-git |
Version history
| Version | Date | Comments |
|---|---|---|
| 1.0 | April 29, 2026 | Initial release |
Disclaimer
THIS CODE IS PROVIDED AS IS WITHOUT WARRANTY OF ANY KIND, EITHER EXPRESS OR IMPLIED, INCLUDING ANY IMPLIED WARRANTIES OF FITNESS FOR A PARTICULAR PURPOSE, MERCHANTABILITY, OR NON-INFRINGEMENT.